The content of this document may be incorrect or outdated.
Print this article Edit this article
Configuring Outlook 2007 for IMAP to ECN
If you use the Purdue ITaP maintained Exchange server, THIS DOCUMENT IS NOT FOR YOU!
This document describes how to set up Outlook 2007 as an IMAP e-mail client for a mailbox on an ECN server on laptops, home computers, and self-supported on-campus computers.
If you're using an ECN-maintained Windows desktop computer, ECN recommends using Outlook only for a mailbox on the ITaP Exchange server. Contact ECN for assistance.
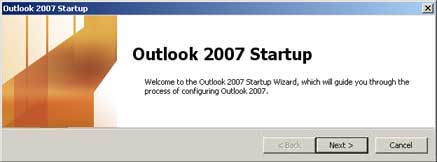 1. Outlook 2007 startup wizard. The first time you launch Microsoft Outlook 2007, its startup wizard will appear.
Click the "Next" button to proceed.
If you have already used Outlook 2007 and need to change its settings or connect it to an additional e-mail account, skip to step #12 below.
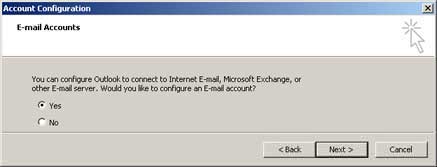 2. E-mail accounts. Outlook will offer to set up Internet e-mail, Microsoft Exchange, or other e-mail account types.
Click the "Next" button to proceed.
 3. Select manual configuration.
In the dialog which appears, enable (place a check in) the "Manually configure server settings or additional server types" box.
Then click the "Next" button to proceed.
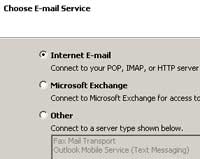 4. Internet E-mail.
The next dialog offers choices of Internet E-mail, Microsoft Exchange, and other e-mail servers.
Select the "Internet E-mail" option.
Then click the "Next" button to proceed.
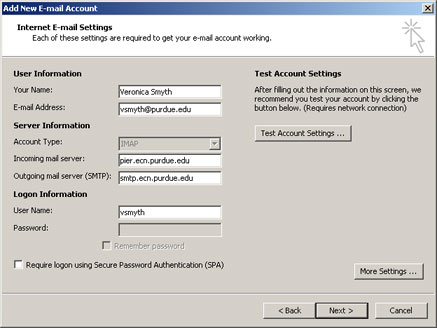 5. Internet E-mail settings.
Read and follow these steps carefully -- and notice that in step #5G you'll click on "More Settings", not "Next"!
5A. In the "your name" field, type your full name.
5B. In the "E-mail address" field, type your Purdue e-mail address. This is typically in the following format:
user@purdue.edu
5C. From the "Account type" menu, select IMAP.
5D. In the "Incoming mail server" field, type the specific name of your ECN home server in this format:
server.ecn.purdue.edu
There are many ECN mail servers (including dynamo, fairway, gilbreth, min, shay, and many others), but only one specific server name is valid for you. If you're not sure which server your mailbox is on, please contact us before proceeding.
5E. In the "Outgoing mail server (SMTP)" field, type the following:
smtp.ecn.purdue.edu
5F. In the "User name" field, if Outlook didn't fill this in already (or if the value does not match your Purdue Career Account alias), type in your career account alias.
5G. To proceed, click on the "More Settings" button (not on the "Next" button).
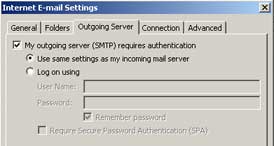 6. Inside the "More Settings" button.
6A. At the top of the dialog box, click on the "Outgoing Server" tab.
6B. Enable the "My outgoing server (SMTP) requires authentication" option.
The first option below, "Use same settings as my incoming mail server," is the default and should remain enabled.
Proceed with step #7A.
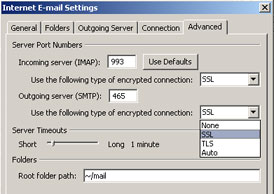 7. Advanced settings.
Read and follow these steps carefully.
7A. At the top of the dialog box, click on the "Advanced" tab.
7B. Beneath "Incoming server (IMAP)", from the "Use the following type of encrypted connection" menu, select "SSL".
7C. In the "Incoming server (IMAP)" field, if necessary, change the value to 993.
7D. Beneath "Outgoing server (SMTP)", from the "use the following type of encrypted connection" menu, select "SSL".
7E. In the "Outgoing server (SMTP)" field, change the value to 465.
7F. In the "Root folder path" field, type exactly the following:
7G. Click the "OK" button to dismiss the dialog.
You will be returned to the previous dialog. Do not click on the "Next" button just yet!
Proceed with step #8.
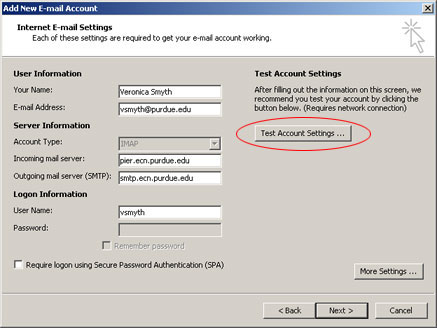 8. Test account settings.
In the center-right of the dialog, click on the "Test Account Settings" button. (In the illustration at right, the button is circled in red.)
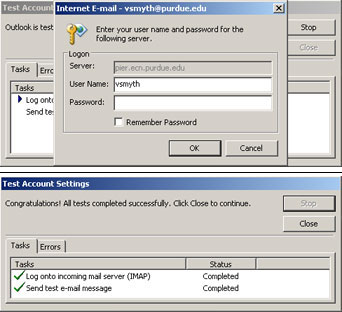 9. Enter your password.
9A. One or two prompts will appear asking for your password, which is normal. Type your Purdue Career Account password.
9B. Optional: In each dialog, if you'd like Outlook to memorize your password, enable the "Remember password" option.
9C. Click the "OK" button to dismiss each password dialog.
Outlook will establish connections to both incoming and outgoing e-mail servers.
9D. If the connections were successful, the dialog will appear as shown at bottom right. Click the "Close" button to proceed.
If the connections were not successful, you may need to review the previous steps to correct any errors and/or to correct problems with your computer's Internet connection.
Then click the "Next" button to proceed.
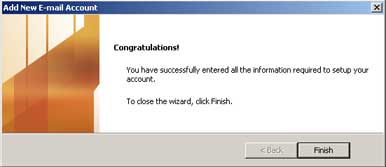 10. Completing the startup wizard.
When the "Congratulations" message appears, click the "Finish" button.
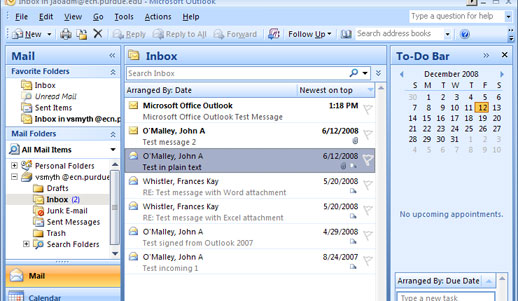 11. The main Outlook window.
Your ECN account will appear in the "Mail Folders" list on the left.
You might need to expand its folder list (by clicking on the "+" icon next to it) to see your ECN account's inbox.
Setup is now complete!
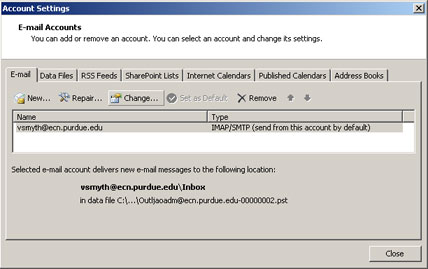 Changing existing account settings in Outlook 2007
12. Changing account settings. If you have already used Outlook 2007 and need to change the settings on an existing e-mail account, or to connect Outlook to an additional e-mail account, follow these steps.
12A. In Outlook's main window, click on the Tools menu and select "Account Settings".
The dialog shown at right will appear.
12B. To modify an existing ECN e-mail account, select it in the list and then click the "Change" button. The dialog described in step #5 above will appear; follow the instructions to modify or correct your ECN mail server settings.
Alternately, to add another e-mail account (such as an off-campus account provided by your Internet Service Provider, or ISP), click the "New" button. Set up the new account using the mail server settings provided by your ISP.
Last Modified:
Aug 1, 2023 4:07 pm GMT-4
Created:
Dec 12, 2008 1:48 pm US/Eastern
by
admin
JumpURL:
