The content of this document may be incorrect or outdated.
Print this article Edit this article
Mapping ECN Network Drive using Windows 7
These instructions describe how to access an ECN network drive from a Windows 7-based computer.
- If you're using Windows XP, see Mapping ECN Network Drive using Windows XP.
- If you're using Windows 8, see Mapping ECN Network Drives using Windows 8, 8.1, or 10 .
- And for Mac Users, see Mapping ECN Network Drive using Mac OSX.
These instructions assume that your computer is connected directly to the Purdue Data Network. (From off-campus, you'll need to be connected first to Purdue's Virtual Private Network.) You will need to know your Purdue Career Account password.
Steps #4 and #6 below also require information which you must obtain by contacting ECN.
Step #8 talks about how to get to your ECN My Documents or Desktop folders.
Before you begin: When using a computer off-campus, this step is required. Establish a connection to Purdue's SSL Virtual Private Network (https://webvpn2.purdue.edu). For a description of this service, please see ITaP's VPN "Getting Started" page.
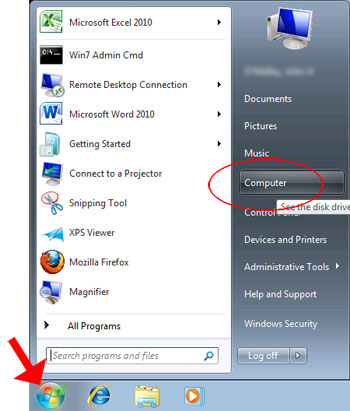 1. Getting started.
Click on the Start menu and choose "Computer."
(The Start menu is usually at the lower-left corner of the screen; see the red arrow in the illustration at right.
"Computer" is in the menu's second column; see the red circle in the illustration at right.)
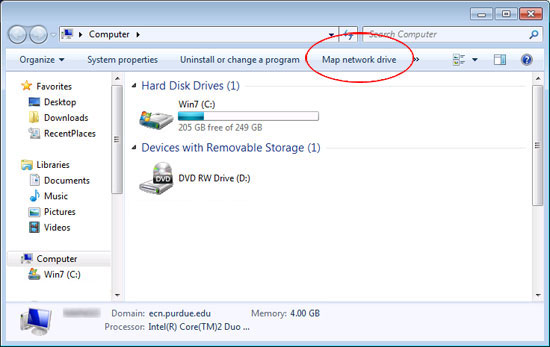 2. "Computer" window.
Click on the "Map network drive" button. (See the red circle in the illustration, right.)
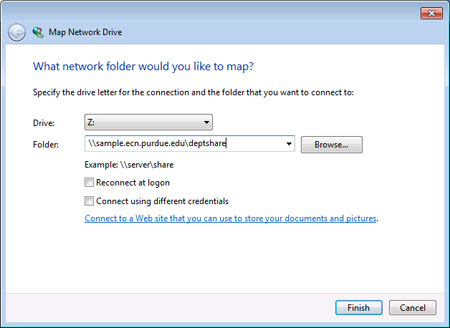 3. Map Network Drive dialog.
In the "Drive" pop-up menu, select a letter. You might pick "S:" for a share drive, for example.
If the letter is already in use, you may choose any available letter.
4. The Folder field.
In the "Folder" field, type the string provided when you contacted ECN for your network drive value. It will look something like this:
\\sample.ecn.purdue.edu\deptshare
Or, if you are connecting to your ECN home directory, you would use something similar to:
\\sample.ecn.purdue.edu\yourusername
5. Reconnect at logon.
If you're using an ECN-supported computer in your own office, having logged into the computer using your own username and password, you may enable this option (place a check mark in the "Reconnect at logon" box). The network drive will be reconnected during subsequent logins to your computer.
If you're connecting to the network drive from a location other than your own office, disable (remove the check mark from) the "Reconnect at logon" option.
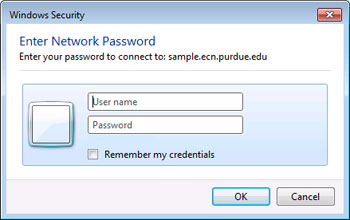 6. If necessary, specify a different user name.
6A. In the "User name" field (see the illustration at right), type this text, substituting your Purdue Career Account username for username:
ecn\username
6B. In the "Password" field, enter your Purdue Career Account password.
6C. Then click the "OK" button.
 7. Finish.
Click the "Finish" button.
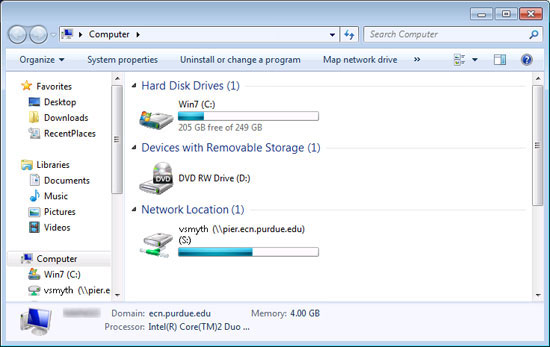
Your share drive and its contents will now be accessible as the disk drive letter you specified in step #3.
The illustration at right shows a sample "Computer" window with a network drive mapped as letter "S:" to the directory "vsmyth" on the server "pier.ecn.purdue.edu."
8. If you saved it in your My Documents folder on your ECN drive, that'll be under the directory S:\Personal. If you saved it on your desktop, you'll have to go into S:\pchome\.pcprefs\Desktop (.pcprefs is a hidden directory).
You can also get to it using an sFTP program like FileZilla or SecureFX.
FileZilla is free, available from https://filezilla-project.org/, and a SecureFX license is available to from www.purdue.edu/securepurdue (free for Purdue people).
Last Modified:
Aug 1, 2023 4:07 pm GMT-4
Created:
Feb 8, 2010 12:57 pm US/Eastern
by
admin
JumpURL:
