The content of this document may be incorrect or outdated.
Print this article Edit this article
Thunderbird for Mac Exchange Client Setup
Thunderbird is a popular free e-mail client for Macintosh and Windows. Download the latest version from Mozilla's web site. These instructions describe how to configure Thunderbird on a Macintosh as an IMAP client for a mailbox on the ITaP Exchange server. If you have mailboxes on both ITaP Exchange and ECN (which is usually a temporary situation), you may move messages from one server to the other.
For an ECN server mailbox instead of (or in addition to) an ITaP Exchange mailbox, see our Thunderbird for Mac IMAP client instructions.
Windows users: For an ECN mail account, see our Thunderbird for Windows instructions. If your mailbox is on the ITaP Exchange server, ECN recommends that Windows users set up Microsoft Outlook.
Thunderbird 3
Thunderbird 3.x initial setup instructions. (See Thunderbird version 2.x instructions below)
With Thunderbird 3, most users can set up their Exchange account during the first run of the program by using the assistant that appears.
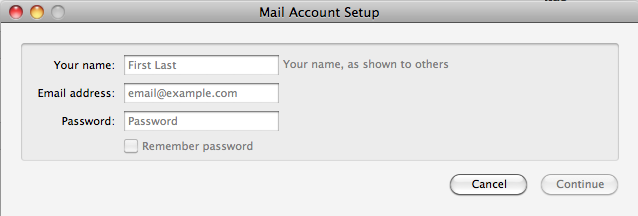
- Your name: Your name as you wish it to appear. This is not your username or your email address
- Email address: Your career username followed by @purdue.edu.
- Password: Your career account password
Click Continue - Thunderbird will attempt to configure your account. It should successfully find the outgoing server settings, but will not find proper incoming settings. This is expected. Click Stop to make changes.
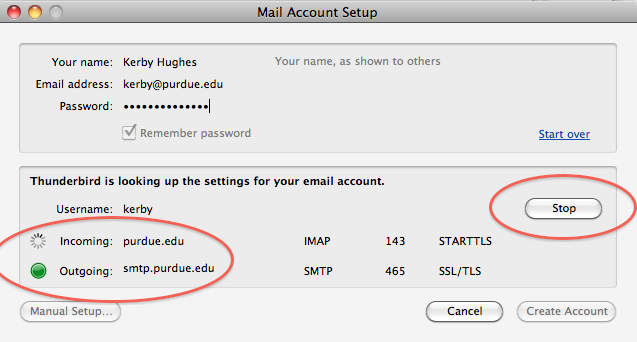
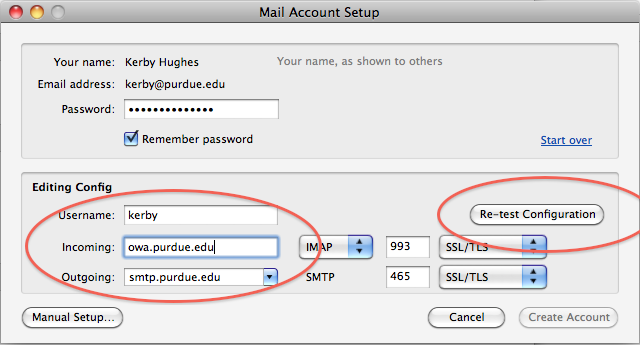
Change the Incoming server to owa.purdue.edu, and click Re-test Configuration.
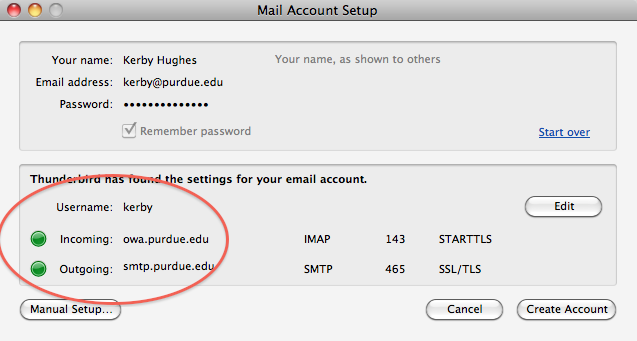
Both Incoming and Outgoing settings should validate now, and you can select Create Account.
Synchronization - For ECN Domain Mac users only>:
This setting is only for users who log onto ECN Domain Macs using their career name and password. These users have their home folders stored on a server, which has a quota. The following steps to turn off synchronization in Thunderbird 3 reduces the amount of space used on these accounts, and speeds up Thunderbird. It should not be used or needed on portables (notebooks) or other machines where the user has an account stored on the machine, where space is not an issue, and email needs to be able to be accessed while offline. These users, with local accounts, can skip this step.
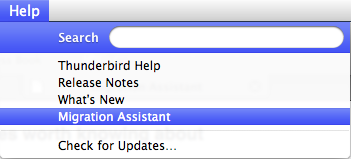
From Thunderbird, click the Help menu, and select Migration Assistant.
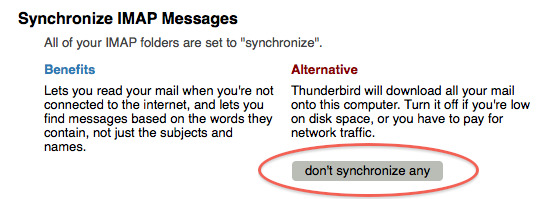
Click the button labeled "don't synchronize any".
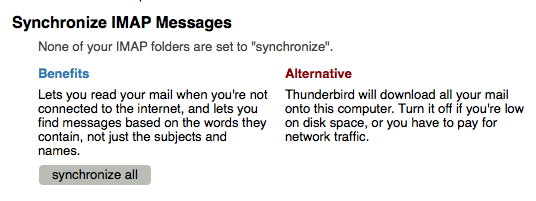
The Migration Assistant tab should change to show the following:
Thunderbird 3.x Exchange setup is now complete.
 Thunderbird 2
Configuring Thunderbird 2.x and 3.x manually for a mailbox on the ITaP Exchange server
Purdue faculty and staff may obtain accounts on ITaP Exchange by contacting their site specialist.
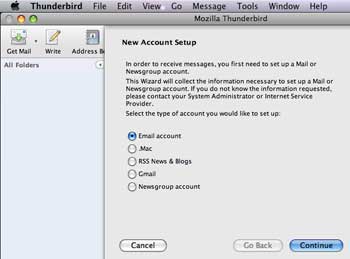
1. Launch Thunderbird. The first time you launch Thunderbird, the program will likely take you into its Account Wizard dialog (see the illustration, right).
- If Thunderbird asks you about importing settings and mail folders, select "Don't import anything" and click the "Continue" button.
- If Thunderbird does not take you into its Account Wizard dialog (or if you've already set up a different e-mail account, perhaps on an ECN e-mail server), click on the Tools menu and select "Account Settings"; then click the "Add Account" button.
Select the "Email account" option.
Then click the "Continue" button.
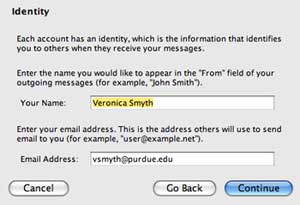 2. Identity.
2A. In the "Your Name" field, type your name as you'd like it to appear in outgoing messages.
2B. In the "Email address" field, type your address in this format, specifying your own Purdue Career Account username:
username@purdue.edu
2C. Then click the "Continue" button.
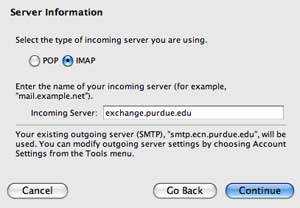 3. Server Information.
3A. For the incoming server type, select "IMAP". (It is very important not to miss this! The dialog should appear only as shown in the illustration at right. ECN does not recommend using "POP".)
3B. In the "incoming server" field, type exactly the following:
exchange.purdue.edu
3C. In the "outgoing server" field, type exactly the following:
smtp.purdue.edu
(If you're adding Exchange as a second e-mail account, Thunderbird might not ask for an outgoing server value here. You'll need to tweak outgoing server settings later.)
3D. Then click the "Continue" button.
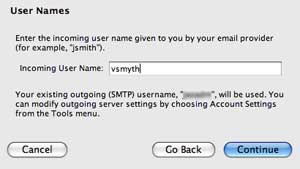
4. User Names.
Thunderbird should have already filled in the "incoming user name" and "outgoing user name" fields for you. Your Purdue Career Account username is the correct value.
Click the "Continue" button.
5. Account Name.
The "account name" field's setting won't have any effect on your ability to send or receive messages, but we suggest entering the following value in this field:
My ITaP Exchange account
Then click the "Continue" button.
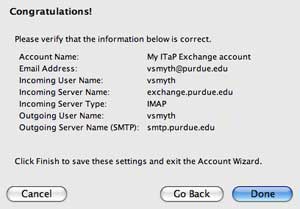 6. Verify information.
Thunderbird presents a dialog with a summary of the information you've entered so far.
If you see no obvious errors, click the "Done" button.
 7. More account settings.
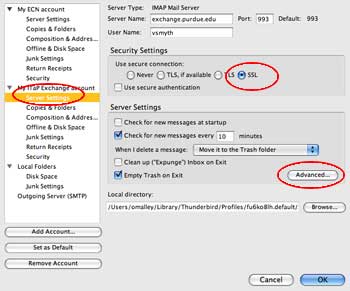
7A. In the left-hand column beneath "My ITaP Exchange account," click on "Server Settings."
7B. In the "Security Settings" area, select "SSL".
7C (optional step). Enable the "Empty Trash on Exit" option. This tells Thunderbird to erase the messages you had previously deleted from your Inbox or other folders.
 8. Adding or editing the outgoing server.
8A. In the left-hand column, click on "Outgoing Server (SMTP)".
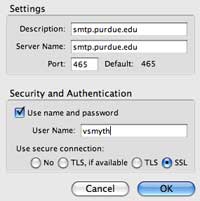
8B. Then click the "Add" button. (If the outgoing server "smtp.purdue.edu" is already listed in the dialog, select it and click the "Edit" button instead.)
8C. In the "Description" field, type (or verify) the following:
smtp.purdue.edu
8D. In the "server name" field as well, type (or verify) exactly the following:
smtp.purdue.edu
8E. In the "Security and Authentication" area, near the lower right corner of the dialog, select "SSL".
8F. Then click the "OK" button.
 9. Setting your Exchange account's outgoing server.
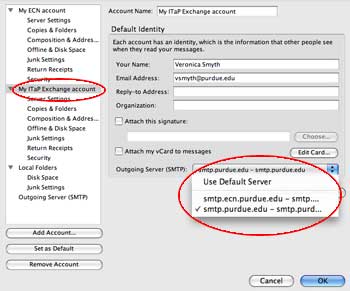
9A. In the left-hand column, click on "My ITaP Exchange account."
9B. On the right-side, there is a pop-up menu next to "Outgoing Server (SMTP)". From this menu, select the entry which begins with "smtp.purdue.edu". (An entry which begins with smtp.ecn.purdue.edu, if it exists, is not the one to use here.)
9C. Finally, click the "OK" button to dismiss the account settings dialog.
 10. Check mail.
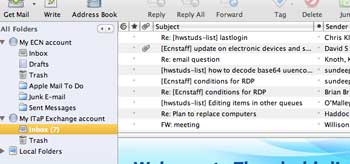
10A. Click the "Get Mail" button on Thunderbird's toolbar.
10B. When prompted, type in your Purdue Career Account password and click the "OK" button.
10C. Beneath "My ITaP Exchange account" in the folder list on the left, click on the Inbox. Your e-mail messages will appear at the right.
Moving or copying messages from one e-mail server to the other
The software which runs ECN's e-mail servers is quite different from the ITaP Exchange server's software; each server supports e-mail folders in a unique way. As such, to copy messages from one server to the other seems to work most reliably when you copy or move the contents of each folder one by one. This is what you'd need to do if, for example, you're in the process of migrating from an ECN mailbox to an Exchange mailbox, or vice versa.
Also, the servers might not support nested folders when accessing them via IMAP protocol.
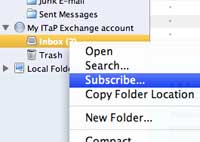
11. Subscribe to your existing folders.
If you have stored e-mail in folders other than your Inbox, those folders might not be visible in the left-side column in Thunderbird until you subscribe to them.
11A. Right-click (control-click) on your Inbox or another existing folder. From the menu which appears, choose "Subscribe."
11B. In the dialog which appears, put a check-mark in the box on the line for each folder which should be visible in your folder list.
11C. Click the "Subscribe" button.
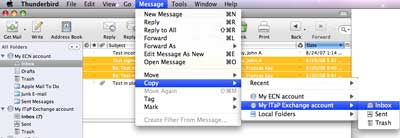 12. Copying or moving messages.
12A. Using the left-hand column, select the folder from which you want to copy or move messages.
12B. In the list of messages, select the messages that you wish to copy or move.
To select multiple messages, you may shift-click to select a contiguous range of messages or command-click individual messages one at a time. If you want every message, click on the Edit menu and choose "Select All."
12C. Click on the Message menu, choose "Move" (or "Copy," if you prefer), and navigate to the specific destination folder shown in the submenus.
Alternately, after selecting the messages in step 12B, you may right-click (or control-click) on one of the selected messages. A context menu will appear with the same "Move" and "Copy" commands.
Last Modified:
Jul 25, 2018 10:20 am America/New_York
Created:
Apr 9, 2009 9:42 am GMT-4
by
admin
JumpURL:
