The content of this document may be incorrect or outdated.
Print this article Edit this article
The People Database
Contents
- Contents
- What is the ECN Resource Database?
- Managing Information in the ECN Resource Database
- Building a Reports from your data
- Appendix
What is the ECN Resource Database?
The ECN Resource Database is a customizable repository for information about Resources at Purdue University. The system is capable of holding information about many types of resources such as people, phones and fax machines. More types of resources can be added as necessary.
Once this information is organized within ECN Resource Database it can be used to generate web pages, phone lists, or any other type of report.
Where does the information come from?
The ECN Resource Database divides resources into groups called entities. Each entity has a parent and may have children. For example: "The Engineering Computer Network" is a child of "The Schools of Engineering" which is a child of "Purdue University". Information for a person within "The Engineering Computer Network" comes from "The Schools of Engineering" that information comes from its parent "Purdue University".
At each entity the information for a resource can be customized. For example within "The Engineering Computer Network" a person may have a different title than they do at Purdue University. Within "The Engineering Computer Network" people may also have a current project associated with them that does not apply to "The Schools of Engineering".
Information about people within the "Purdue University" entity comes from the Purdue Electronic Directory and I2A2. This means you can add a Purdue Person to your entity and have information about that person available without doing any data entry. The information automatically available includes:
- qualified_name
- first_name
- last_name
- nickname
- building
- office
- phone
- office_fax
- other_phone
- department
- school
- title
- url
- alias
- campus
In addition each entity below Purdue University can add to the list of attributes they would like to store with their list of people.
Managing Information in the ECN Resource Database
How do I get an entity created?
Send your request to webmaster@ecn.purdue.edu. Include your name, email address, the entity name.
How do I edit my entity?
Once your entity is created, browse to it from the main page of the ECN Resource Database. If it does not show up by default, click the "Expand Tree" link to view all entities.
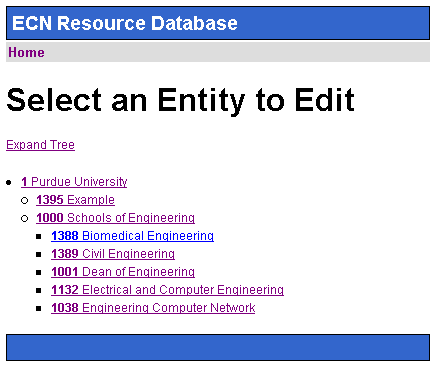
After clicking on your entity the Entity Overview Screen will load. From here you can manage all aspects of your entity.
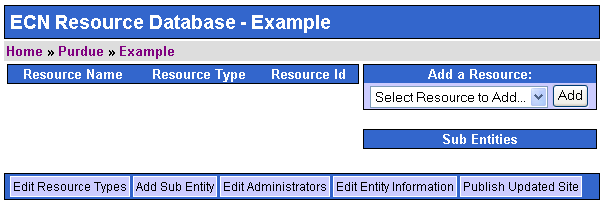
The top of the page contains a title bar which says, "ECN Resource Database" followed by the name of the entity you are viewing.
Below the title bar is the breadcrumbs bar, clicking on a link it this bar allows you to browse backwards from the current page to previous pages.
The area below the breadcrumbs bar is divided into two columns. The left column contains a listing of all the resources associated with this entity. The right column contains a drop down menu titled "Select Resource to Add..." followed by a list of any child entities.
The bottom of the page contains the options bar. These options will be rarely be used once your entity is setup.
Adding a Person to my Entity
From the Entity Overview Screen select "Purdue Person" from the "Select Resource to Add..." menu.
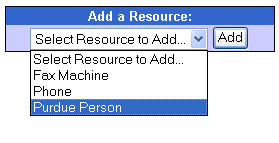
The next page has you search for an existing person in the ECN Resource Database. Type in a portion of the person's name you wish to add and click the "Search" button.
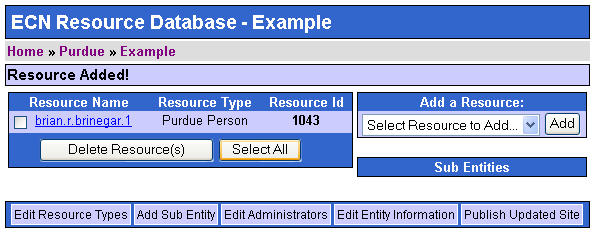
After a few seconds the results of your search will appear. Select the correct result by checking the radio button to the left of the resource name and click the "Add Selected Resource" button. The resource is now added to your entity.
Editing a Resource within your Entity
After a resource has been added to your entity, you can customize that resource by clicking on the resource name from the Entity Overview Screen. This will load the "Edit Resource" screen for that resource.
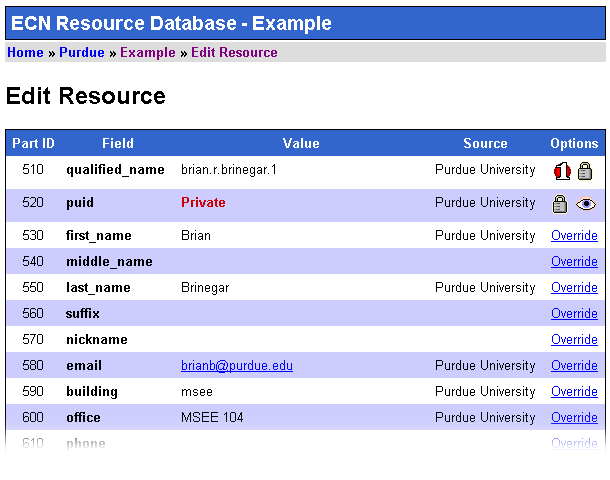
Here you can view the data associated with that resource in your entity.
- Part ID - The unique ID for that field
- Field - The name of the field
- Value - The Value of that field
- Source - The entity which is supplying that value
- Options - Information and options for this field
-
 Primary Field - used to uniquely identify a resource
-
 Locked Field - may only be edited by the entity that defined the field
-
 Private Field - may only be viewed by the entity that defined the field
- Override - The current entity does not have a value for the field, click this to override the acquired value
- Edit - The current entity has a value for the field, click this to change the value
- Unset - The current entity has a value for the field, click this to remove the value and revert to the acquired value
-
Click on the "Override" link for the field you wish to edit. This will load the Edit Field Screen.
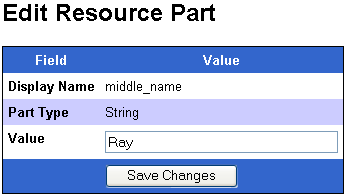
Type in the new value and click the "Save Changes" button. You will return to the "Edit Resource" screen where you can see that the value for the field has been changed. The "Source" column will change to the name of your entity and the options will change from "Override" to "Edit" or "Unset". This change will only affect your entity and its child entities.
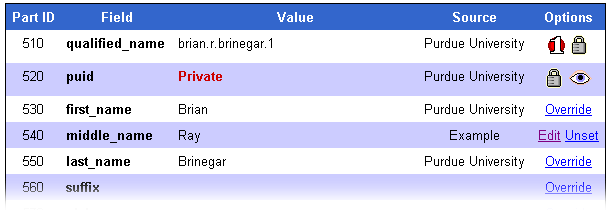
To revert to the previous value for the field click the "Unset" link in the options column.
Adding to the Schema for a Resource Type
From the options bar for your entity click the "Edit Resource Types" button. This will load the Edit Resource Types Screen. From here you can select from the existing resource types by clicking on its name. Once you have selected a resource type the Edit Resource Type Schema Screen will load.
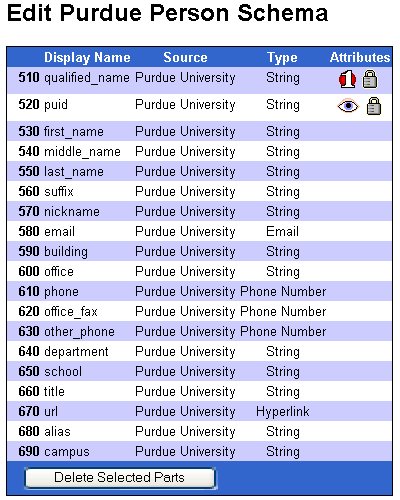
The Edit Resource Type Schema Screen lists all of the parts for a resource type.
- Display Name - The prompt of the part
- Source - The entity which defined this part
- Type - The type of the part (String, Text, etc.)
- Attributes - These are attributes set for that part (See Editing a Resource Above)
Below the resource schema table is the "Add Part to Schema" form. Here you can add additional parts the schema for a resource type.
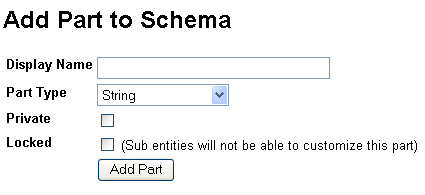
- Display Name - The name that is displayed for the new part. Display Name may only contain alphanumeric characters and underscores.
- Part Type - The type of data the part will hold
- String - One line of text
- Text - Multiple lines of text
- Email - Email Address
- Hyperlink - A URL
- Phone Number - A Phone Number
- Single Selection - A single choice from a list of choices
- Multiple Selection - Multiple choices from a list of choices
- Private - Only the entity which creates this part can see its value
- Locked - Child Entities will not be able to override this part
Once a part is added it can be removed by selecting the checkbox next to its name and clicking the "Delete Selected Parts" button. A part can only be deleted by the entity that created it.
You may also change the private and locked options as well as set a default value for the part by clicking on the parts name.

Adding a Sub Entity
From the options bar for your entity click the "Add Sub Entity" button. This will load the Add Sub Entity Screen.
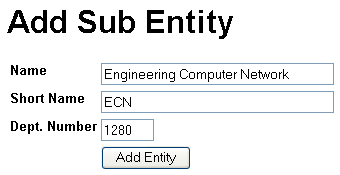
- Name - The name of the Sub Entity
- Short Name - A short name for the entity (used in the breadcrumbs)
- Dept. Number - An optional Purdue Department Number
After supplying a Name and Short Name click the "Add Entity" button. This returns you to the Entity Overview Screen. Notice that the new entity is listed in the Sub Entities box on the right half of the screen.
A child Entity can be removed by checking the checkbox next to its name and clicking the "Delete Entities" button.
Adding an Administrator
From the options bar for your entity click the "Edit Administrators" button. This will load the Edit Entity Administrators Screen.

Type the fully qualified name of the user you would like to grant administrator access to into the "Qualified Name" box and click the "Add Administrator" button.
An administrator can be removed by checking the checkbox next to her name and clicking the "Remove Administrators" button.
Building a Reports from your data
Data Caching and Site Tables
Data for a resource within the ECN Resource Database is stored across multiple entities. When querying the Resource Database for information about a specific resource you must also specify the entity where the information should come from. The ECN Resource Database then looks at that Entity and all of its parents pulling each piece of the information for a resource until an entire record can be assembled.
The result is a set of rows with a part id and a value, this is not ideal for generating reports. Instead the ECN Resource Database has a system for preassembling all of the records for a resource type and inserting them into a table for your entity. These tables are called a Site Tables and should be queried to generate your reports.
The Site Tables contain entries for all of the resources at or below your entity. In other words, all of the resources in the children of your entity are included in the Site Table.
Site Tables are public to anyone with access to an ECN Oracle account and do not contain any private fields. If you need access to private data send an email to webmaster@ecn.purdue.edu.
Creating/Updating a Site Table
From the Entity Overview Screen click the "Publish Updated Site" button in the options bar. Generating the site table could take several minutes. The table is created within the ecnweb Oracle account and select access is granted to the public. The tables are named pdb_<entity_id>_<resource_type_id>. Where entity_id is the unique id for your entity and resource_type_id is the unique id for the type of resources it contains. If your entity has no instances of a specific resource type the table is not created.
All of the existing Site Tables are recreated on a nightly basis. If you would like changes to your data to take effect immediately you can recreate a Site Table by clicking the "Publish Updated Site" button.
How do I determine the names of my site tables?
As mentioned above Site Tables are named pdb_<entity_id>_<resource_type_id>. To find an entity id look at the title bar of the Entity Overview Screen. The entity id is listed in parenthesis.

To find the resource_type_id click the "Edit Resource Types" button in the Options Bar of the Entity Overview Screen. From there you will see a listing of the Resource Types with their unique resource_type_ids listed.

For example if I wanted to access the Site Table containing "Purdue People" in the "Example" entity I would query pdb_1395_500 in the ecnweb table space.
How do I determine the columns in my site tables?
The columns of a site table correspond to the display names of the parts defined for the resource type. All columns are of type VARCHAR2. The display names are accessable by through the "Edit Resource Types" button in the options bar.

Any additional parts defined in the child entities are also included. In addition to the parts defined for a resource type there is also a column containing the entity_id and the resource_id. Alternately you could describe the table within sqlplus using the following command:
SQL> desc ecnweb.pdb_1395_500
Querying a Site Table
Simple Query Example
A sample query could look something like this:
SELECT
  first_name,
  last_name,
  email,
  entity_id
FROM
  pdb_1395_500
ORDER BY
  last_name
The is_child PL/SQL function
It is common that you only want a listing of resources within a child entity of your site. You can query your Site Table using the is_child PL/SQL function. The is_child function takes two arguments the entity_id of a parent and the entity_id of a child it returns 1 or 0. Here is an example using the is_child function:
SELECT
  first_name,
  last_name,
  email,
  entity_id
FROM
  pdb_1395_500
WHERE
  is_child(entity_id, 1400) = 1
ORDER BY
  last_name
This query would return all of the "Purdue People" which fall within the 1400 entity.
If you want all of the resources in your Site Table except those at or below the 1400 entity you would change the " = 1" to " = 0".
Example Report in Zope using Page Templates
This example generates a list of all of the entities within a Site Table for the "Example" entity and the "Purdue People" within those entities. The entity_id for the "Example" entity is 1395. In addtion I've added three sub entities "Management", "Staff" and "Students" under the "Example" entity.
First I define a ZSQL Method which returns the list of entities under the "Example" entity. This is done using the pdb_entity_information table described in the Auxiliary Tables section of the Appendix.
Id: getEntities
Arguments:
Query Template:

SELECT
  entity_id,
  name
FROM
  ecnweb.pdb_entity_information
WHERE
  parent_id = 1395
Next I define a ZSQL Method which returns the first_name, last_name, email, and phone for the people in a specific entity.
Id: getPeopleForEntity
Arguments: entity_id
Query Template:

SELECT
  first_name,
  last_name,
  email,
  phone
FROM
  ecnweb.pdb_1395_500
WHERE
  <dtml-sqltest entity_id type="int">
ORDER BY
  last_name,
  first_name
Next I create a Page Template to present the data.
<html>
<body>
<div tal:repeat="entity container/getEntities">
<h3 tal:content="entity/name">Entity Name</h3>
<ul>
  <li tal:repeat="person python:container.getPeopleForEntity(entity_id=entity.entity_id)" >
     <span tal:replace="person/first_name">First Name</span>
     <span tal:replace="person/last_name">Last Name</span> -
     <span tal:replace="person/phone">555-5555</span> -
     <span tal:replace="person/email">email@host.com</span>
  </li>
</ul>
</div>
<body>
<html>
The output of this example is:
Management
- John Doe - 494-5555 - jdoe@purdue.edu
- Thomas Tee - 494-5555 - tee@purdue.edu
Staff
- Bob Arnold - 494-5555 - barnold@purdue.edu
Students
- Sam Student - 495-5555 - sam@purdue.edu
- Steve Stduent - 495-5555 - steve@purdue.edu
This same procedure can be used to generate any kind of report from phone lists to custom web pages for each member of your faculty.
Appendix
Auxiliary Tables
create table pdb_entity_information (
    -- Define an entity if parent_id is NULL
    -- The entity is a root level entity
    entity_id       INTEGER primary key,
    short_name      VARCHAR2(20) not null,
    name            VARCHAR2(256) not null,
    dept_number     VARCHAR2(10),
    parent_id       INTEGER
);
create table pdb_resource_types (
    -- The types of resources maintained globally
    -- Types include Person and Phone
    resource_type_id    INTEGER primary key,
    name                VARCHAR2(128) NOT NULL UNIQUE
);
create table pdb_part_options (
    -- Options for Resource Types with selection
    -- Parts
    part_id         INTEGER NOT NULL,
    option_id       INTEGER NOT NULL,
    display_text    VARCHAR2(4000)
);
Last Modified:
Dec 19, 2016 11:12 am US/Eastern
Created:
Aug 9, 2006 12:59 pm GMT-4
by
admin
JumpURL:
