The content of this document may be incorrect or outdated.
Print this article Edit this article
Mac OS X: Enabling SSL on E-Mail Clients
This Knowledge Base article will help you understand how to configure different e-mail clients for Mac OS X to use SSL. Most all e-mail clients available today have the ability to use SSL to check your e-mail. Using SSL ensures that no one can intercept your e-mail or password. The following e-mail clients are covered below:
Apple Mail for Mac OS X 10.2
Note: To properly use SSL with Mail, you must have OS X version 10.2.3 or later. You can check this by selecting About this Mac... from the Apple menu at the top of your screen. Your copy of OS X 10.2 can be updated as far as 10.2.8 for free by running Software Update, located in the System Preferences. To upgrade to OS X 10.3 or 10.4, contact your site specialist.
First, open Mail. You can find Mail in the Dock next to the Finder icon, or in /Applications. See Figure 1.
 Figure 1
After Mail opens, go to the Mail menu and select Preferences. See Figure 2.
 Figure 2
Select your e-mail account and click Edit. See Figure 3.
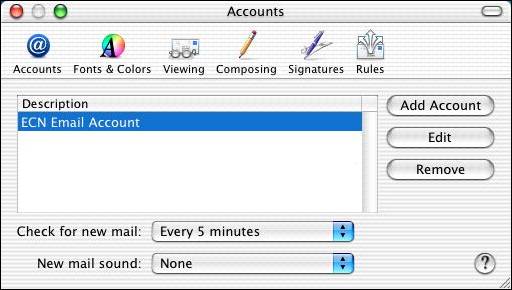 Figure 3
At the bottom of the Account Information tab, click Options.... You will be presented with Mail's advanced SMTP options. See Figures 4 and 5. Set the following attributes:
- Use Secure Sockets Layer (SSL): checked
- Authentication: set to Password; use your ECN username and password
 Figure 4
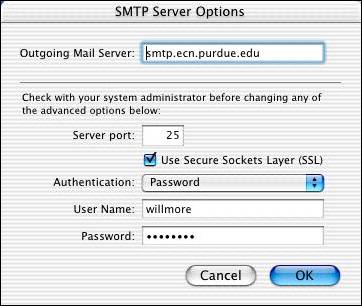 Figure 5
Go to the Advanced tab. At the bottom of the window there will be a port number and a checkbox to enable SSL. Also enable password authorization, using the same ECN user name and password.
- POP account: The port will change from 110 to 995. See Figure 6.
- IMAP account: The port will change from 143 to 993. See Figure 7.
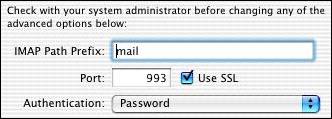 Figure 6
 Figure 7
Exit the preferences. That e-mail account will now connect using SSL. To enable this on multiple e-mail accounts, you will have to repeat this procedure for each account.
Apple Mail for Mac OS X 10.3 and 10.4
Note: Although the main interface between Mail.app in Mac OS X 10.3 and 10.4 is significantly changed, the account setup layout is virtually identical.
First, open Mail. You can find Mail in the Dock or in /Applications. See Figure 1.
 Figure 1
After Mail opens, go to the Mail menu and select Preferences. Mail's preferences window will appear. See Figure 2.
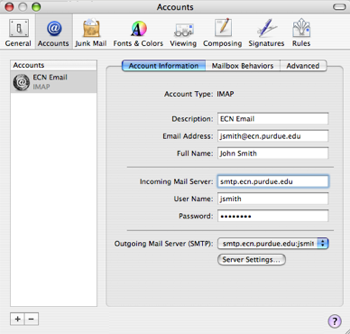 Figure 2
Select the mail account from the list on the left and click the Server Settings... button on the bottom of the Account Information tab. The advanced SMTP options will appear. See Figure 3. Set the following attributes:
- Use Secure Sockets Layer (SSL): checked
- Authentication: set to Password; use your ECN username and password
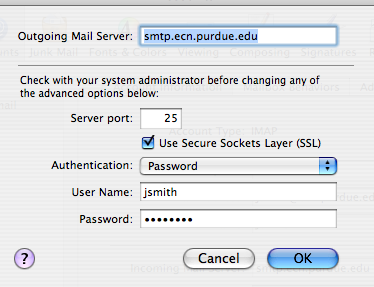 Figure 3
Go to the Advanced tab. At the bottom of the window there will be a port number and a checkbox to enable SSL. Also enable password authorization, using the same ECN user name and password. See Figure 4.
- POP account: The port will change from 110 to 995.
- IMAP account: The port will change from 143 to 993.
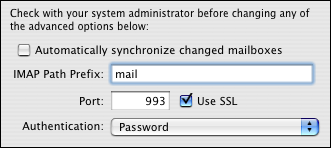 Figure 4
Exit the preferences. That e-mail account will now connect using SSL. To enable this on multiple e-mail accounts, you will have to repeat this procedure for each account.
Eudora for Mac OS X
Note: These steps require Mac OS X 10.2.5 or later. You can update by selecting Software Update... from the Apple menu.
First, open Eudora. By default, it is installed in /Applications/Eudora Application Folder. See Figure 1.
 Figure 1
From the Special menu, select Settings.... Select Sending Mail from the list to the left. Make sure that Allow authorization is checked. See Figure 2.
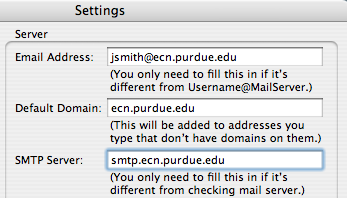 Figure 2
Now, select SSL from the list on the left. See Figure 3. Set the following attributes:
- SSL for POP: set to Required (TLS)
- SSL for SMTP: set to Required (TLS)
- SSL for IMAP: set to Required (TLS)
- Standard Port SSL Negotiation: select Maximum Compatibility
- Alternate Port SSL Negotiation: select Maximum Compatibility
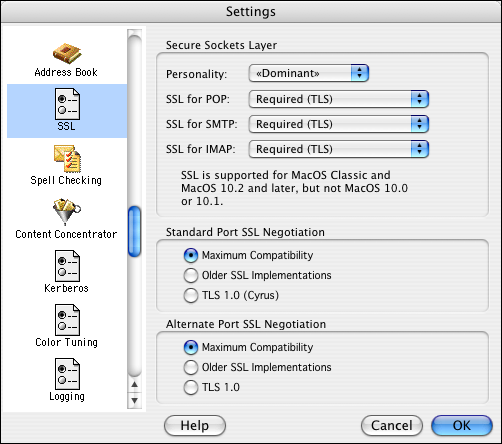 Figure 3
Click OK to save the settings, and check your mail. Now that it is communicating via SSL, it will receive ECN's SSL certificate. The certificate will be handled automatically for you.
Microsoft Entourage 2004
First open Microsoft Entourage, usually found in /Applications/Microsoft Office 2004/. See Figure 1.
 Figure 1
Select Accounts from the bottom of the Tools menu. Select the Mail tab and then the account you wish to enable SSL with. Click Edit to open the account settings. See Figure 2.
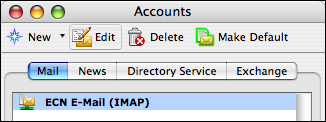 Figure 2
Under the Account Settings tab of the window that appears, click Click here for advanced receiving options under Receiving mail. Check This service requires a secure connection (SSL). For POP users, the port will change from 110 to 995. For IMAP users, the port will change from 143 to 993. See Figure 3.
 Figure 3
Now click Click here for advanced sending options under Sending mail. See Figure 4. Modify the following options:
- SMTP service requires secure connection (SSL): checked
- SMTP server requires authentication: checked; select Use same settings as receiving mail server.
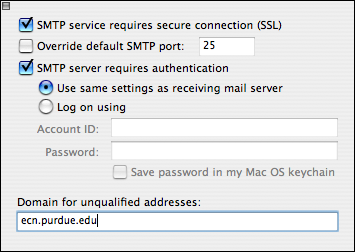 Figure 4
Close the Accounts window. All mail will now be sent and received via SSL.
Last Modified:
Jul 20, 2021 7:21 am America/New_York
Created:
Nov 6, 2007 1:18 pm US/Eastern
by
admin
JumpURL:
