The content of this document may be incorrect or outdated.
Print this article Edit this article
Disable Outlook Anywhere (RPC over HTTPS)
Outlook Anywhere is a feature which allows Microsoft Outlook client software to connect to a Microsoft Exchange server from outside of a corporate or university campus. This feature is unnecessary when using an ECN-supported computer on campus -- and, in fact, you might experience performance issues when this feature is enabled. Follow the instructions below when using ECN-supported computers to disable this feature.
These instructions were written using Microsoft Outlook 2007. Step #1 has been updated to include illustrations for both Outlook 2010 and Outlook 2007.
|
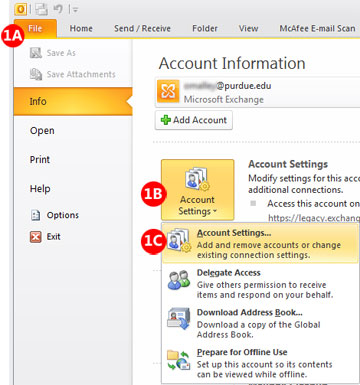
Outlook 2010: 1A. Inside Microsoft Outlook 2010, click on the File menu. 1B. Click the "Account Settings" button. (Look for the icon next to the red "1B" in the illustration, below.) 1C. In the menu which appears, click on "Account Settings...". (Look for the menu choice next to the red "1C" in the illustration, below.")
Proceed with step #2.
|
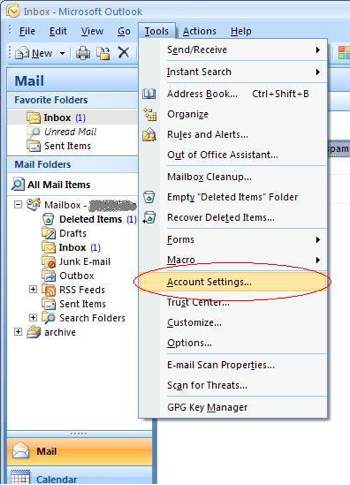
Outlook 2007: 1A. Inside Microsoft Outlook, click on the Tools menu and select Account Settings. (See the red circle in the illustration, below.)
If step #1A worked for you, skip ahead to step #2. But if Outlook is not running and/or if you are not able to launch Outlook, proceed with the following alternate steps: 1B. Click on the Start menu, navigate to Settings, and go into Control Panel. 1C. If necessary, click "Switch to Classic View" in the left-hand column. 1D. Double-click on the Mail control panel. 1E. Click on the "E-mail Accounts" button. 1F. In the authentication dialog which appears, log in as you would when starting Outlook normally. Remember to type your username in the following format:
1G. After several seconds, if Outlook presents an error about connection problems, click the "Work Offline" button in the dialog. Proceed with step #2. |
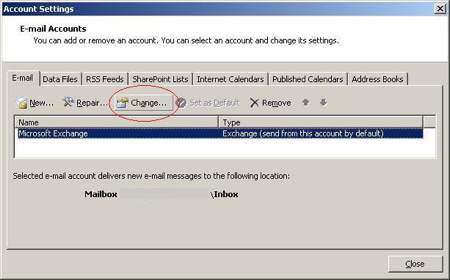 2. Make sure the E-mail tab is selected and that Microsoft Exchange is highlighted.
Then click the Change button. (See the red circle in the illustration at right.)
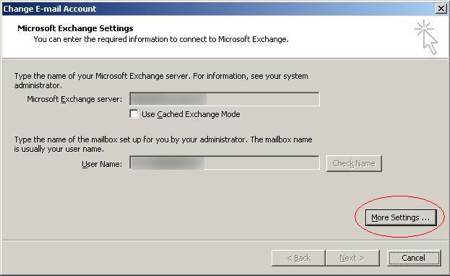 3A. In the "Microsoft Exchange server" field, be sure that it has anything ending with "purdue.edu" or "purdue.lcl", and that "User Name" field contains your name.
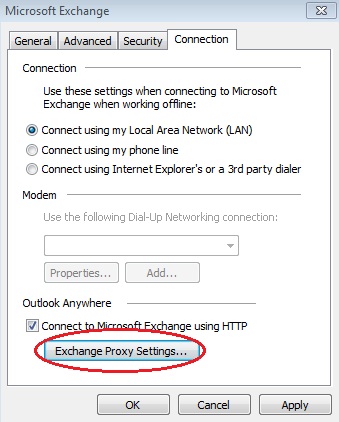 4A. Click on the "Connection" tab.
4B. In the "Outlook Anywhere" part of the dialog, click "Exchange Proxy Settings".
(See the red circle in the illustration at right.)
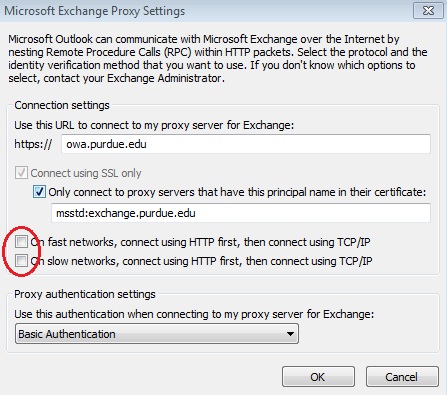 5. Disable (remove the check from) the "On fast networks..." and "On slow networks..." options (see the red circle in the illustration on the right).
6. Now click the OK button.
If Outlook is running, you may be presented with the message "You must restart Outlook for the changes to take effect." Click the OK button.
Click OK twice to close the previous two boxes box and then choose Next> and Finish and Close.
If Outlook is running, click on the File menu and select Exit. Then you may launch Outlook again.
Last Modified:
Dec 19, 2016 11:12 am US/Eastern
Created:
Apr 26, 2011 4:40 pm GMT-4
by
admin
JumpURL:

