The content of this document may be incorrect or outdated.
Print this article Edit this article
Apple Mail IMAP Client Setup
Here's how to configure Mail, the e-mail client included in Mac OS X, as an IMAP client for a mailbox on an ECN server.
These instructions were written using Mail 3.5 and Mac OS X 10.5.6. Any version of Mail running within Mac OS X 10.4.x or 10.5.x will probably work the same or similarly.
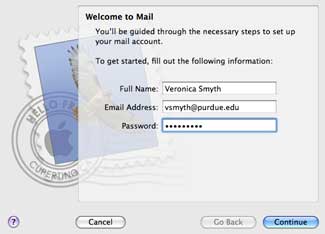 Configuring Apple Mail for a mailbox on an ECN server
1. Launch Mail. The first time you launch Mail, the program will likely take you into its "Welcome to Mail" dialog (see the illustration, right).
- If you need to configure a new account but Mail does not take you into the account settings dialog, click on the Mail menu and select "Preferences"; then click the "+" button at the bottom of the left-side column.
- To verify or change the various settings described in the steps below, click on the Mail menu (at the top left of the screen, next to the Apple menu), select "Preferences," and then click the "Accounts" icon in the toolbar.
1A. In their respective fields, type your full name, your @purdue.edu e-mail address, and your Purdue Career Account password.
1B. Then click the "Continue" button.
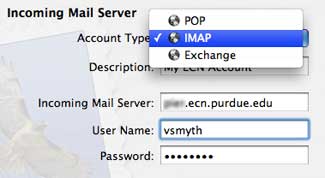 2. Incoming Mail Server.
2A. For the account type, select "IMAP". (It is very important not to miss this! The dialog should be set only as shown in the illustration at right. ECN does not recommend using "POP".)
2B. The "description" won't have any effect on your ability to send or receive messages, but we suggest entering the following value in this field:
My ECN account
2C. In the "incoming server" field, type the specific name of your ECN server in this format:
server.ecn.purdue.edu
There are many ECN mail servers (including dynamo, fairway, gilbreth, min, shay, and many others), but only one specific server name is valid for you. If you're not sure which server your mailbox is on, contact your site specialist before proceeding.
2D. In the "user name" field, type your Purdue Career Account user name.
2E. Apple Mail should already have filled in your password for you (from step #1A).
2F. Then click the "Continue" button.
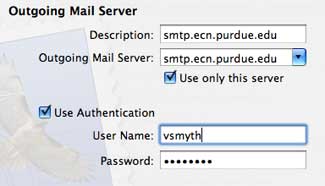 3. Outgoing Mail Server.
3A. As in the previous dialog, the "description" field here is also merely a cosmetic value, but we suggest typing the following:
smtp.ecn.purdue.edu
3B. In the "outgoing mail server" field, it's vital that you type exactly the following:
smtp.ecn.purdue.edu
3C. If necessary, enable (place a check mark in) the "Use only this server" box.
3D. Enable (place a check mark in) the "Use Authentication" box.
3E. Type your Purdue Career Account user name and password in the respective fields.
3F. Then click the "Continue" button.
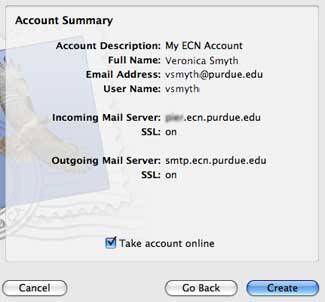 4. Account Summary.
Mail will establish a connection to the e-mail server. If the program asks for your password again, enter it.
The program should automatically detect that ECN's servers require "SSL" to be "on." If successful, the dialog should appear similar to the illustration at right.
4A. If necessary, enable (place a check mark in) the "Take account online" box.
4B. Then click the "Create" button.
Apple Mail will open and display the contents of your ECN account's e-mail inbox ... but it is essential to continue with step #5, below, to ensure correct functionality.
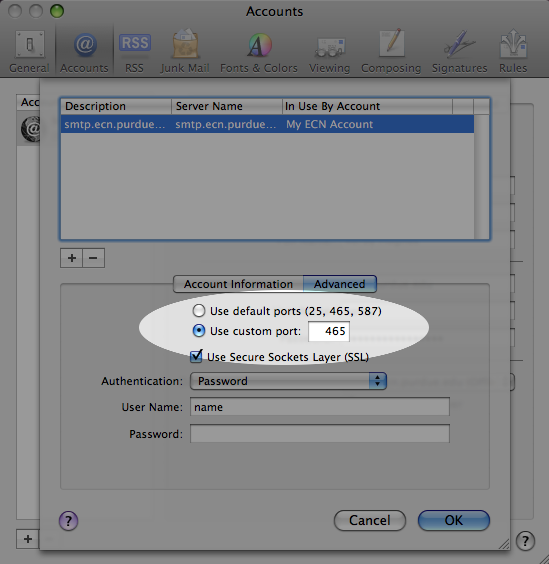
5. SMTP Server Settings
5A. Click on the Mail menu (at the top left of the screen, next to the Apple menu) and select "Preferences."
5B. On the toolbar, click the "Accounts" icon.

 6. Advanced account settings.
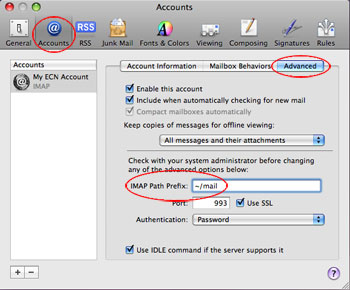
6B. On the toolbar, click the "Accounts" ..
6C. In the row of tabs at the top of the right-side "column," click the "Advanced" tab.
6D. In the "IMAP Path Prefix" field, type exactly the following:
6E. At the upper left corner of the window, click the red dot to close the dialog.
6F. Mail will ask if you want to save the changes you made. Click the "Save" button.
The configuration of Apple Mail is now complete.
Last Modified:
Jul 25, 2018 10:21 am America/New_York
Created:
May 19, 2009 9:24 am GMT-4
by
admin
JumpURL:
