Assembling the Panorama
To turn your sixteen still photos into an interactive panorama, you'll use a program called PhotoVista. It is currently installed only on one PC in the student pool, so you'll have to be using the appropriate computer. You should be able to tell if your PC has PhotoVista installed by looking for the PhotoVista icon on the desktop.
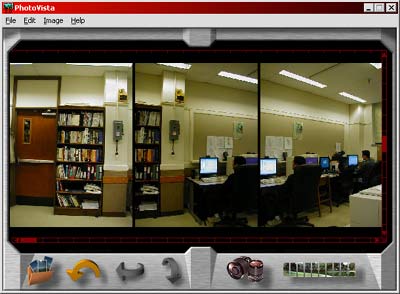
Open the PhotoVista software by double-clicking the desktop icon. If the icon is missing, look for the program in the Start Menu. After a splash screen, you'll see the PhotoVista interface. The interface is quite simple, and once you've done a few one-time steps, you will be able to create panoramas with just three or four buttons.
First you will need to import your images. To do this, click the icon that looks like a folder with photos in it, or choose "Open Source Images" from the "File" menu. In the "Open Source Images" window, browse to the folder with your downloaded images. Select the 16 images that you want to include in the panorama using the Control or Shift key, and click the "add" button. The list of selected images will appear in the "Source Files" list on the right side of the window. Click "Sort" under the list. Since the digital camera numbers the images in the order that you take them, clicking Sort ensures that the photos will be in the right order. Then click OK.
The images that you selected will now appear in the main interface window, but because the camera was on its side when you took the photos, the images will all be sideways. To rotate them, click the "rotate" icon at the bottom of the window. If you had the camera properly configured when you took the photos, the photos should be properly oriented after three clicks of the rotate button.
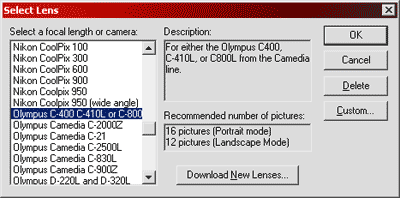
Next you should configure your lens settings. This is a step you only need to do once. Afterwards, PhotoVista will remember your settings every time you start the program from that computer. To configure the lens settings, click the button at the bottom of the screen that looks like two camera lenses. You will be presented with a list of cameras, and you are expected to choose the camera that you used to photograph the panorama. Unfortunately, neither the Olympus D-400 or D-460 are listed. However, if you just choose "Olympus C-400," the lens settings will be acceptable. If you choose the wrong lens or leave the lens settings at their default, your panorama will show some strange warping. If that happens, go back to your lens settings and try a different lens.
Now you are ready to stitch the panorama. Click the "Stitch Panorama" button (rightmost button on the bottom). In the new window, make sure that "Full 360 degree panorama" and "Crop non-image area" are checked. "Use automatic alignment" will be automatically checked already. Then click "Preview Stitch". Wait a few moments while the images are stitched together into a low-resolution version of the panorama. By default, the panorama will be displayed as a long still image. To view it in virtual tour mode, click "Show Viewer" from the "Panorama" menu. Scroll around the panorama by clicking and dragging within the window. Make sure that the objects in the scene are properly aligned with each other.
If the panorama looks fine, skip to the next paragraph. If you see problems with the alignment of the image, return to the main interface window and examine the series of images. Now that you have run a preview stitch on the images, they should be roughly aligned in the interface window. Scroll through the images until you find two images that are out of alignment. To fix the problem, you can align them manually. Click on the image that is misaligned so that red dots appear in its corners. Then select "Adjust" from the "Image" menu. You will be given a high-resolution display of the image you clicked and the image to its left. You can move to a different image by moving the slider at the bottom of the adjustment window. When you spot the misalignment, click on the rightmost of the two images and drag it until the objects in the two photographs look aligned. It will be impossible to align everything perfectly, so focus on the objects vertically in the middle of the scene. Close the adjustment window and click "Stitch Panorama" again. This time, make sure that "Use automatic alignment" is unchecked because you want the program to use your new, manual alignment. If the new stitch still has problems, repeat the adjustment process until you are satisfied with the results.
When the preview panorama looks the way you want it to look, click "Stitch Panorama" again. Leave all the checkboxes the same as they were for the preview stitch (remember to uncheck "automatic alignment" if you made manual adjustments as described in the previous paragraph). This time, click "Full Stitch." The full stitch will take quite a bit longer than the preview stitch, so take a few deep breaths while you wait.
When the stitch is finished, choose "Show Viewer" from the "Panorama" menu. Check the final results for glitches. There will often be some minor problems, such as door frames, railings, or ceiling pipes with breaks in them. I've found that these are all but impossible to correct, so just accept them and move on. When you are satisfied, choose "Save As..." from the "File" menu. The save dialog screen has a lot of options, but you don't need to worry about most of them for now. Just make sure that you are saving the file into a folder where you'll be able to find it again, and give it a descriptive name. I generally name it after the laboratory that it represents. If you took more than one panorama in one lab, you can name the panoramas sequentially (i.e. "chemical01.jpg, chemical02.jpg"). The file naming is only for your own reference, so use whatever system is most convenient for you.
Saving the panorama produces two files: a jpeg image and an IVR file. Both will have the same name (i.e. "chemical.jpg" and "chemical.ivr"). The jpeg is the actual image used in the final tour. The IVR file is a text file that tells the virtual tour program how to display the jpeg as a panorama.
Congratulations! You've finished creating a panorama, but you aren't finished yet! Next you will need to adjust the jpeg image to make it suitable for web viewing.