TI Kit Logo

TI Kit Help Centerđź’ˇ

Getting Started

Step 1: Create a folder on your hard drive to store TI Kit files. [Energia will not work if installed on the cloud.]
  1. Open Finder [Command + N]
  2. In the top bar, select Go > Home
  3. Select File to create a folder and rename it
  4. Create Folder on Computer
    Figure 1: Creating TI kit folder.
  1. Open the File Explorer [Win + E]
  2. In the left bar, select This PC
  3. Select your Windows C: Drive
  4. Create a folder and rename it
  5. Create Folder on Computer
    Figure 1: Creating TI kit folder.

Use your file navigation system to create a folder anywhere on your hard drive.

Step 2: Check your TI Kit version: we are using MSP-EXP430FR5994 for this class.
Chek TI Kit Version
Figure 2: Check version from the TI board.
Step 3: Download and install the launchpad driver. [Additional Resources] The launchpad driver should be unzipped and placed in the folder you created in Step 1 (the same folder as Energia IDE is in, you will download in next step).

Mac users please download from here.

  1. Windows users please download from here.
  2. Unzip/Extract the folder and drag it to the folder you created in Step 1.
    1. Right click the zipped file and select "Extract All..."
    2. Create folder on desktop
      Figure 3.1.1: Extract/Unzip the files.
    3. Extract the files to the desired location. (Or move the files after extracting)
    4. Create folder on desktop
      Figure 3.1.2: Choose location to extract files.
  3. Run the installer.
    1. Open the unzipped driver folder, and double-click the version correspond to your computer. Most likely to be Windows 64 bit.
    2. Create folder on desktop
      Figure 3.2.1: Run the installer.
    3. Select Next as shown in Figure 3.2.1
    4. Create folder on desktop
      Figure 3.2.2: Select Next.
    5. Select Finish as shown in Figure 3.2.2
    6. Create folder on desktop
      Figure 3.2.3: Select Finish.

Linux users please download from here. This is required to run the Energia IDE not as root.

  • Excute the following command: sudo mv /71-ti-permissions.rules /etc/udev/rules.d/
  • No drivers are required for installation.
Step 4: Download Energia IDE. [Additional Resources] Energia IDE must be placed in the folder you created in Step 1 (the same folder as the launchpad driver is in).

Mac users please download from here.

  1. Download the zipped file using the link above.
    Create folder on desktop
    Figure 4.1.1: Downdoaded file.
  2. Double click to unzip, and the app icon will apear.
    Create folder on desktop
    Figure 4.1.2: Unzip the file by double-clicking.

Windows users please download from here.

  1. Download the zipped file using the link above.
    Create folder on desktop
    Figure 4.2.1: Downdoaded file.
  2. Extract everything to the folder you created in Step 1. Please note that everything MUST be remained in the same folder after extraction.
    Create folder on desktop
    Figure 4.2.2: Right click the zipped folder to extract.
    Create folder on desktop
    Figure 4.2.3: Extract the zipped file to the designated location.
  3. After extraction, feel free to delete the original zipped folder.

Linux users please download from here.

Step 5: Configure the course files in Energia.
  1. Open Energia IDE. This will create a folder in your Documents titled “Energia”.
  2. Find Energia in Documents.
    Figure 5.1: Find Energia in Documents.
  3. Download the ENGR 131 Sketchbook.
  4. Unzip the ENGR 131 sketchbook file and copy the folders inside into the “Energia” folder in your Documents.
    Create folder on desktop
    Figure 5.2: Move folders in "sketchbook" into Energia.
  5. Close and restart Energia.
  6. Navigate to File → Sketchbook, and you should see the Classes 2B_3A, ENGR 131, and LaunchPad_Grove_Kit folders with sketches available to use for class.
    Create folder on desktop
    Figure 5.3: Check files in sketchbook.
Step 6: Setup Energia to communicate with the TI kits.
  1. Connect the MSP430 board to your laptop using a cable.
  2. In Energia, open Tools and set the following:
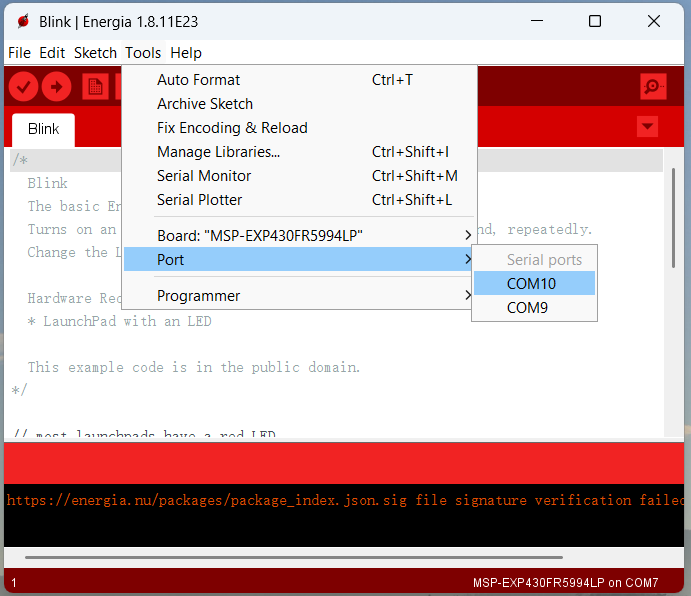
    • Board → MSP-EXP430FR5994LP
      Create folder on desktop
      Figure 6.1: Selecting the correct board.
    • Port → Select the port that corresponds to your laptop’s USB/Type-C connection. If you are unsure which port it is, try each option until the board is detected.
      Create folder on desktop
      Figure 6.2: Selecting port.
  3. Update your board package to the latest version.
    • Ensure the board is updated with the latest package: Tools → Board → Board Manager. Under MSP430 dropdown menu, select the latest version.
    • Create folder on desktop
      Figure 6.3: Equip your board with its latest package.

TI Kit Troubleshooting

Here are common problems and their solutions.

Communication error between Energia IDE and your TI kit
  1. Ensure your TI kit is plugged in correctly using the provided Micro B (to either USB or Type C) cable. There should be a green power LED lit up when this occurs.
  2. The COM port seleted in Energia is not the correct port. While it is generally the highest port number available, this is not always true. All COM ports should be tested if there are Communication issues.
  3. Ensure all drivers have been installed. Please refer to Step 3 in Getting Started.
  4. Restart Energia IDE.
  5. Restart your computer. This should not be required, but can help depending on your computer's settings.
Error uploading sketches to your TI kit
  1. Ensure your TI kit is plugged in correctly using the provided Micro B (to either USB or Type C) cable. There should be a green power LED lit up when this occurs.
  2. Ensure the board is updated with the latest package: Tools → Board → Board Manager. Under MSP430 dropdown menu, select the latest version.
Error in uploading with a message showing "need Python 2.7"
Error installing driver
  1. Install TI UniFlash.
    • Download UniFlash here.
    • During installation, the MSP430 drivers will also be installed automatically.
    • This option is lighter and faster if you only need the drivers and a programming tool.
  2. Install Code Composer Studio (CCS).
    • Download CSS here.
    • During installation, make sure to select MSP430 device family support.
    • This will install both CCS (for coding and debugging) and the necessary drivers.

⚠️ Please note: If you already installed the standalone drivers and Windows still does not recognize your LaunchPad, using either UniFlash or CCS should resolve the issue by updating the drivers automatically.

TI Kit Activities

Click on an activity to expand and view details:

In-Class Activity: Blink an LED

Objective: In this activity, you will practice controlling the built-in LEDs on the MSP430FR5994 by programming them to turn on, blink at different speeds, alternate, and follow simple patterns. You will also measure the timing of the blinks with a stopwatch to see how human error affects consistency, then analyze your results using basic statistics. By the end, you’ll gain hands-on experience with both programming a microcontroller and evaluating real data to support design decisions.

Tasks:

  1. Turn on one of the LaunchPad LEDs (green or red).
  2. Change the blinking speed of that LED.
  3. Turn on the second built-in LED.
  4. Create an alternating blinking interval to 2 seconds using delay(2000).
  5. Measure the ON and OFF times manually with a stopwatch for at least 10 cycles (this will incorporate human error).
  6. Record your data in Excel, calculate descriptive statistics (mean, standard deviation, minimum, maximum), and create a graph of the results.

Source File:

In-Class Activity: Buzzer & Selection Structure

Objective: This activity is to introduce you to using the TI MSP430 LaunchPad, Grove board, buzzer, to design a simple alert system. You will practice writing and modifying selection structures (if/else logic) to control how the buzzer responds to different conditions. This will help you understand how decision-making in code can be used to build real-world warning systems.

Tasks:

  1. Draw a block diagram for a microcontroller set up
  2. Draw a flowchart that represents the selection structure for a given scenario.
  3. Modify the selection structure in the given code such that the buzzer beeps as desired.

Source File:

In-Class Activity: Early Warning System

Objective: The purpose of this activity is to guide you in designing a simple early warning system, inspired by the real-world failure of the Taum Sauk Reservoir, where human error and lack of safeguards led to disaster. Using an ultrasonic ranger, you will measure the distance to an object and apply a selection structure in your code to decide whether to trigger a buzzer alert when the object gets too close. This hands-on project shows how sensors and logic can work together to prevent accidents by warning operators before a threshold is crossed. To evaluate how reliable your system is, you will also test its fidelity by calculating the percent error and sum of squared errors (SSE) between your measured distances and the theoretical threshold. Through this, you’ll not only practice programming and hardware integration but also see how engineers assess accuracy and safety in real systems.

Tasks:

  1. Draw a block diagram for a microcontroller set up.
  2. Write a pseudocode for the warning system logics.
  3. Modify the code such that it alerts with sound when an object gets too close.
  4. Record distances measured when hearing the alert, compare these values to the theoretical threshold you defined, and analyze the errors.
  5. Comment on your error analyses.

Source File:

In-Class Activity: Real-Time Data Aquisition

Objective: Design and test a simple alarm system using the MSP430-Grove board to simulate how early detection of high water levels could have prevented the Taum Sauk Reservoir failure. Students will use an ultrasonic sensor to measure distance, a buzzer to trigger an alert when the water level is too high, and Excel Data Streamer to visualize data in real time.

Tasks:

  1. Data Streamer Screenshots
    • Capture a screenshot showing the three columns: Time, CH1, and CH2.
    • Include at least one screenshot where: CH1 displays "ALERT: Water level critical!" and CH2 shows 1(indicating a critical water level).
  2. Excel Chart
    • Create a chart using the data obtained from Data Streamer.
    • Set X-axis to be Time (s) and Y-axis to be Distance (cm).
    • Add a descriptive title.

Source File:

In-Class Activity: Smart Light

Objective: The purpose of this activity is to guide you in building a smart lighting system that responds intelligently to environmental changes. Using a light sensor, you will detect ambient brightness, and with an ultrasonic ranger, you will detect nearby objects. By applying logical operators (AND / OR) within your code, you will combine these sensor inputs to control when an LED turns on — for example, turning on the LED only when it is dark and someone is nearby. This project demonstrates how multiple sensors can work together through simple logic to enable more responsive and energy-efficient systems, similar to those found in real-world smart homes and safety applications. Along the way, you will also explore different logic structures, observe their effects, and reflect on how system behavior changes with different conditions.

Tasks:

  1. Write a clear pseudocode or flowchart that describes the logic controlling the LED using AND and OR operators.
  2. Combine and modify code from the light and ultrasonic examples to implement the smart lighting behavior.
  3. Test the system under different light and distance conditions and observe how different logic operators affect the LED response.
  4. Experiment with and reflect on alternative logic structures to see how system behavior changes and discuss potential real-world applications.

Source File:

Supplemental Documents

Here are some resources that could be useful:

TI Kit Loan & Return Procedure

General References

Sensor Code Supplemental