Note: Steps 4 and 5 are fairly similar. You can refer to step4guide.pdf for instructions on both steps.
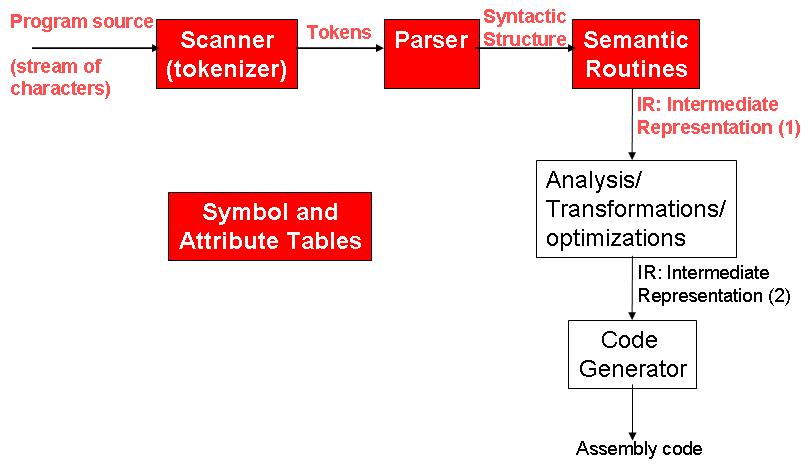
In the so-called parser-driven compilers, the compilers call code-generation routines every time a grammar rule is recognized by the parser. This step, as well as steps 4 and 6, deals with the code generation routines, also called semantic routines, for the MICRO language. This step assumes that you have fixed all the problems with the parser developed in "step 2" as well as the symbol table developed in "step 3". You may find useful to get familiar with the material listed in the "Readings" section of this handout before you start the implementation. The diagram below shows the stage of the compiler construction after the completion of this step:
Your goal in this step is to generate executable code for a simple program written using the MICRO language (a program that only has the main function, which calls no other functions). For simplicity reasons, the code that your compiler will generate is meant to be executed on the Tiny simulator.
In order to achieve this goal you have to add the semantic routines that will be executed by the parser every time a grammar rule is recognized. The rules you will have to deal with are the ones related to statements IF and FOR. ECE 573 students should also deal with BREAK and CONTINUE. The implementation strategy we suggest is:
The intermediate representation is the representation of the program in a language internal to the compiler. Many code optimization techniques operate on the intermediate code. However, for now, the IR will serve only as an intermediate step for the generation of the final tiny code. The intermediate representation is implemented as a linked-list that has every intermediate instruction as a node. For branch instructions the node also has a pointer to the target node. The intermediate instructions are machine independent. We suggest you to follow the IR description provided here.
Note that the guide was written for an older version of the project. As a result, it does not cover the exact control structures in this year's version of the language. Here are the templates to follow for this year's control structures:
Example: IF-ELSE
         INT a, b;
         a := 2;
         IF (a = 1)
          b := 1;
         ELSE
          b := 2;
         FI

         STOREI 2 $T1        /* a := 2 */
         STOREI $T1 a
         STOREI 1 $T2        /* a = 1? */
         NE a $T2 label1
         STOREI 1 $T3        /* b := 1 */
         STOREI $T3 b
         JUMP label2         /* jump to out label */
         LABEL label1        /* else label */
         STOREI 2 $T4        /* b := 2 */
         STOREI $T4 b
         JUMP label2         /* jump to out label */
         LABEL label2        /* out label */
Example: FOR
         INT a, b;
         a := 1;
         FOR ( b := 5; b >= 1; b := b - 1)
             a := a * b;
         ROF

         STOREI 1 $T1
         STOREI $T1 a
         STOREI 5 $T2
         STOREI $T2 b
         LABEL label1        /* top label */
         STOREI 1 $T3
         LT b $T3 label3     /* if the condition is false, jump to the out label */
         MULTI a b $T6
         STOREI $T6 a
         LABEL label2        /* increment label, would be needed for continue statement */
         STOREI 1 $T4
         SUBI b $T4 $T5
         STOREI $T5 b
         JUMP label1         /* jump to the start of the loop (top label) */
         LABEL label3        /* out label*/
For this step you can assume that all variables are defined globally. There will not be any additional variables defined in main().
The tiny simulator is meant to work as a simplified version of a real machine. It works executing a stream of assembly instructions. A description of the tiny simulator is here. The source code for the tiny simulator is here. You can compile the source code using the following command:
g++ -o tiny tinyNew.C
You implementation of item 1 will generate an internal representation of the MICRO program and store that representation in memory using a linked-list. In the code generation process you have to implement a procedure that will traverse the linked-list and translate the IR instructions to tiny instructions. Note that your IR code consists in three operand instructions as opposed to the two operand instructions of the tiny simulator. Therefore, some instructions in the IR representation will be translated in more than one tiny instruction. Please read carefully the tiny manual to understand how the tiny instructions are defined.
For this step you don't need to care about register allocation, therefore the symbols of the final tiny code can be the same ones used in the intermediate representation. You will use a version of the tiny simulator that allows your code to use up to 1000 registers. That would be enough to map all each temporary result to one different register and there will be still registers available for intermediate operations that may need extra registers.
Execution of the compiler would output BOTH the IRcode and tiny code and combine them together on the standard output. The output forms an executable file on the tiny simulator. It should start with the IRcode, with each line commented out by prepending a ';' to its front. Then the second half of the output should be the tiny code. Please take a look at the example outputs given below.
Grading: We will grade by running the outputted code on the tiny simulator, and look at the results. Since the IR codes are commented out, they don't affect tiny machine execution. (Although we will look at them too to help debug.) We do not care about the specific instructions you generate, as long as the output of your compiled program is correct.
The testcases are available here, and a reference solution is available here.
Please note that these outputs are only examples -- it is perfectly ok if your generated IR or Tiny is different. What really matters is the execution result of your code.