Running LaTeX on Your Windows Computer
July 4, 2013
Mark Senn
Installing LaTeX
I now recommend using TeX Live instead of MikTeX.
TeX Live is also available for Linux and Unix.
MacTeX is based on TeX Live and is for Macs.
See
TeX Live
and
Installing TeX Live 2011 on Windows 7
for instructions on how to install TeX Live.
Ignore the below instructions—they are all about MikTeX.
- Go to
http://www.miktex.org/2.9/Setup.aspx
and click on
``Download "Basic MiKTeX" Installer''.
Run it and accept all defaults except select ``Preferred paper: Letter''.
Detailed instructions for this step:
- Goto
http://www.miktex.org/2.9/Setup.aspx.
- Click on
``Download "Basic MiKTeX" Installer''.
- Save the
basic-miktex-2.9.4250.exe
file.
Note where it is being saved so you can left-double-click on it in the next step.
- Left-double-click
(press left mouse button twice in rapid succession)
on
basic-miktex-2.9.4250.exe.
- Copying Conditions
Read the ``Copying Conditions''.
Left-click on the ``I accept the MiKTeX copying conditions.'' check box.
Left-click the ``Next'' button.
- Shared Installation
Left-click on the ``Anyone who uses this computer (all users)'' radio button.
Left-click the ``Next'' button.
- Installation Directory
Left-click the ``Next'' button.
- Settings
Change the ``Preferred Paper:'' drop down box to ``Letter''.
Left-click the ``Next'' button.
- Information
Left-click the ``Start'' button.
- Executing
Wait until the ``Next'' button is highlighted---this may take a several minutes
depending on speed of your computer.
Left-click the ``Next'' button.
- Completing the MiKTeX Setup Wizard
Ignore the ``To exit the wizard click Finish.'' message.
Left-click the ``Close'' button.
- Update the miktex-bin package.
Detailed instructions for this step:
- Do Start => Programs => MiKTeX 2.9 => Update to start the MiKTeX updater.
- Left-click the ``Next'' button.
- Left-click the ``Next'' button.
- Select only the miktex-bin package.
- Left-click the ``Next'' button.
- Left-click the ``Finish'' button.
- Update all packages.
Detailed instructions for this step:
- Do Start => Programs => MiKTeX 2.9 => Update to start the MiKTeX updater.
- Left-click the ``Next'' button.
- Left-click the ``Next'' button.
- Select all packages.
- Left-click the ``Next'' button.
- Left-click the ``Finish'' button.
- Go to
http://www.texniccenter.org/resources/downloads/29
and left click on
``TeXnicCenter 1 RC 1 Installer''.
Run it and accept all defaults except select ``Create a link on the desktop''.
Detailed instructions for this step:
- Goto
http://www.texniccenter.org/downloads.html.
- Left-click on
``SourceForge.net''
next to
``TeXnicCenter Setup, Version 1 Beta 7.01 ('Greengrass')''
in the ``Downloads'' column.
- Save the
TXCSetup_1Beta7_01.exe
file.
Note where it is being saved so you can left-double-click on it in the next step.
- Left-double-click on
TXCSetup_1Beta7_01.exe.
- Welcome to the TeXnicCenter Setup Wizard.
Left-click the ``Next'' button.
- License Agreement
Read the license agreement
Left-click on the ``I accept the agreement'' radio button.
Left-click the ``Next'' button.
- Select Destination Location
Left-click the ``Next'' button.
- Select Components
Left-click the ``Next'' button.
- Select Start Menu Folder
Left-click the ``Next'' button.
- Select Additional Tasks
Select ``Create a link on the desktop''.
Select ``Add TeXnicCenter to the 'Send To' menu''.
Left-click the ``Next'' button.
- Ready to Install
Left-click the ``Install'' button.
- Completing the TeXnicCenter Setup Wizard
Left-click the ``Finish'' button.
Running LaTeX
TeXnicCenter should now be installed.
Below are three exercises to get familiar with it.
Short Device-Independent File Exercise
- Left-double-click on the TeXnicCenter icon on the desktop to start TeXnicCenter.
- Do File => New... .
- Enter these lines in the main part of the window:
\documentclass{report}
\begin{document}
This is page 1.
\newpage
This is page 2.
\newpage
This is page 3.
\end{document}
- Do File => Save As... and save the file as short.tex.
- Do Project => Create with active file as main file.
Select Language ``en''.
Select Dialect ``US''.
Left-click OK.
- At the top of the edit window, select DVI output.
| Use | | To Produce This Output |
|---|
 | | DeVice Independent |
 | | Portable Document Format |
 | | PostScript |
If you don't see "LaTeX=>DVI",
left click the mouse on the down arrow
to the right of what you do see
and select "LaTeX=>DVI".
- Press F7 key
(Build => Build Output)
to process the short.tex file
and make a short.dvi
(DeVice Independent)
file.
Note that the window splits and the bottom half contains
the ``Output Bar'' with messages from LaTeX.
The last line should be
0 Error(s), 0 Warning(s), 0 Bad Box(es), 2 Page(s)
- Press F5 key
(Build => View Output)
to preview the output.
This should start a new yap
(Yet Another Previewer)
window on the screen.
- Experiment with these yap commands:
| Use | To |
|---|
| F11 key | enter or leave full-screen mode |
| n | go to next page |
| p | go to previous page |
| q | quit |
 | show one page per window |
 | show two facing pages per window |
 | display a one page wide scroll |
 | display a two page wide scroll |
 | display ruler
(left-click and then left-click
on output---do shift-left-click for vertical ruler),
the ruler is is only used for measuring,
not setting margins, tabs, etc. |
 | move output on screen (left-click , left-click on output and while holding left mouse key down move mouse) |
 | magnify
(left-click and then left-click on output) |
- Go to LaTeX input window and intentionally introduce some errors.
Change
This is page 1.
to
This is an \alpha page 1.
and
This is page 2.
to
\error This is page 2.
- Press F7 key. Note the message about errors in the Output Bar.
- Press F9 key to go to the first error and change ``\alpha'' to ``$\alpha$''.
\alpha is a math mode command.
The first $
(or you can use ``\('')
causes LaTeX to go from text to text math mode;
the second $
(or you can use ``\)'')
causes LaTeX to go from text math to text mode.
- Press F9 key again to go to the next error.
False alarm---fixing the above error will fix this one also.
- Press F9 key again to go the the next error and remove ``\error ''.
- Press the F7 key.
- Press the F5 key.
- If you want to print the entire document you could left-click the printer icon
on the yap window. Warning: on my computer even I select a range a pages my
entire document gets printed using this procedure. Workaround: do LaTeX => PDF
instead of LaTeX => DVI processing and use your PDF reader to only print out
selected pages of the output.
If your pages print in reverse order: in the Print Setup dialog box try
left clicking ``Properties''
then left click on the ``Features'' tab
to select ``Start Printing from Last Page''.
- Go to near beginning of edit window and left-click.
Left-click on
 and experiment with finding text.
- Go to near beginning of edit window and left-click.
Left-click on
 and experiment with replacing text.
- Do File => Exit in the edit window to leave TeXnicCenter.
Setup an Inputs Directory
I've had one report stating using "Local TeX Files" didn't work but "LocalTeXFiles" (note no spaces) did.
I have not tested this.
You may want to use "LocalTeXFiles".
Set up an inputs directory so the files in it can be used by LaTeX while in another directory
Choose somewhere to make a \Local TeX Files\tex\latex\misc subdirectory that you have write access.
I chose C:\Documents and Settings\mark\My Documents\Local TeX Files\tex\latex\misc.
Detailed instructions for this step:
- Do Start => Programs => MiKTeX 2.9 => Help => Manual.
- Left click on ``6.2 Walkthrough: Registering Your Own Root Directory''
under ``4. Maintenance''.
- Follow the instructions that start with
``You use MiKTeX Options to register''
two paragraphs before Figure 4.5
and continue to the end.
Instead of using C:\Local TeX Files,
use the directory you just created.
Thesis/Dissertation PostScript File Exercise
- Get the files the example thesis uses and your thesis could use and put them
in the misc subdirectory of the inputs directory you just created:
puthesis.cls
notoccite.sty
pulongtable.sty
- Do Start => Programs => MiKTeX 2.9 => Settings,
click on the General tab,
and then click on the Refresh FNDB button
to refresh the file name data base
so LaTeX knows where these three shared files are.
The file name data base is an index containing
file names and which directory they're in.
- Get the template files if you don't already have them.
Detailed instructions for this step:
- Warning: This step might destroy any template.zip file you now have.
Get
http://engineering.purdue.edu/~mark/puthesis/template/my-windows-texniccenter/template.zip
(last updated March 24, 2007)
.
- Warning: This step might destroy any template subdirectory you now have.
Unzip the template.zip file.
This will make a template subdirectory.
See your local documentation or computer administrator if you need help unzipping the file.
- In Windows, double-left-click on template subdirectory.
- In Windows, double-left-click on the thesis.tex file---this should
automatically start TeXnicCenter.
- Do Project => Create with active file as main file.
Select "Uses BibTeX".
This document uses BibTeX to produce its bibliography.
Select Language ``en''.
Select Dialect ``US''.
Left-click OK.
- Press F7 key.
You may get a warning message about subfigure.sty missing---if so, left-click INSTALL.
This should automatically try to install a subfigure.sty file from the Internet.
If you can't get the file automatically, get it from the
Comprehensive TeX Archive Network
(CTAN).
- Check the Output Bar after LaTeX has processed the document.
Errors mean something is probably wrong.
Warnings mean something may be wrong.
Bad Boxes mean something is taking up too much horizontal or vertical space
and may be protruding into the margin.
- Press F5 key.
Yoy may get a warning message about the document can't be rendered properly and
be asked if you want to switch to the Dvips render method.
Left-click Yes so Encapsulated PostScript figures are properly displayed.
- Experiment with clicking some items in the Navigator window, just to the left of
the main window.
It goes directly to the corresponding location in whatever file is needed.
- Experiment with clicking the four icons at the bottom of the Navigator window.
- Click on the
 in the Navigator Window or Output Bar to close those windows
and make the edit window bigger.
Use the View menu if you want either of those windows back.
in the Navigator Window or Output Bar to close those windows
and make the edit window bigger.
Use the View menu if you want either of those windows back.
- Did you notice that the table of contents was empty.
On the first run LaTeX collected information for the table of contents.
Press F7 again to incorporate that information in your document
and F5 if you want to see the new version of your document.
- Do File => Exit in the edit window to leave TeXnicCenter.
Thesis/Dissertation PDF File Exercise
- Get the ntemplate (note the "n") files if you don't already have them.
Detailed instructions for this step:
- Warning: This step might destroy any ntemplate.zip file you now have.
Get
http://engineering.purdue.edu/~mark/puthesis/template/my-windows-texniccenter/ntemplate.zip
(last updated September 27, 2007)
.
- Warning: This step might destroy any ntemplate subdirectory you now have.
Unzip the ntemplate.zip file.
This will make a ntemplate subdirectory.
See your local documentation or computer administrator if you need help unzipping the file.
- In Windows, double-left-click on ntemplate subdirectory.
- In Windows, double-left-click on the thesis.tex file---this should
automatically start TeXnicCenter.
- Do Project => Create with active file as main file.
Select "Uses BibTeX".
This document uses BibTeX to produce its bibliography.
Select Language ``en''.
Select Dialect ``US''.
Left-click OK.
- Use Adobe Reader to preview PDF files.
Detailed instructions for this step:
- Do Build => Define Output Profiles...
- Left click on "Viewer" tab.
- Left click on "LaTeX => PDF" in left hand column.
- Insure all the options are like this:
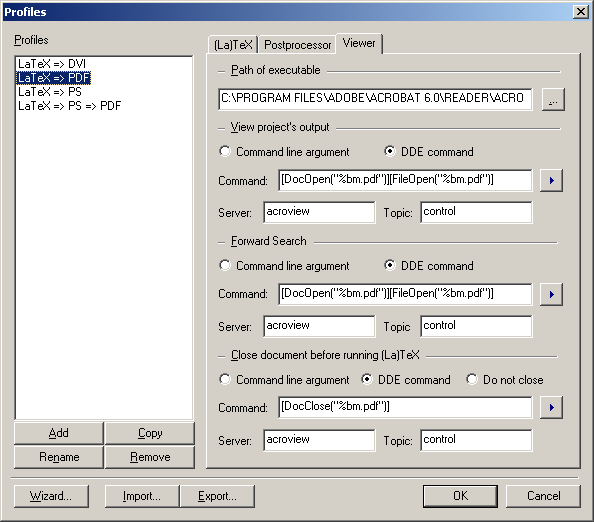
- Change the "Path of executable" to be the complete
filename to Adobe Reader.
I used
C:\Program Files\Adobe\Reader 8.0\Reader\AcroRd32
on my home computer.
- Left click on "OK".
- Make sure you have LaTeX => PDF selected at the top of the edit window.
- Press F7 key.
- Check the Output Bar after LaTeX has processed the document.
Errors mean something is probably wrong.
Warnings mean something may be wrong.
Bad Boxes mean something is taking up too much horizontal or vertical space
and may be protruding into the margin.
- Press the F5 key.
- Notice that the table of contents is empty.
On the first run LaTeX collected information for the table of contents.
Press F7 again to incorporate that information in your document
and F5 if you want to see the new version of your document.
- Do File => Exit in the Adobe Reader window to leave Adobe Reader.
- Do File => Exit in the edit window to leave TeXnicCenter.
Revised: July 4, 2013
Created: March 12, 2007