Jacqueline Greer's Lab Notebook
Week 01
January 9, 2013 (1 hour):
Met as a team after class to discuss preliminary project proposal and complete Homework0.
WEEK 01 SUMMARY
Accomplishments: Submitted preliminary project proposal (Homework0).
Weekly Work Total: 1 hour
Project Work Total: 1 hour
Week 02
January 14, 2013 (1 hour):
Set up this notebook for future updates to the development of the project.
January 16, 2013 (2 hours):
Met as a team to discuss feedback on the preliminary project proposal and come up with ideas for making our project more hardware intensive.
Set up Git repository in Eclipse with Tom to make collaboration on the game software easier.
January 17, 2013 (0.5 hours):
Reviewed final project proposal and discussed what changes would now have to be made to our original idea of what language to program the games in.
A microcontroller may not have Java library support to the extent we would need to have advanced games. Python may be a more feasible choice.
We need to keep this in mind as we are choosing our parts, and make it one of the criteria for determining which parts to get.
WEEK 02 SUMMARY
Accomplishments: PSSC and project proposal finalized.
Weekly Work Total: 3.5 hours
Project Work Total: 4.5 hours
Week 03
January 22, 2013 (3 hours):
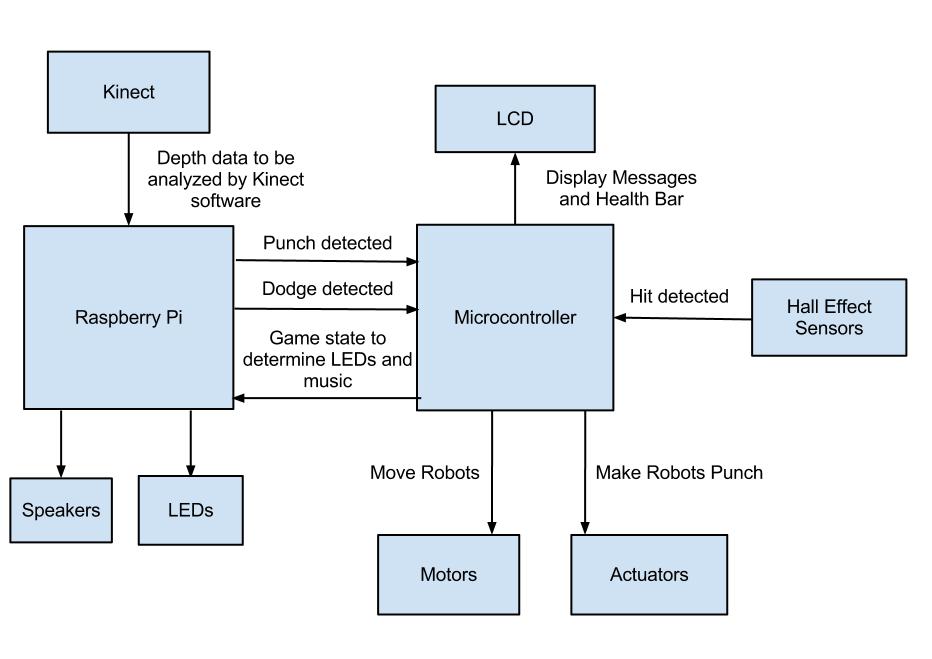
Team meeting to discuss feedback from project proposal. We agreed that our original idea isn't complex enough, brainstormed new ideas,
and decided to try out Kinect-controlled Rock 'Em Sock 'Em Robots at the presentation on January 23. Created block diagram and PSSCs for new idea,
and made presentation of both ideas.
January 23, 2013 (2.5 hours):
Team worked on Homework 2, but got stuck at finding the correct parts in libraries for the schematics. Plan to ask TAs for advice on January 24.
January 24, 2013 (0.5 hours):
Individually worked more on Homework 2, still not finding the new Schottky rectifier we were told to use. Plan to finish by Tuesday January 29.
Individually reviewed feedback from presentations and made list of what should get done over the weekend.
WEEK 03 SUMMARY
Accomplishments: Developed new and better project idea - Rock 'Em Sock 'Em Robots controlled via XBox Kinect.
Weekly Work Total: 6 hours
Project Work Total: 10.5 hours
Week 04
January 27, 2013 (4 hours):
Another team attempt at finishing Homework 2. Managed to work around the parts issue by finding parts we assume will be acceptable, but now
we're stuck on what to do with the layout. Tomorrow we will ask for help from a TA and hopefully complete it after that.
We fleshed out several key aspects of our new project idea, since we were behind by a week or two having just switched ideas less than a week ago.
We decided we will add instruments to the classic Rock 'Em Sock 'Em Robots game arena instead of fabricating our own to eliminate complications
that would bring up. We will be using a "health bar" concept, so that the winner of a round is based on the combined sum of punches landed on
head or body, not just on a single punch to the jaw as it is in the classic game. The arena will be oriented sideways so that two players standing
side by side facing the Kinect will see a profile view of their respective robots. The LCD will be placed on the side of the arena facing the
players. The Kinect will be placed at a suitable distance away from the players, connected by cable to the board located under the arena.
That distance has yet to be determined. We began a general flow of gameplay, including things such as when motors are enabled and disabled,
when sound is played, when certain messages are displayed on the LCD, etc.
January 29, 2013 (2 hours):
Picked out the Hall effect sensors and discussed how they would be placed on the robots and wired to the PCB. We are thinking of having an array
of sensors covering the chest of each robot, so that if any one of them is triggered, it counts as a hit, instead of having to hit the particular
place on the chest that the tiny sensor is placed. Placing them on/in the robots is its own issue. We don't want to directly punch the sensors,
so we're thinking of cutting open the robot and putting the sensors inside it. This creates an issue with wiring though, and more thought needs
to be given to this.
January 31, 2013 (3.5 hours):
Assisted Tom with Design Constraint Analysis by compiling data on parts that were picked out on January 29, documenting references,
and looking up any information he needed to complete the assignment.
WEEK 04 SUMMARY
Accomplishments: Learned Eagle software for creating PCBs, got caught up on some of the major details of our new project,
fleshed out the block diagram, and decided on parts.
Weekly Work Total: 9.5 hours
Project Work Total: 20 hours
Week 05
February 3, 2013 (4.5 hours):
Decided we are going to run Linux on the Raspberry Pi since it has been done before, so there will be resources for it when we get stuck,
and is more lightweight than other operating systems. Installed OpenNI, SensorKinect, and NiTE on my laptop which runs Windows. Used provided
sample programs to track skeleton movement, and track in detail the movement path of a hand. OpenNI interfaces with the Kinect and collects
raw data. SensorKinect contains the drivers for the Kinect. NiTE takes the raw data from OpenNI and creates a nice interface for skeleton tracking,
which we will use to recognize punching and moving gestures. I wrote up what we should do to install this on the Raspberry Pi to avoid
the trial and error I had to go through to get this to work. That is below, along with some issues I encountered in case it helps.

Steps to install:
1. Install OpenNI 1.5.4.0 SDK from
http://www.openni.org/openni-sdk/openni-sdk-history-2/
2. Download PrimeSense SensorKinect from
https://github.com/avin2/SensorKinect
3. Run dpinst-amd64 in the downloaded zip folder's Platform/Win32/Driver folder
4. Run the Windows installer in the downloaded zip folder's bin folder
5. Copy SampleConfig.xml from SensorKinect to OpenNI - SensorKinectUnstable/OpenNI/Data to OpenNI/Data
6. Install PrimeSense NiTE 1.5.2.21 from
http://www.openni.org/openni-sdk/openni-sdk-history-2/
7. Plug the Kinect in and run tests from OpenNI/Samples/Bin/Release and PrimeSense/NITE/Samples/Bin/Release
Important Notes:
- Compatibility issues between OpenNI 2.0, SensorKinect, and NiTE 2. Make sure to use version 1 from the links above.
This was the root cause of all problems I ran into.
- Running any sample program says no device found means that the drivers aren't correct, version combatibility issues with SensorKinect.
- Running some sample programs gives error "Cannot create any node of the requested type." Version compatibility issues with NiTE.
February 5, 2013 (2.5 hours):
Read documentation from NiTE, specifically a document giving a general overview of how NiTE's algorithms work, and began reading
the user manual, both of which are in PrimeSense\NITE\Documentation. The algorithm document suggested that tracking arm motion would be difficult
if the arms were close together and to the torso, which is the neutral position for our purposes. Prior experience with the Kinect boxing game
tells me that we will be fine for basic punching and dodging, but I also tested it by running the Sample-StickFigure64 test in
PrimeSense\NITE\Samples\Bin64\Release, which generates a skeleton stick figure based on your body in front of the Kinect. Punching in a variety
of ways were all recognized and clear in the stick figure. More research needs to be done on how user IDs are created, used, and potentially
saved if a user walks outside of the sensor area.
Important Notes:
- PrimeSensor produces a depth image where each pixel represents the distance from the Kinect. NiTE translates this data to usable
information in the form of skeleton joing positions and angles, which can then be used in an application to determine if a movement
was a punch that we will make use of.
- Image I see on my computer is mirrored, so when I move my right arm, my mirrored figure moves its left arm. The convention is to
call this side the right side because it corresponds with the user's right arm.
- User's must be between 1 meter and 3.5 meters away, with the optimal distance being 2.5 meters.
- Stand away from walls, other users, and other objects to make it easier to differentiate users from the background.
- Don't wear baggy clothing and keep long hair contained so that NiTE can better find the user's skeleton.
- Kinect will auto calibrate and track the user's skeleton when a user enters the sensor area, only if they are standing, not sitting.
- To make calibration more successful, adopt a neutral pose and don't make fast movements for a few seconds.
February 7, 2013 (3 hours):
Read more documentation from NiTE and OpenNI to understand how the general structure of Kinect software works together.
Image Source: NITE Controls User Guide, PrimeSense, 2011, pp.10.
Did some research into if people have interfaced the Kinect and Raspberry Pi together to see if there was a nice explanation of how they did so
and if there was a recommended language to program in. Because the Raspberry Pi is such a new product, there wasn't much useful information on that
front besides people speculating over how it would be done when the Pi first came out. We are hoping to just act as if the Pi is a computer,
install software on it, and run programs on it. We plan to get most of the Kinect software created and on the Pi for the design reviews, so if we
run into problems, we will have plenty of time to fix them. The (likely overly ambitious) plan is to have Kinect software specific to our project
working on my computer by the end of next week, and use the next week to get it on the Pi. Since we have the Kinect and Pi already, it would
be most efficient to work with those now while waiting for the other parts, and then focus on the software and all the other issues with them
once they arrive.
WEEK 05 SUMMARY
Accomplishments: Installed OpenNI, PrimeSense, and NiTE on my computer to use for Kinect software and documented that process
for when we need to do it again on the Raspberry Pi. Became familiar with the general structure of those programs that make up the
Kinect software, and created a plan of action for the next two weeks.
Weekly Work Total: 10 hours
Project Work Total: 30 hours
Week 06
February 10, 2013 (1 hour):
Experiment with the sample programs given in OpenNI and NiTE to have a good idea of what would be good references when I start coding, as well
as what features to expect to be able to readily use.
Useful OpenNI Samples:
- NiSimpleRead and NiSimpleCreate - show two different ways of creating a program to grab data
- NiUserTracker - identifies user and calibrates them if they are in a "calibration pose." Need to test multiple users with this one.
- NiViewer - Demonstrates many configuration settings if I might need them. Also contains highly entertaining "psychedelic mode"
and "rainbow mode."
Useful NiTE Samples:
- Boxes - Demonstrates gesture recognition of gestures like "click," "push," and "swipe," and can likely be expanded into other gestures
that will be useful to us.
- StickFigure - Generates stick figure based on a detected user's skeleton
February 11, 2013 (1.5 hours):
Begin setting up coding environment for Kinect software. I already have Eclipse installed on my computer which does C++ projects, which is
what all of this software is coded in, so I tried building an existing sample program with Eclipse. Searches for documentation of the project
setup details all give fantastically detailed instructions for using Microsoft Visual Studio. I am not familiar enough with the theory behind
how Eclipse and Visual Studio do compiler and linker settings to easily figure out equivalent instructions for Eclipse,
so I'll download and use Visual Studio instead.
February 12, 2013 (3.5 hours):
Day 2 of setting up coding environment, now in Visual Studio. Today I'm setting up a sample OpenNI project, specifically NiSimpleRead.
I'm following steps in
http://www.codeproject.com/Articles/257633/How-to-Create-a-Simple-Natural-Interaction-NI-App
to set up a new project. Because I downloaded the x64 binaries for everything, there were several modifications,
several issues I encountered, and their solutions which I will outline. Later on in the Kinect software development process we will
determine what needs to be done differently to make a compatible build for the Raspberry Pi, but the code should be independent.
- Created solution in VS and added the existing NiSimpleRead project to it. I discovered that you must change SAMPLE_XML_PATH in any
sample file if your directory setup isn't exactly as it specifies. There must be a Data folder with SamplesConfig.xml in it for this to work,
and SAMPLE_XML_PATH points to that file.
- Make sure to run Visual Studio as an Administrator (right click - Run As Administrator) so that VS can write to and access files in the
C drive. This gave me errors of the form "can't write to foo.log"
- I wasn't sure what's working and not working at this point, so I created a new project from scratch, following the steps found at the link above.
- Copied NiSimpleReader.cpp to my project folder, and added it as an existing file to my Source Files in VS.
- In the Project Properties window,
- Add to Configuration Properties->C/C++->Include Directories->$(OPEN_NI_INCLUDE);$(XN_NITE_INSTALL_PATH)
- Add to Configuration Properties->Linker->General->Additional Library Directories->$(OPEN_NI_LIB64);$(XN_NITE_INSTALL_PATH)\Lib64
- Add to Linker->Input->AdditionalDependencies->C:\Program Files\OpenNI\Lib64\openNI64.lib;XnVNITE64_1_5_2.lib
- Ran into error LNK1104: cannot open file openNI64.lib which I fixed by restarting VS. It seemed that the process was running already
and could not be started again.
- Copied OpenNI/Data to solution folder to bring over SamplesConfig.xml mentioned earlier.
- Finally able to build and run. A screenshot of the successful build is shown below.
February 13, 2013 (2 hours):
Day 3 of setting up coding environment, today setting up a NiTE sample project, StickFigure.cpp. I began by removing NiSimpleReader.cpp
and adding StickFigure.cpp and see what errors come up to see what I need to fix.
- Missing GLUT include files, which are needed to display graphics. This sample project displays a small stick figure outline
of the user's skeleton. The software I will develop will not display graphics, though it could be useful for debugging.
- Copied the GL, glh, and Libs folder from the NiTE StickFigure project folder to my project folder.
- Add Linker->Input->AdditionalDependencies->Libs
- Added path to where Libs is (path to project) to C/C++->Include Directories
- Error that something in glh/glh_extensions.h is deprecated
- Changed strdup (only occurs once in file) to _strdup like the error says to
- Ran into error LNK1104: cannot open file openNI64.lib again. This time restarting VS didn't fix it, nor did
restarting my computer. This time it seems that the linker additional dependencies somehow was messed up, and so just to be
sure, I changed openNI64.lib to "C:\Program Files\OpenNI\Lib64\openNI64.lib" (with quotes).
- Seeing a large bunch of LNK2019 unresolved external symbol errors. This looks like something isn't being linked properly.
- I apparently totally messed something up, because I can't even undo what I did today and have the project from yesterday work.
February 14, 2013 (1 hour):
Day 4 of setting up coding environment. After much time spent yesterday and today searching for what this LNK2019 error can mean,
I discovered it was all because I was building for a Win32 platform instead of an x64 platform, which is what all the binaries
I downloaded are for. In the Project Properties window, do Platform->New->x64. I have no idea how this succesfully ran on 2/12.
Also, the warning "Cannot find or open PDB file" doesn't affect build or run. Tomorrow I will run through this from scratch
to make sure I actually have this setup correct, to document and understand precisely what is needed, and make sure that this
working today wasn't another fluke.
February 15, 2013 (2.5 hours):
Day 5 of setting up coding environment. I verified the configuration for the OpenNI project I finished yesterday and succesfully built
a NITE project, making specific documentation of what I did for both for future reference. I will not modify these projects in order
to have projects that I know will work (solely on their configurations). A screenshot of the NITE sample project running after being
built by Visual Studio is shown below.
OpenNI Project Configuration
- After creating a new project, add the desired .cpp source file.
- Copy OpenNI/Data to Projects/(Solution Name)
- In Project Properties, set the Platform to be x64.
- C++ Additional Include Directories - $(OPEN_NI_INCLUDE);$(XN_NITE_INSTALL_PATH)
- Linker Additional Library Directories - $(OPEN_NI_LIB64);$(XN_NITE_INSTALL_PATH)\Lib64
- Linker Input Additional Dependencies - .... ;openNI64.lib;XnVNITE64_1_5_2.lib;
- Make sure the SamplesConfig path is correct - in my case, in NiSimpleRead.cpp - SAMPLE_XML_PATH "../Data/SamplesConfig.xml
NITE Project Configuration
- Follow steps for OpenNI Project Configuration
- Copy the GL, glh, and Libs folder from the NiTE StickFigure project folder to the project folder
- Linker Additional Library Directories - (path to project)\Libs
- Linker Input Additional Dependencies - glut64.lib
* Fixed Error LNK1104 can't open file "glut32.lib" - looking for wrong file, so I told it what to look for
- Copy glut64.dll from NITE/Samples/Bin64/Debug to (solution name)/x64/Debug
* Fixed System Error can't find glut64.dll
- Copy NITE/Data files to (solution name)/Data and change paths in the source file to reference ../Data, where I seem to be putting everything
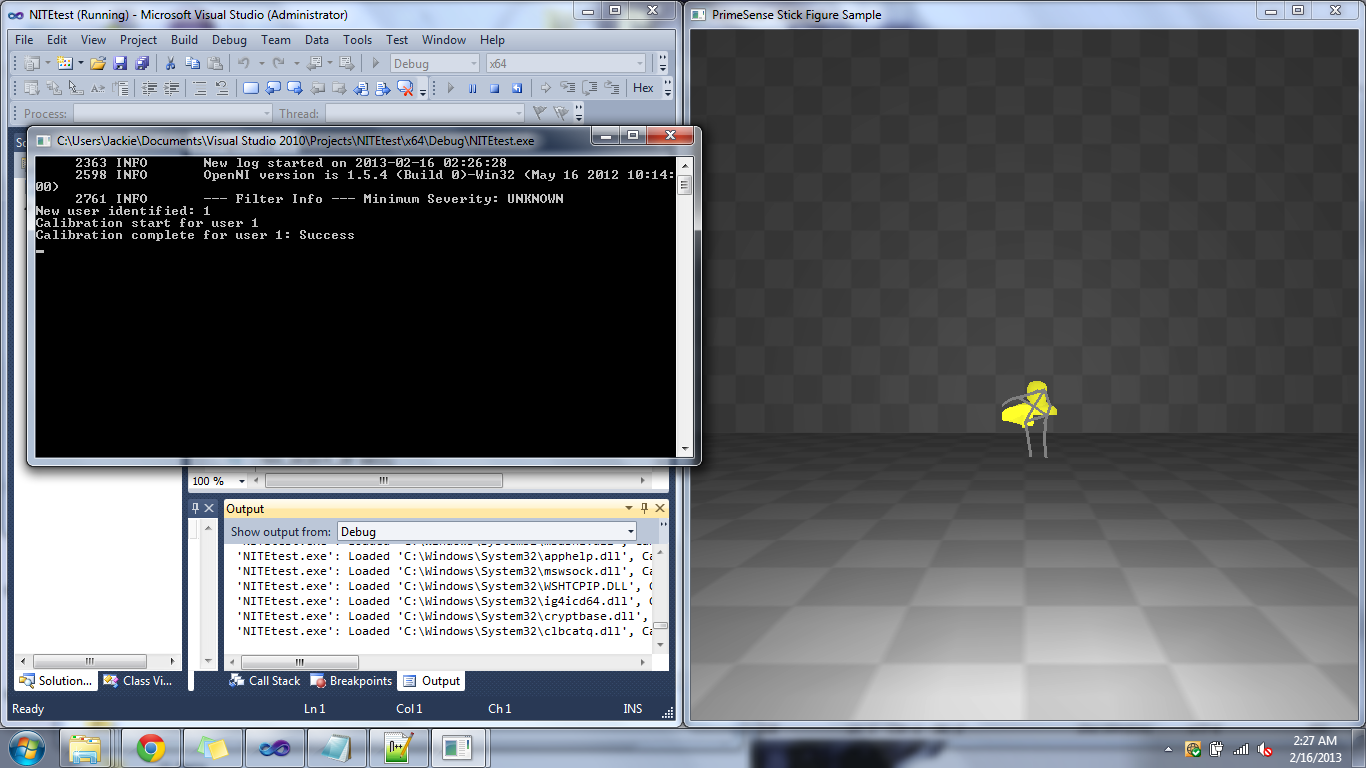
February 16, 2013 (2.5 hours):
The first task that needs to be done for creating the Kinect software is recognizing, calibrating, and tracking the two players. Instead of
starting from scratch, I'm going to adapt a sample project to our needs. I started with NITE's sample project Players, which displays a
window with the image the Kinect sees and player outlines colored in with different colors to show which user we are. After playing around
with the code and trying to get it to build, I realized much of the code dealt with displaying the users images to the screen, which we
will not be doing in the actual software. After some more poking around with available sample projects, OpenNI's NiSimpleSkeleton is
nearly precisely what we need. It just outputs text to the console, displaying when a new user is recognized, when calibration starts,
when a user is calibrated, when a user's skeleton is being tracked, and when a user is lost. It also displays the position of the torso,
which I can build off of for other joints and gestures. This is just what I need to do this first task that I outlined.Having images being
displayed might be helpful for debugging the code as I write it, but the code that drives that would be its own problem. This sample
project code also has a MAX_NUM_USERS variable already in use that I can change to be 2, for 2 users. We only want 2 users to be registered
as players so that we ensure only two users are sending input to the robots.
NiSimpleSkeleton Console Output for One User

WEEK 06 SUMMARY
Accomplishments: Installed Microsoft Visual Studio and set up my coding environment for creating the Kinect software.
Found a sample project I can adapt to be the base of my software, and will begin on that next week.
Weekly Work Total: 14 hours
Project Work Total: 44 hours
Week 07
February 17, 2013 (7.5 hours):
Today I achieved the core of the first task that I mentioned on February 16. Software now exists that can calibrate, identify, and track
two users. Also, I began making a list of some things that are up to the user to ensure correct gameplay that I cannot create code to
deal with. Tom and I decided that using leds to tell users if they're too close or too far to be calibrated would be too complicated
from a software standpoint to implement. We may use leds to display when we recognize a user, when we're calibrating, and when we're
done calibrating and now are successfully tracking.
Modified NiSimpleSkeleton Recognizing, Calibrating, and Tracking 2 Users
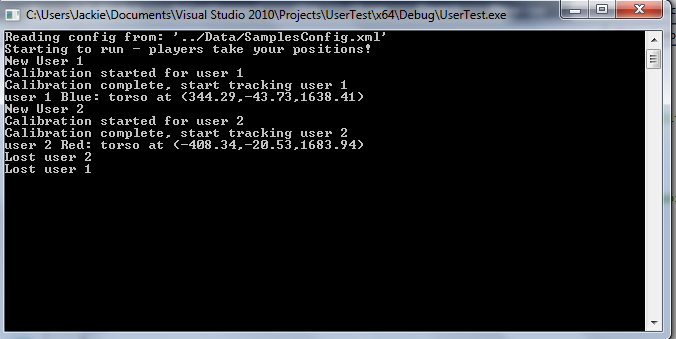
I created a Player.cpp class to keep track of individual player's names (Red or Blue), and their ID that's used to track them.
A Player object is created/initialized when the New_User callback is performed, and cleared when the Lost_User callback is performed.
A Player's name is determined by the side of the Kinect that they are standing on. If two users are playing, the user on the left (must be
to the left of the center line of the Kinect) is Red, and the other, standing to the right of the center line of the Kinect, is Blue.
This led to some specification of what expected user behavior is.
- No one should enter the playing zone other than the two players. This is typical for every Kinect game. Even though they won't officially
be detected as a new user, their body could interfere with the tracking of the actual player, which is not something that I can account
for in the code. Only officially detecting two users is mainly to ensure that two users' data and no more is being analyzed and sent out
from the Kinect.
- Again typical for every Kinect game, a clear area for gameplay is required or unexpected results may occur. We have seen some sample
programs identify doors, walls, and beds as players, and there is not much I can do about that. This is not a difficult thing to ask for.
- Users should be clearly on either the left or right side of the Kinect. If at any point during gameplay you cross that line, you may
start controlling the other robot, and your own will have no controls.
February 18, 2013 (4.5 hours):
Tested my code for user registration more thoroughly to see if there were any bugs. Currently it only works if both players enter the
playing area once and never left. If one leaves and returns there will be unexpected behavior. Adding support to fix this is giving me
some troubles because of how the supporting software calls the Lost_User callback. I need to map out in detail how this section of
the code will work, and while I'm at it, I should map out how all of it should work, now that I understand more of what I can do.
For now, the code is functional, and if need be, I can put off some of the finesse until later.
February 19, 2013 (2.5 hours):
Got caught up on notebooks and resolved to update them daily like I should, regardless of if I want to finish a section of work that
I've been stuck on before updating my notebook. Also remembered software documentation, and decided my current point in the Kinect
software might count as version 0.0.
February 22, 2013 (3 hours):
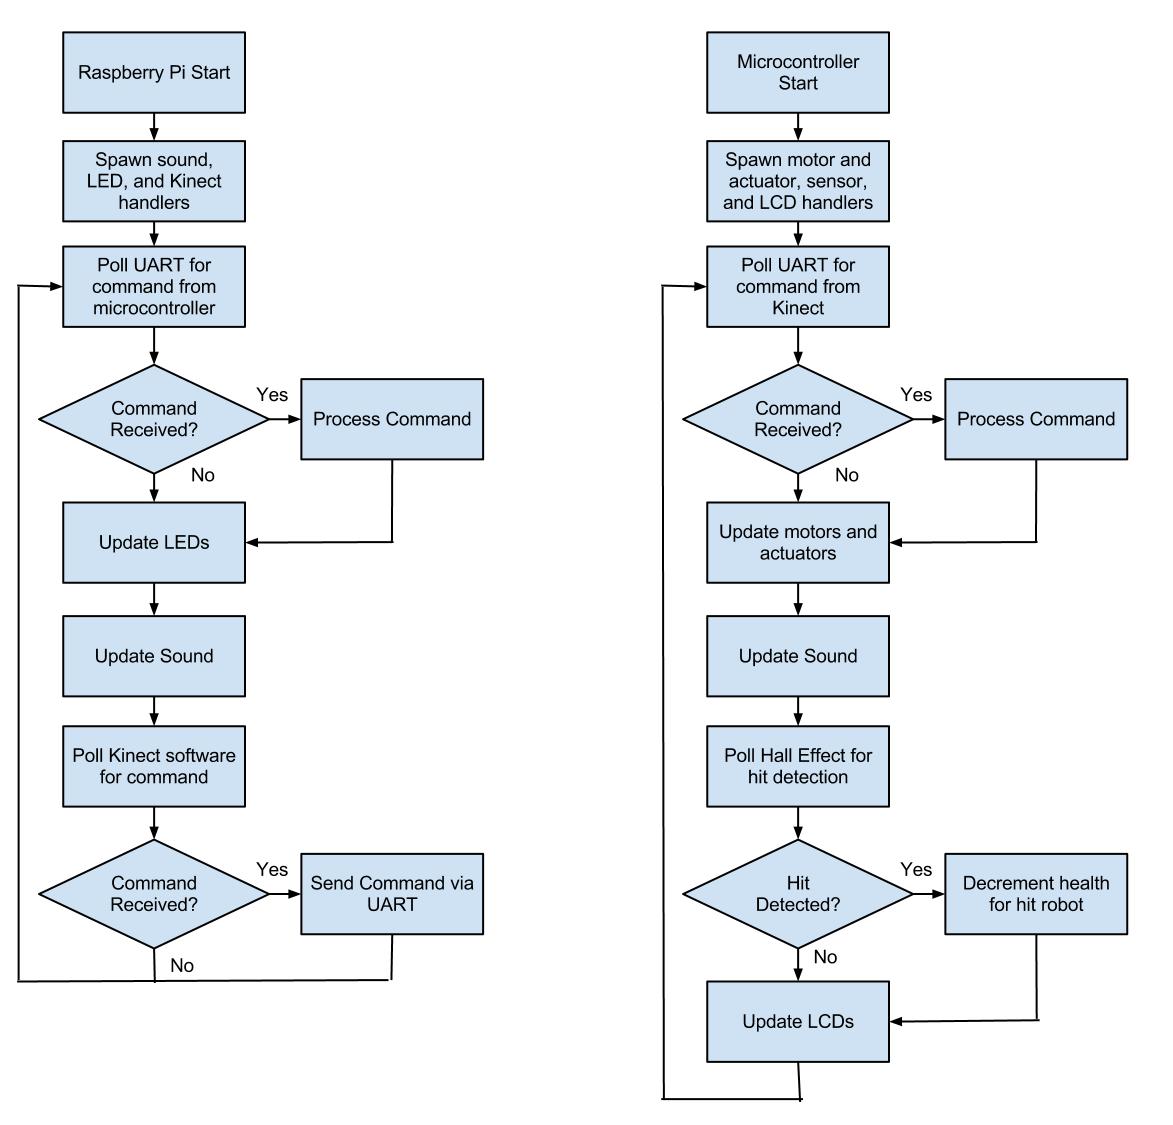
I realized we'd gotten past the learning how to use the software phase and had started into the actual development phase without having
made any thorough software plan. That was done today, and is shown below. From startup to power down, I generally specified the sequence
of events for game play and what software is needed to run them. This should help us modularize our code conceptually before beginning
to write it.
Software Flowchart

WEEK 07 SUMMARY
Accomplishments: Wrote Kinect software code that successfully recognizes two users. There are some problems that arise
when users leave the playing area. Created software flowchart of what component does what task when during gameplay.
Weekly Work Total: 17.5 hours
Project Work Total: 61.5 hours
Week 08
February 24, 2013 (4.5 hours):
Installed Atmel Studio 6 on our computer in lab. I assisted Tom with putting together the microcontroller development board and powering
it up. We tried to run a basic LED test on the micro, but had problems finding good example code, correct libraries, and documentation.
February 25, 2013 (1.5 hours):
We began creating our design review powerpoint, decided who is speaking about what, and figured out how to create a Gantt chart in Excel
if we choose to have one in our presentation.
February 26, 2013 (2.5 hours):
Met as a team to create project completion schedule. We put in lots of float time towards the end, so that when we inevitably fail to meet
deadlines we set, we've at least planned some time in for that already. If we're successful, we'll have an light last two weeks. I also
worked on the sections of the presentation that I will be giving.
WEEK 08 SUMMARY
Accomplishments: Began learning how to write microcontroller software, and created design review.
Weekly Work Total: 8.5 hours
Project Work Total: 70 hours
Week 09
March 5, 2013 (5 hours):
Assisted Tom in getting microcontroller code that got LEDs to light up and blink on the development board. I wired up the linear regulator,
but had issues with generating two different voltages to the same circuit, since one side needs 3.3 V and the other needs 5V.
March 7, 2013 (4 hours):
Assisted Mark in thinking about solutions to the actuator current draw problem. It draws a lot of current in pulses and we weren't sure if
the board, power supply, and other circuits could handle it. We got a new power supply with the voltage and current we think will be
sufficient.
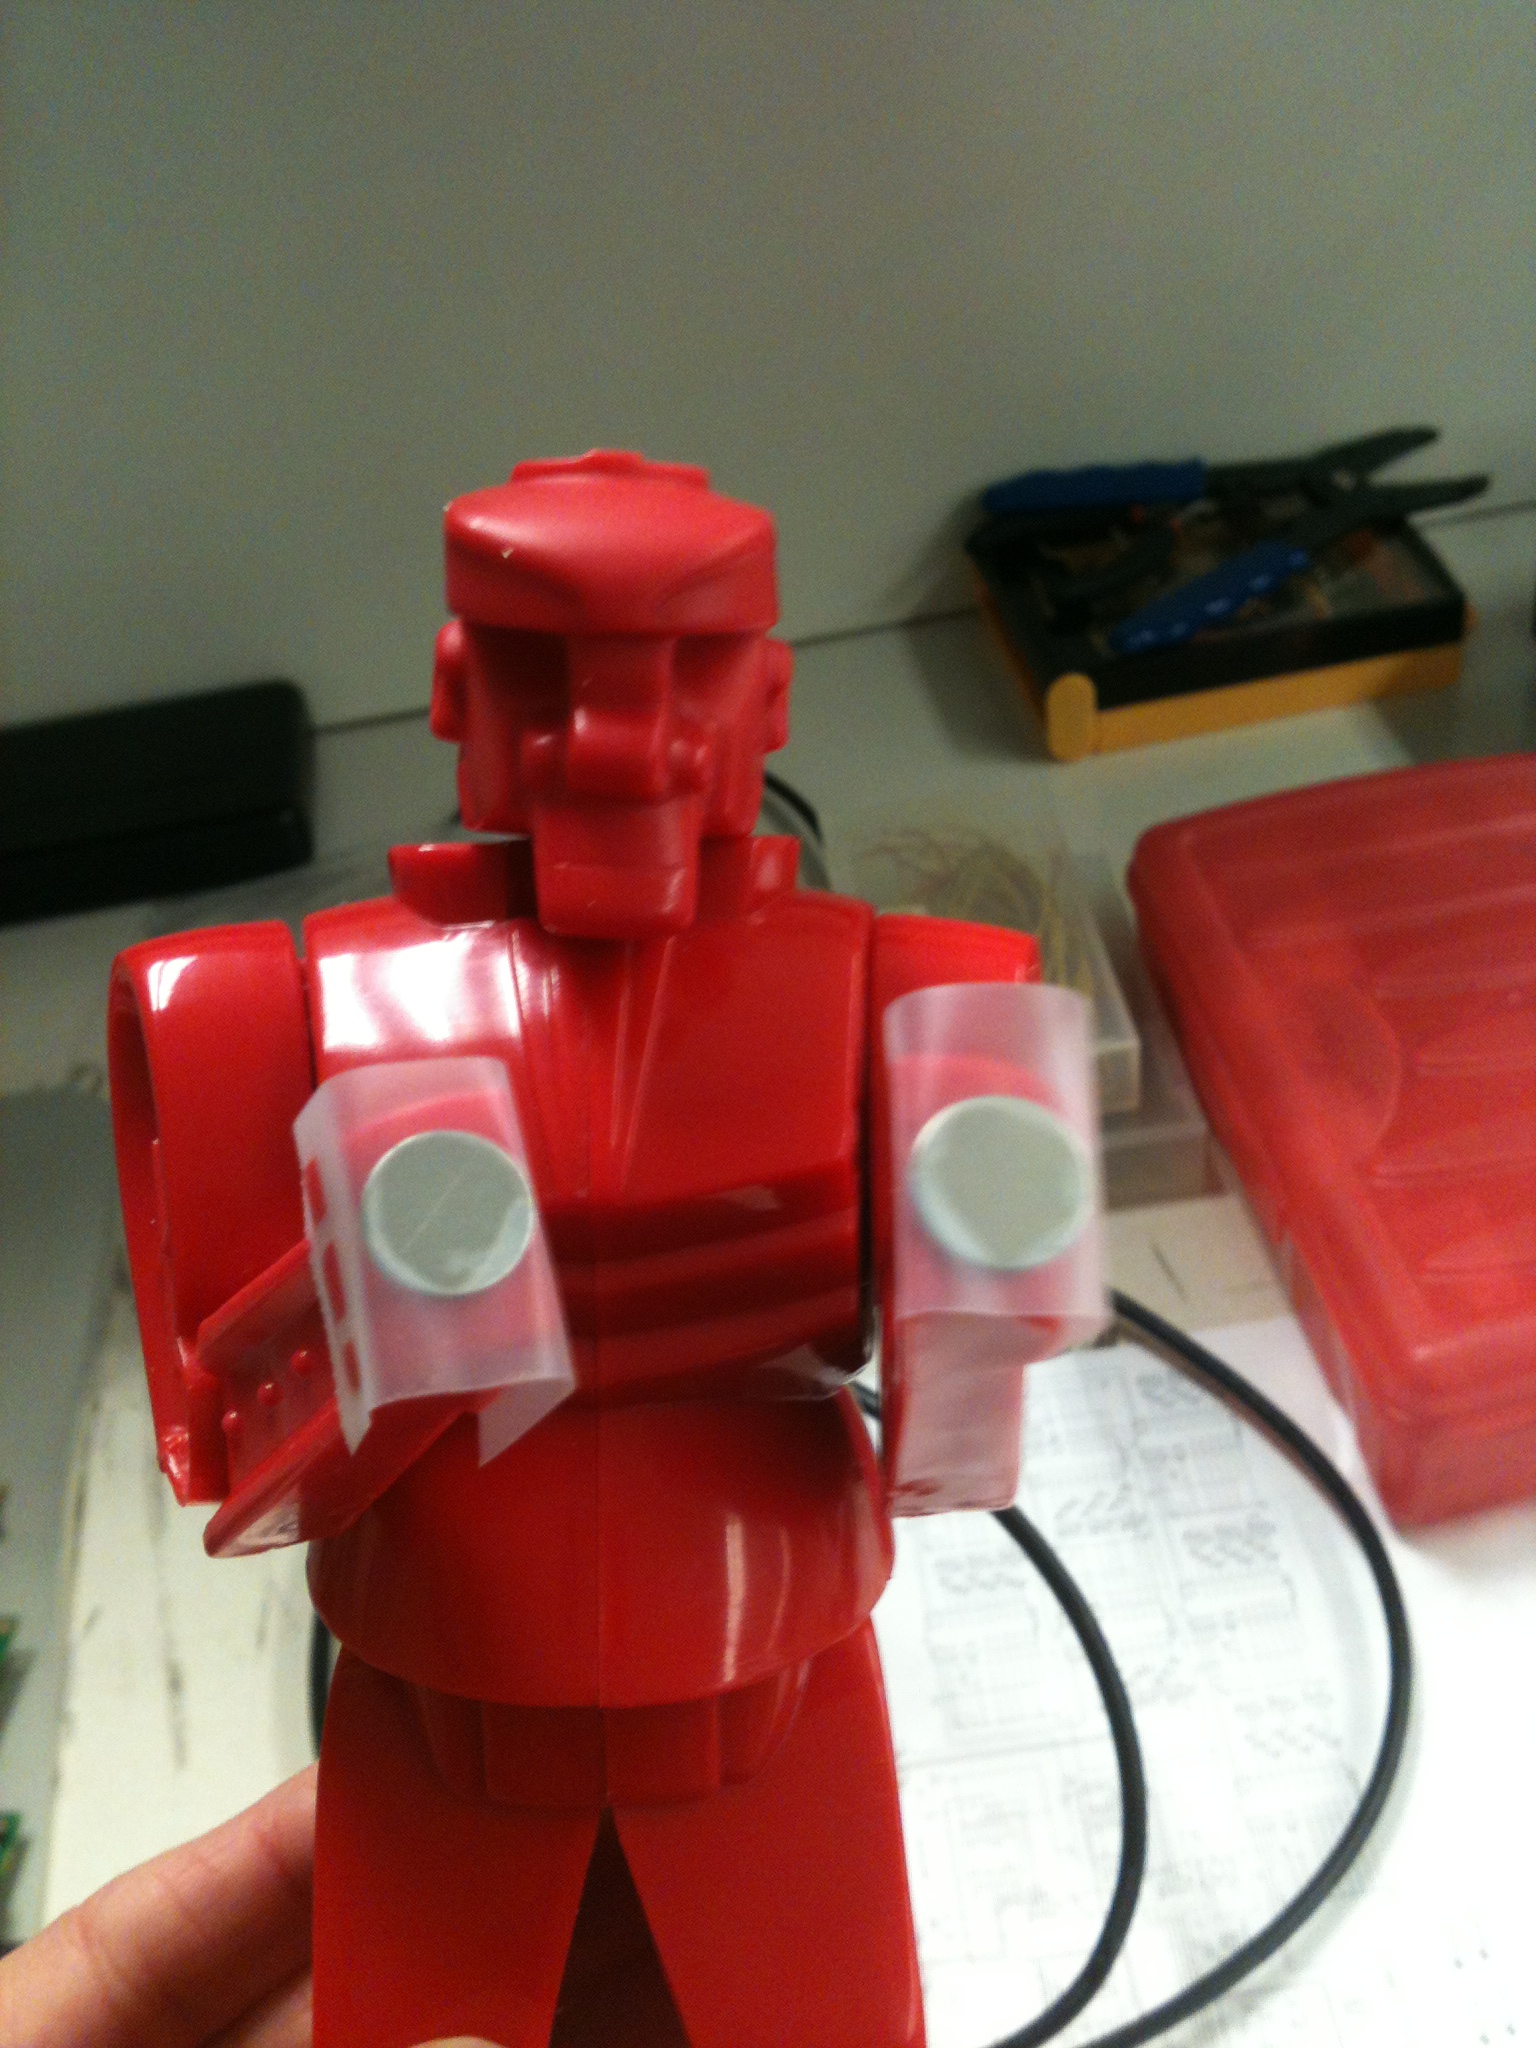
I tested how magnets would work with the hall effect sensors using what I believe was Team 3's test circuit for their protoboard. We found
that you have to have the magnets fairly close to the sensors to register anything, which will help us be more accurate in defining what
is a hit and what isn't.
We discussed a couple of options for where to put the hall effect sensors on the robot now that we know more about how it works. We will
probably run wires up through the inside of each robot and attach the sensors on the inside of the chest area. I taped the magnets to one
robot's hands to see if the magnets, which were fairly strong, would interfere with each other and prevent the robot from punching freely.
They do not. We only had one robot in the lab when I tested this, so we will bring the second robot in next time we are there to make sure
one robot's hands do not get stuck to the other's while punching each other.
WEEK 09 SUMMARY
Accomplishments: We finally had a breakthrough with making the microcontroller code work. We also made lots of little
breakthroughs on getting parts wired up and working, and felt confident going into spring break.
Weekly Work Total: 9 hours
Project Work Total: 79 hours
Week 10
WEEK 10 SUMMARY
Accomplishments: Spring Break
Weekly Work Total: 0 hours
Project Work Total: 79 hours
Week 11
March 17, 2013 (3 hours):
I added code to the Kinect software to register player movements left and right. A center/neutral position is defined as wherever the user
is when they are first calibrated, so the user should get to their preferred playing area quickly, or I'll add in code to "learn" a new
center position if this seems to become a problem. The robots will be moved in discrete distances, so I needed to define what is a left
movement and what is a right movement, and not worry about how far the user actually moved from their center. This is done by setting a
tolerance on what is considered center, and anything outside of that is either left or right. The tolerance is set so that movement of a
player's torso will be enough to trigger a move, no side to side steps are necessary. The torso is what's being tracked for positioning data.
Just moving the torso would make it easier to come back to center than moving the whole body, and would limit the physical interference with
the other players. The tolerance level needs to be tested more with people of different body types. I am fairly petite, and the movements
that I think are large may seem small to someone who is much larger than me. I am also fairly physically mobile, so even though I find it
easy to move my torso to the positions required without moving my feet, it may be difficult for someone of more limited mobility. After
testing this with a few more people to see their opinions I should have a widely acceptable tolerance and method of playing determined.
If the player is centered, and then shifts to a direction, a signal should be sent to the microcontroller to tell it to tell the motor
corresponding to the user's robot to move in that direction. That signal hasn't been created yet, but is simulated through print statements.
Currently there is a bit of jitter with small movements, by which I mean that sometimes if I barely move while holding in a position, it will
trigger a move signal. I will need to test this more to nail down what the problem is.
March 18, 2013 (2 hours):
I tried debugging the Kinect dodging code to see why sometimes when a user is standing still, the software will register left and right
movements. After much testing, I could not find a way to consistently reproduce this behavior. I extended the tolerance bounds that I
mentioned in my last entry to require users to take very large steps to identify as a movement left or right, and even then, standing in the
very center there will sometimes be this bizarre behavior. From a skeleton tracking standpoint, this means that NITE's software is saying
that the user's torso point that it tracks is actually one large step to the either direction. As I'm writing this, I realized that when I've
worked with some of NITE's sample projects that display the user's skeleton stick figure on top of a video feed from the Kinect, I noticed
that sometimes it will appear to lose track of a user's body. It doesn't think it has fully lost a user, but the skeleton can sometimes appear
vastly different from what the body is actually doing. This has typically been due to interference from other people or objects in the playing
area. The next time I get a chance, I will test this in an open area the size that the Kinect specifies should be clear of other objects,
and see if I can get this behavior at all.
I also briefly had Tom test what I have done to get his opinions on the movements required to dodge from a user standpoint, as well as his
opinions on my thoughts for what signals need to be sent to the microcontroller, which I outlined in my last entry. He suggested a smaller
tolerance to require less movement, and agreed with me on sending what user and what direction to the microcontroller.
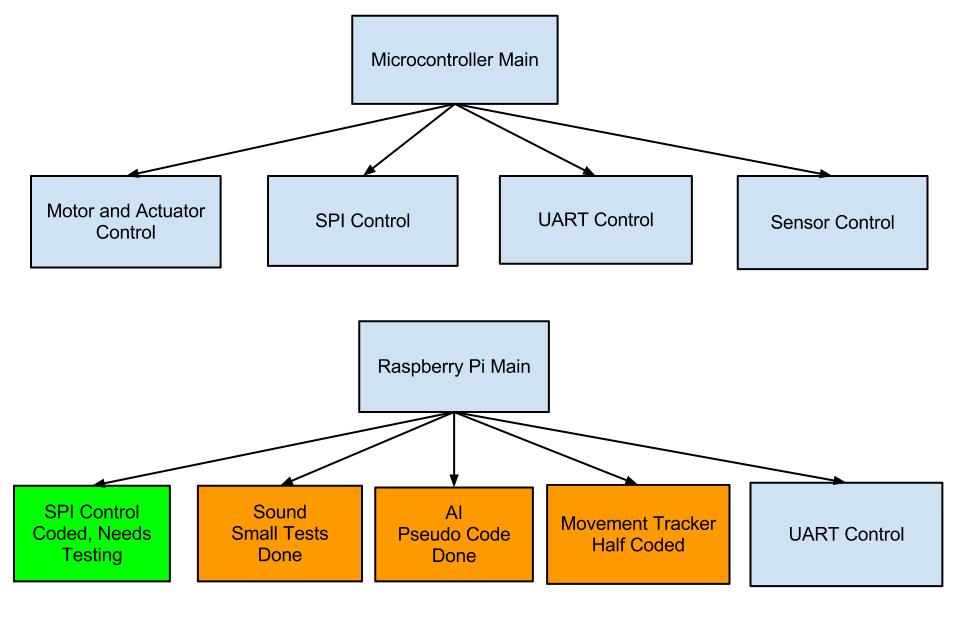
March 19, 2013 (5.5 hours):
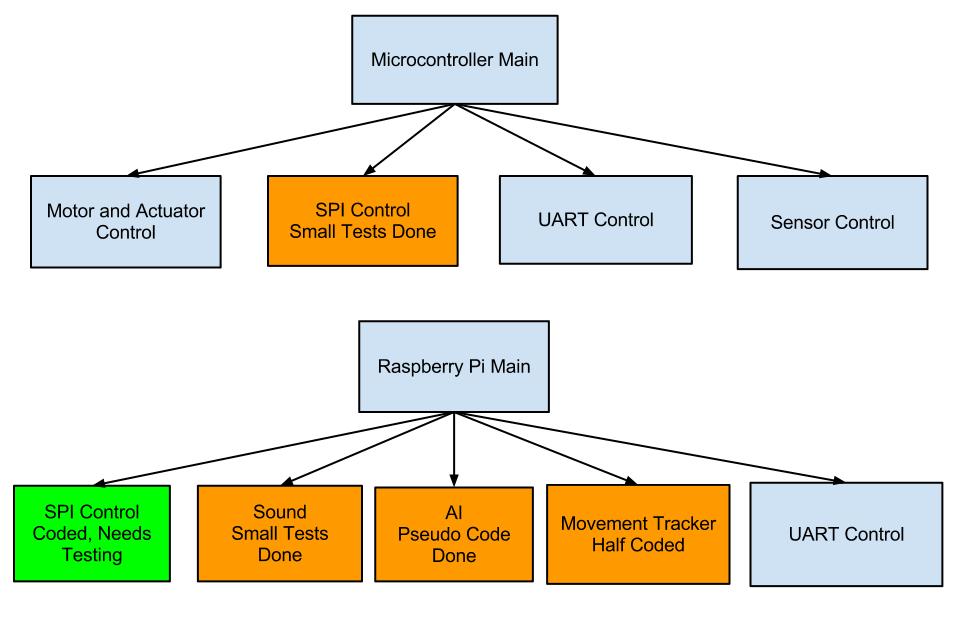
Today was mainly spent working on the software design narrative presentation, creating a software oriented block diagram, and creating a
software hierarchy diagram. I also put my Kinect software code on the Github folder Tom has set up to share our code.
I assisted Tom with installing OpenNI on the Raspberry Pi using the instructions I had made from when I installed it on my Windows laptop. We
ran into the usual hiccups one encounters when using technology that's as new as the Pi is, but thanks to hobbyists who like to keep blogs
about their projects and specifically what they did, we got it installed. Next will be installing the PrimeSense SensorKinect drivers and
ensuring that a sample program will run.
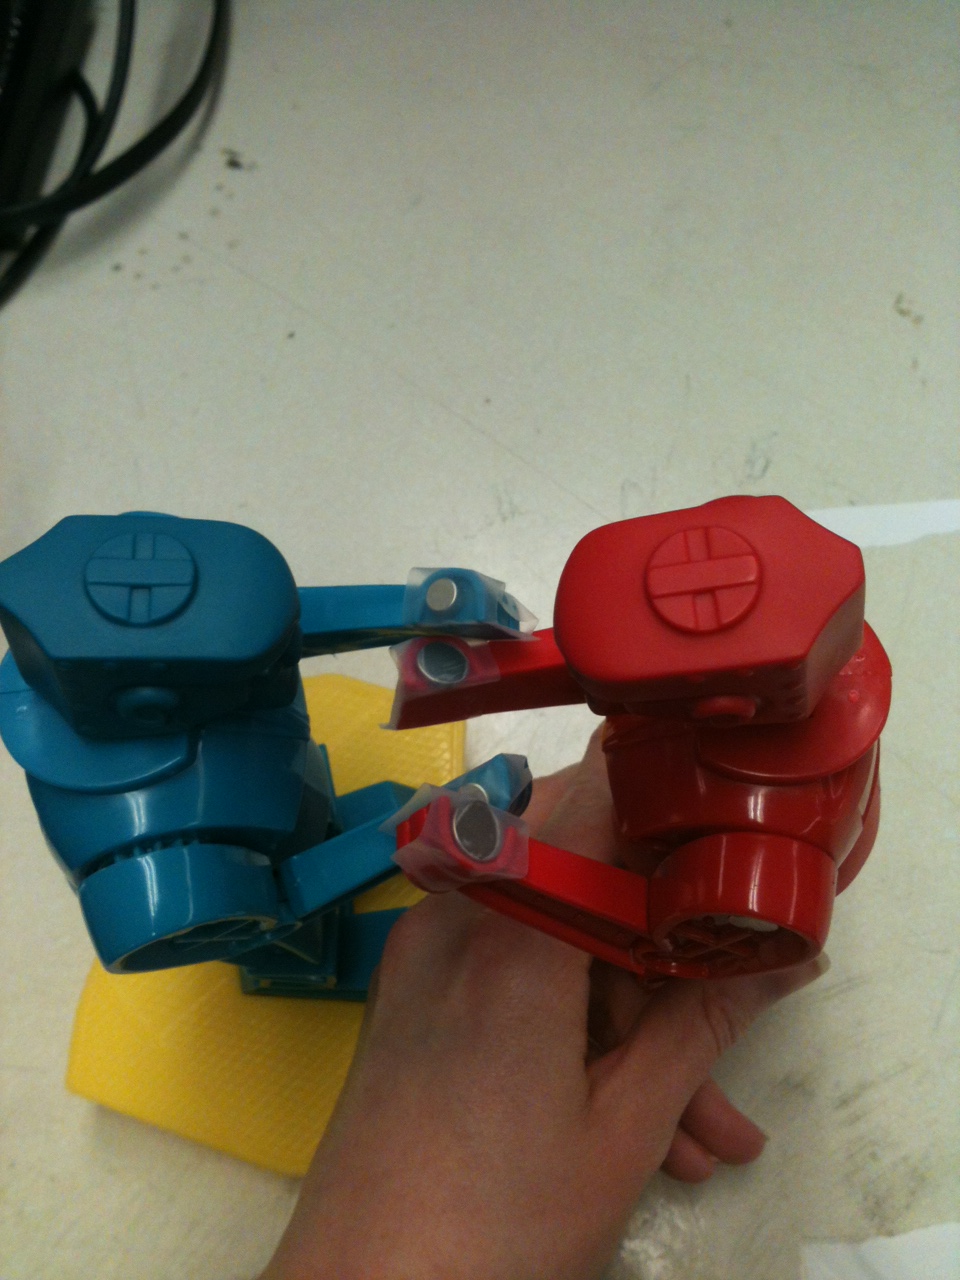
We brought the second robot to the lab to test how the magnets on the hands would work together. Unfortunately, they stuck together. We
experimented with a few different configurations of where to place the magnets on the hands and found one or two that might work. We need to
have a hall effect prototype circuit to test with these potential magnet placements to see which one of them would work.
March 21, 2013 (7 hours):
Today I completed the Software Design Narrative, modified our software flowchart into a flowchart of the main programs that will run on the
microcontroller and the Raspberry Pi, and updated the software hierarchy diagram to reflect progress since March 19. Since I've been talking
about the issue of magnets on the robot, I will also mention that Duncan had the brilliant idea to put the magnets on the chest of the robot
and the hall effect sensors in the hands. This way the magnets won't interfere with each other or the movement of the hands.
Tom and I tried to run one of the OpenNI sample programs through the Raspberry Pi, but ran into issues. When I installed OpenNI onto my
computer, it came with the programs already compiled and built. All I needed to do was run the .exe it had provided. In the case of the Pi, the
programs were not compiled or built. All that we were provided with was the source code. I tried putting the .exe I had built on my computer
for our Kinect software onto the Pi in the long shot that it would work regardless of the architecture, but with no luck. I think I should be
able to build the software for the ARM architecture (which is what the Pi is) and put the executable on the Pi instead of having to put all of
the libraries on the Pi and compile and build it there. I will look into this more next week.
WEEK 11 SUMMARY
Accomplishments: Software Design Narrative presentation and paper, much more organization of our software structure,
movement tracker's new dodge capability, begin putting Kinect drivers and software on Pi.
Weekly Work Total: 17.5 hours
Project Work Total: 96.5 hours
Week 12
March 24, 2013 (4.5 hours):
I spent today attempting to run a sample OpenNI program on the Raspberry Pi, and while I made lots of progress, we have hit what could be a
major roadblock. First, I looked around in the software that Tom put on the Pi to see what all was there, and I found the executables for the
samples that we somehow missed in openni/openni_rpi/Platform/Linux/Redist/OpenNI-Bin-Dev-Linux-Arm-v1.5.4.0/Samples/Bin/Arm-Debug, as well as
openni/openni_rpi/Platform/Linux/Bin/Arm-Release. I tried running Sample-NiSimpleSkeleton, and got the error "One or more of the following nodes
could not be enumerated: Device: PrimeSense/SensorV2/5.1.2.1: The device is not connected!" A post by hitcher404 in
http://www.raspberrypi.org/phpBB3/viewtopic.php?f=37&t=4530&start=75
suggested to try running niLicense PrimeSense 0KOIk2JeIBYClPWVnMoRKn5cdY4= to register the device. I checked on my local computer, and that
exact license key was used, though I think it was setup automatically for me when I installed PrimeSense drivers. On the Pi, there was no
license key registered. After running niLicense, nothing changed, though I believe it was a necessary step. Just to be sure, I moved the Kinect
to the other USB port on the Pi, but that didn't change anything. In looking at the directions Tom followed at
https://gist.github.com/jvcleave/4355551, it is not clear what exactly he used for the
OpenNI code or the drivers. I uninstalled the drivers Tom installed and got avin2's SensorKinect drivers like I installed on my Windows PC.
During this I had a build error about VFP registers, and fixed it with directions by theunit from
http://www.raspberrypi.org/phpBB3/viewtopic.php?p=115695#p115695,
except hard instead of softfp. Next I got the error "Open failed: Failed to set USB interface." A lot of different forum posts said this was
because of the gspca_kinect module, and the solution was to sudo rmmod gspca_kinect. I might need to blacklist it if it becomes a problem again.
Next I got the error "Open failed: USB interface is not supported!" This was fixed by going into /usr/etc/primesense/GlobalDefaultsKinect.ini
and changing UsbInterface=2 to =1. Now when running Sample-NiSimpleSkeleton, I get the error Find user generator failed: Can't create any node
of the requested type! I believe this means we need to install NITE, so it is an acceptable error for now. When running Sample-NiSimpleRead,
I get the error "UpdateData failed: A timeout has occurred when waiting for new data!" This error seems to have most people stumped on the forums
I have been on. There might be a bottleneck in the USB drivers where the Pi can't handle the frame rate or size that the Kinect is sending.
I will look into this problem further and any alternatives to software during this week as my top priority.
March 26, 2013 (4 hours):
I looked into several different options of what we can do to move past this issue with the Kinect not working with the Raspberry Pi. First I did
more research into the Pi's USB drivers to see if there was anyone who had figured out how to get around the bottleneck. After much searching
through Raspberry Pi forum posts, I deem it impossible to connect the Kinect to the Pi in the timeframe we have. There seem to be lots of issues
with the USB portion of the Raspberry Pi, both on the hardware and driver sides. Even though the issues were found nearly a year ago, they haven't
been fixed because the Pi is funded through a charity and improvements like this are not a priority. As for the specific issue, I think that the
Kinect transfers data in isosynchronous mode, and the Pi USB drivers just don't handle that mode well, if at all. The default transfer mode for
the Pi might be bulk. Before this problem, I was getting an error about the USB interface not being supported, and I changed a value in the driver
configuration that made it isosynchronous instead of bulk transfer mode, and that error went away. I think that error was a mismatch in the Pi
expecting bulk and the Kinect providing isosynchronous, so after I switched the Pi over, it was satisfied, though it doesn't matter in the end
because the Pi doesn't do that mode. Some people think it might be a bandwidth issue with the transfer frame rate from the Kinect being too high,
but then others say the bandwidth should be perfectly fine and have even tried messing with the transfer frame rate and gotten no change in results.
In the end it's sounding like a Pi issue that's a big roadblock for our plans. Two last ditch efforts that I will look into tomorrow is using a
powered USB hub to connect the Kinect to the Pi, and using the OpenKinect libfreenect software instead of taking the OpenNI route. I don't have much
faith that either of those two efforts will solve a problem that seems based in the USB drivers on the Pi.
Tom and I discussed a few options on what to do from here to get a working project, hopefully keeping costs down and salvaging as much of the
work that we have done so far.
1. Run the Kinect software on my Windows PC where we know it works and send signals to the Pi in a manner we know it can handle. This might seem
clunky to have the Kinect, a computer, speakers, and our arena containing the PCB, all with their own power supplies, but we were thinking of sort
of marketing it like the computer is your game console along with the Kinect, and when you buy the game, it comes with both the arena and the software
to put in and play. This option is my personal favorite because it lets us keep all of the work we've done so far, and the only change is finding a
reliable way to communicate between the PC and the Pi.
2. Use the Asus Xtion instead of the Kinect. In my research I've found people with documented success on the Pi and same software using the Xtion.
I haven't been able to find anything about what usb transfer mode the Xtion uses to see if it's bulk, but not finding anything on the matter might be
better than finding endless pages of Google results for "Kinect usb transfer not working". It may be as blessedly simple as switching out the hardware,
because I believe the software is still compatible. However, the Xtion is over $100, plus whatever shipping costs we would incur when we want to get
it here soon enough to test and see if it works.
3. Switch out the Raspberry Pi for a motherboard that we know could handle this. This would incur another cost and time in getting it, and would likely
throw out all of Tom's work on software for the Pi unless they are compatible.
4. Use Nintendo Wii Remotes instead of the Kinect. We haven't thought much about this yet, but we could likely use them to communicate over WiFi.
This would throw out all of my work on the Kinect, though we have Wii Remotes to use so it would not incur any additional cost.
Needing further input, I emailed George all of this to get his opinion on what would be the best option.
March 27, 2013 (2.5 hours):
First I tackled the question of if a powered USB hub would help us connect the Kinect and Raspberry Pi. I looked up what problems people have had that were
solved with using a powered USB hub, as well as information about the cable we are using to connect the two to determine if it is in fact a powered USB hub
already. All of the issues that people encountered that were fixed with a powered USB hub were very obvious, and we are having none of them. The cable also
appears to be a powered USB hub, so this is not a solution to our problem.
Tom and I researched into a different motherboard that we could use with the Kinect, and found that people have widely documented success using an Arduino.
We also looked more into using Wii Remotes via WiFi with the Pi, and that actually looks easier than using the Kinect. We're keeping both options open for now.
March 30, 2013 (3 hours):
I did more detailed research into how we would make the Wii Remotes work. First was finding what was the most reliable Bluetooth dongle to use to communicate
between the Wii Remote and the Raspberry Pi. In the end, we settled on the Sabrent BT-USBT Bluetooth Dongle. I found someone's blog who detailed exactly how
they got everything working with the Pi along with a video of it working at
http://www.brianhensley.net/2012/08/wii-controller-raspberry-pi-python.html.
We also found a list of "verified peripherals" for the Raspberry Pi that listed the Sabrent as a good Bluetooth Dongle. I'm not exactly sure where this information
came from. It may have even been based on the fact that the guy in that blog I found got it to work. With both of those sources, we felt ok to go ahead and
order it, and we will test it out when it gets in on Wednesday.
One thing I wanted to get straight in my head was how the players would use the WiiMotes so I could know what sorts of inputs from the WiiMotes I'd need
to be looking for. I know there is a Wii Sports Boxing game, so I looked up some videos of people playing it. In the game, you're able punch with both hands
using the remote and nunchuck.
This site had a detailed video explaining that gameplay.
Players can also dodge by holding the remote and nunchuck vertical and moving them side to side. This is still the same general
idea we had for our gameplay, and I'm glad to know that the WiiMotes have the functionality for it. We should be able to use the WiiMote and the nunchuck for
one player and not have to use two WiiMotes per player.
I started looking into what sort of software people used to grab the WiiMote's data. Since the Wii has been out since 2006, there are a lot of options,
some of which are really abstracted, which may make it super easy for us. The Kinect software has only been hacked in the past 2 years, so our options were
limited and the software wasn't very easy to work with.
This site has software that lets you easily map Wii Remote controls
to mouse and keyboard controls for people to use the Wii for controlling their computer. One idea we could do with this is to listen for the keyboard data
and decode those into the commands we'll send to the microcontroller. This would be much simpler than the super detailed movement tracker software that we had
to work with the Kinect, which is good considering the amount of time we have now to salvage this. I'll look into a few more software ideas before making a
decision, and hopefully have one solid idea ready to test with the Bluetooth dongle when it comes in on Wednesday.
WEEK 12 SUMMARY
Accomplishments: We ran into a major roadblock with the Kinect software and the Raspberry Pi's USB drivers not being compatible. We
have hopefully found a good solution with the Wii Remotes.
Weekly Work Total: 14 hours
Project Work Total: 110.5 hours
Week 13
April 1, 2013 (4 hours):
I did detailed research into exactly how we would connect the Wii remotes to the Raspberry Pi via Bluetooth, which I will compile tomorrow into a test script
to be run as soon as the Bluetooth dongle gets in (hopefully Wednesday). Most people who have done this sort of project use the
Cwiid library, so there are lots of sources for example code out there which we can make extensive use of.
I found a couple good sources of code at this blog detailing setting up
Bluetooth and connecting the Wii on the Raspberry Pi, also using Cwiid, and this site for connecting and gathering
input from two WiiMotes. Most people who hack WiiMotes usually aren't making multiplayer games, so it was a bit difficult to find any confirmation that it was
possible, but I'm confident that both the Bluetooth + Pi side and the Cwiid software side support two WiiMotes. I will need to create a startup script for the
Pi that will start the Bluetooth and scan for WiiMotes, which I can hopefully base off of the two sources I mentioned above. Those sources also had code for
getting accelerometer and button data from the WiiMotes, so I hope that will adapt easily and quickly to make up for lost time.
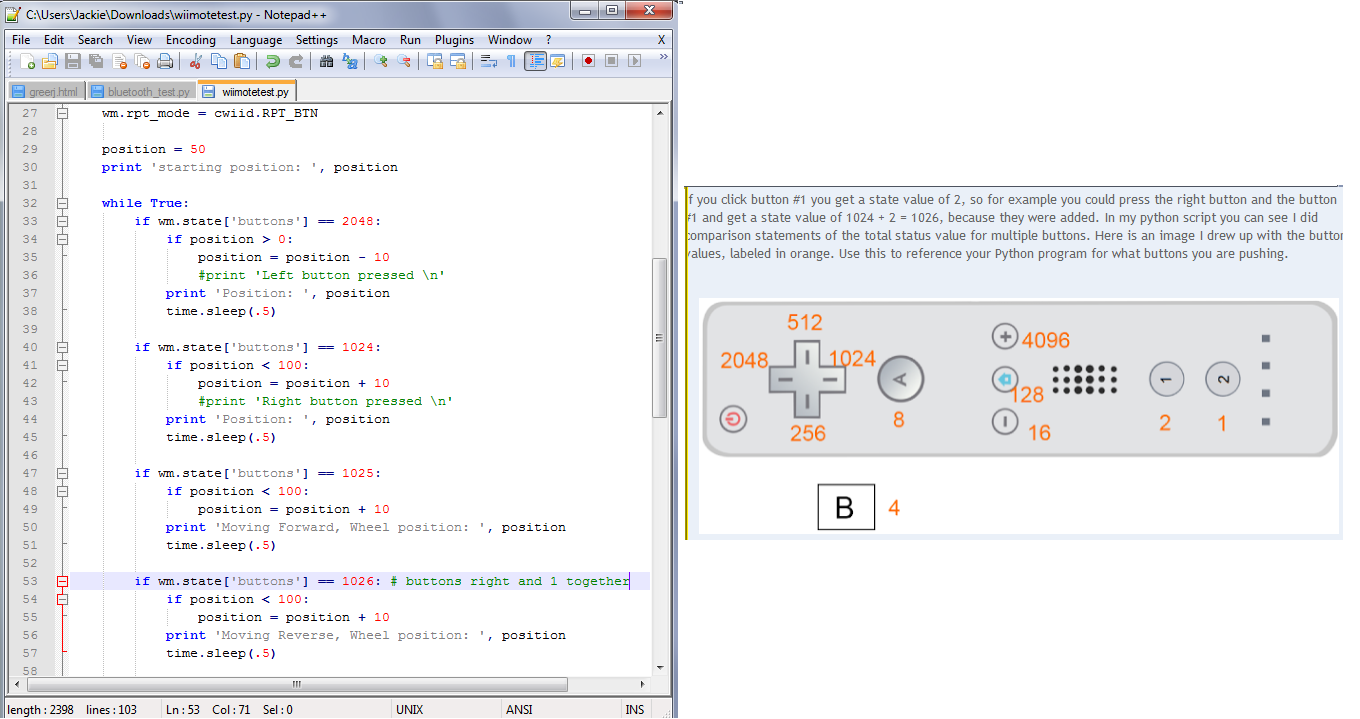
Example button mapping code from Brian Hensley's blog
April 2, 2013 (4.5 hours):
Three python scripts were developed to test connecting WiiMotes to the Raspberry Pi via Bluetooth based on my research from yesterday,
bluetooth_test.py,
connect2wiis_test.py, and
accel_nunchuck_test.py.
These haven't been tested, but will be tomorrow when the Bluetooth dongle comes in. The first tests if one WiiMote can connect to the Pi by pressing the 1 and 2
buttons on the WiiMote simultaneously, and if it connects, the WiiMote will rumble and the Player 1 LED will turn on. The second tests the same thing, but for two
WiiMotes. The third isn't fully developed yet, but when finished, it will test what sort of output the Cwiid software gives when buttons are pressed, the WiiMote is
tilted or moved, or the Nunchuck attachment is tilted or moved. That third test will give me the baselines for what I have to work with for developing the actual
game code. These tests were all developed based off of the information found in the links given in my last entry.
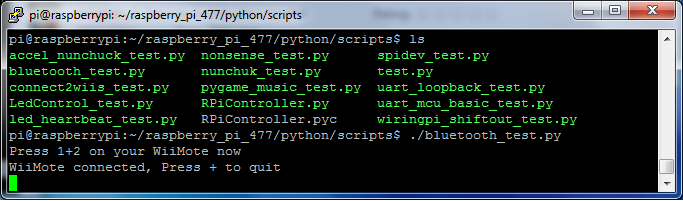
April 3, 2013 (3 hours):
Today the Bluetooth dongle came in, so I began work on testing it and the scripts I wrote yesterday. The progress in this area of our project moved
forward more in these 3 hours than it has in the last 3 weeks, and now I am definitely convinced the switch to WiiMotes is the right way to go.
The Bluetooth module was already installed on the Raspberry Pi thanks to Tom. Following the Bluetooth setup instructions found at the oft-referenced
Brian's blog, I plugged the dongle into the Pi and did
"sudo service bluetooth status" which gave me "[ ok ] bluetooth is running." This means that we can just startup the Pi and not have to specifically
start up bluetooth. Doing "hcitool scan" displays "Scanning..." and when I hold down the 1 and 2 buttons on the WiiMote, making it
discoverable, it displays the MAC addresses of the WiiMotes. The black WiiMote we have has MAC addr "E0:E7:51:BB:18:58" and the blue WiiMote has
MAC addr "E0:E7:51:B4:FC:F6".
While running bluetooth_test.py, I discovered that you have to try to connect to a WiiMote a few times before it will work sometimes. I changed
the test to try 10 times before it gives up, giving the user some time to press 1+2 on their WiiMote as well. Also, hardcoding in the MAC addr of the
WiiMotes speeds up the connection time to something very reasonable. If we were turning this into a full fledged product, we'd need a way to register
users WiiMotes in this manner, but for now doing this will be acceptable. It will also be an easy way to determine which user corresponds to which
robot. The blue WiiMote will be the blue robot, and the black robot will be the red robot. My connect2wiis_test.py script also works after I made
the changes I learned from bluetooth_test.py, proving that 2 WiiMotes can successfully be connected at the same time. Next I will be working with the
buttons to make sure I can use them for menu selections and the accelerometers in the WiiMote and nunchuck to punch and dodge.

April 4, 2013 (1.5 hours):
Today further development and testing was done on the WiiMotes software, specifically accel_nunchuck_test.py. I learned that the "button" state that
the WiiMote reports is changed while a button is being held down, and so I had to modify my code to register just the first instance of this change
as what I will use as a signal to the micro when a button is pressed, so that I don't have 20 or so signals for one button press. Buttons are very easy
to reference in this manner, and implementing the menu code should not present any technical problem, I just need to code it.
This also applies to the accelerometer states, since we need a clear "dodge right," "dodge left" style of signal to the micro. I identified a general
center position and played with the boundaries of what should be considered a dodge. One thing to note for the users is that you must move clearly
and quickly. I was able to slowly move my WiiMote to the right without triggering a "dodge right" because the accelerometer takes acceleration into
account rather than position. Next I will be doing more experimenting with the accelerometers to learn more about the coordinate plane that the Wii
uses and how to best take advantage of it, making sure those same principles apply to the nunchuck's accelerometers, and likely a few days from now,
patching a simple test into Tom's code that communicates between the Pi and micro to send a signal when I press a button on the Pi.
WEEK 13 SUMMARY
Accomplishments: Connected 2 WiiMotes with the Raspberry Pi simultaneously, grabbed button data and some accelerometer data from the WiiMote.
Weekly Work Total: 13 hours
Project Work Total: 123.5 hours
Week 14
April 7, 2013 (4 hours):
Began work on the environmental and ethical impacts homework. Did research for, outlined, and finished 2/3 of the environmental impacts section.
April 8, 2013 (3 hours):
Did more experimenting with how to use the accelerometer data to get dodging and punching movements. I learned that the data it outputs isn't coordinates
for positioning, it's acceleration relative to the Earth's gravity, which should really have been a bit more obvious seeing that it's called an accelerometer.
I'm unfamiliar with the mechanical workings of accelerometers, so I didn't think it should be difficult for it to notice what direction the force came from
and give a sign as well as magnitude, but apparently it is. One thing that was successful today was that I determined I just need to plug in the nunchuk and I
can get the data from it, I don't need any fancy plugins.
Also finished environmental impact section of the homework due Friday and started creating the presentation for Wednesday.
April 9, 2013 (6.5 hours):
I did some research into how I can get the WiiMote to detect a left and right movement for dodges. It seems that most people have to use the Wii
sensor bar to get positioning, or use the new Motion Plus. If this is the case for us, I would prefer to use the Motion Plus to have more of the
focus in software and add less hardware components at this stage in the semester. Cwiid yields Motion Plus outputs in 3 angular rates in rad/sec.
Assuming that even this is enough to determine a left or right tilt, this could be used to sense if the user tilts the WiiMote to the left or right,
corresponding to a left or right dodge. This seems a bit complicated though, and I still don't understand why I can't determine direction along
with magnitude of the accelerometer output. I hunted down the accelerometer IC that is in the Wii, and according to its
data sheet, page 11 states that "Phase-sensitive demodulation
techniques are then used to determine the magnitude and direction of the acceleration." So they do output direction, and cwiid must do away with
it for some reason. I just need to determine if there is an acceleration impulse in the X plane and if it's in the +X or -X direction. I don't need
to know the exact angle of the remote, and in fact that seems rather limiting to assume that a player will tilt the WiiMote and not keep it vertical.
I plan to track down how cwiid gets the accelerometer data and see if changing that is easier than taking the Motion Plus route.
I switched gears from dodging to punching. This only requires detecting an acceleration impulse in the Y plane, technically in the +Y direction.
This proved to be much easier than dodging, and I have code written to detect left and right punches for one WiiMote in
accel_nunchuck_test.py. This used
the accelerometer in the WiiMote for the right hand and the nunchuk for the left hand. I need to tell the user that the WiiMote is held in the
right hand and the nunchuk in the left hand to translate to robot movements, since there is no way to determine relative positioning of the two
while being held by the user. There is a very brief calibration period, but the user doesn't need to be holding it, it may be resting on a table.
This may change based on whatever I do for dodging however, and it may be required to not be moving. I need to test that and also to see if this
is actually sensitive to direction. The sensitivity for how much force is required to trigger a punch action was tested by myself, Tom, and Duncan,
and they all confirmed it felt natural.
I also began a new test for a cleaner way of dealing with two wiimotes so I don't have to have a duplicate of the entire code I've written so
far, which is good coding practice. I also finished the presentation for tomorrow over the environmental impact of our project.
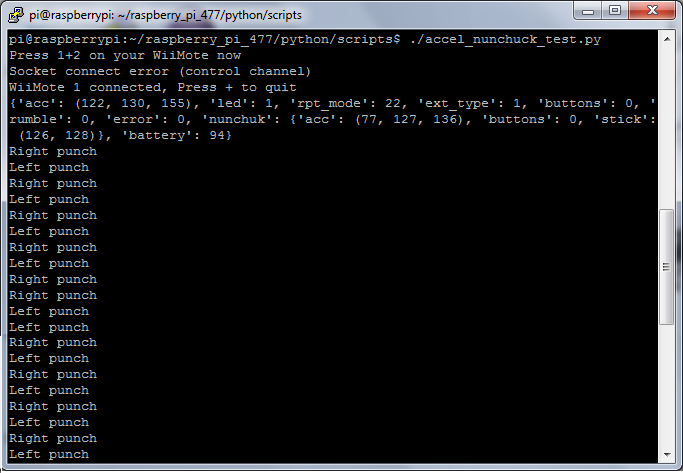
Left and Right Punching Success!
April 10, 2013 (2.5 hours):
I finished the Environmental and Ethical Impact Analysis that is due Friday. All that's left is to proofread it and fully cite the references I used.
April 11, 2013 (5.5 hours):
A lot of progress was made today on the software side. I synced up with Tom to combine what I have been doing with Wii software with what he has
been doing with the main Raspberry Pi and microcontroller code. I added WiiMote connection and calibration code and a function to poll buttons for menus to
RPiController.py. We worked out in detail
what needs to happen when for the beginning of the game, right after you turn it on. The microcontroller will start up, wait to hear that the Pi
software has started, and then prompt the user to press 1+2 on the black remote for connecting the 1st player - the red robot. The Pi software
will connect and calibrate the WiiMote, then go into the phase where the 1st player can select 1 or 2 player mode. The Pi will poll buttons for
the menu until the microcontroller sends back the mode decision. If 1 player mode is selected, the AI will be initialized, which hasn't been coded
yet. If 2 player mode is selected, the 2nd WiiMote will be connected and calibrated. Then the Pi will go into the music selection phase. It will
poll buttons on both WiiMotes until the microcontroller sends back the decision of what song. The Pi will then play that song. At the end of today,
we successfully played through the startup all the way through hearing a song played. This is probably about 1/3 of the code completely done here.
I determined that the punching code does not just detect a forward impulse, but a backwards one. If you flick the WiiMote forward and then backward
with equal force, it will detect two punches. However, we didn't see this when I tested it two days ago because the nature of how people punch.
A punch forward typically has much more force than the the action of bringing your hand back close to your chest. Therefore I wouldn't classify this
as a big problem, and is probably passable for a prototype. If I can make cwiid work the way I think it should when I figure out dodges, this could
be fixed, but if not, it's ok.
Also, I finished and submitted the paper due Friday.
WEEK 14 SUMMARY
Accomplishments: Environmental and Ethical Impact presentation and paper, successfully got punches to work with the WiiMote, and
integrated my work into the main Raspberry Pi code to get through all of the startup code.
Weekly Work Total: 21.5 hours
Project Work Total: 145 hours
Week 15
April 15, 2013 (4 hours):
I started experimenting with the MotionPlus gyroscope to use for dodging. This is only in the WiiMote, not the nunchuk, so dodging will only be done
with the right hand. The gyroscope does return values that I can use to differentiate between left and right, which makes it better than the
accelerometer already. It doesn't detect relative position however, just direction based on its current position. I'm having some trouble with the
logic that differentiates between the different positions, so I'll take a fresh look at it tomorrow. I also added functionality for polling punches
and AI to the main Raspberry Pi code. The AI will simply loop through a list of punches or dodges to simulate user input, so the microcontroller won't
know the difference. The main loop in the Pi code will control how often to poll the AI.
April 16, 2013 (4 hours):
Dodging is nearly complete as of today. Because of the sensitivity of the accelerometers, players will need to keep their WiiMotes fairly upright to
ensure proper operation. Otherwise, the Wii software will detect dodge movements where there are none. I had to mix using the gyroscope to detect left
and right movements and the accelerometer to detect if the WiiMote is "centered," which is when it's vertical. The accelerometer can be affected by the
tilt forward or backward of the WiiMote, so if not kept in the proper alignment, the software could detect a non-centered position. There were quite a
few tolerance values that were guessed at and are slowly being narrowed down, so perhaps with further tuning, this could be better. Currently, it works
to some degree, so we're going to take this for now and come back later once other crucial things are completed.
April 17, 2013 (4 hours):
We had a major accomplishment today. Tom and Mark got the actuators working through the H-bridges, so Tom added that to the micro code. That along with
my WiiMote punching code came together and now the robot will punch when you punch with the WiiMote! All of the startup code woks as described in a
previous entry, and now once you choose a song, the song begins playing, and 5 seconds later, the round starts and players can punch.
I also finished implementing code for dodging and added it to the main Raspberry Pi code. Instead of having the player tilt his/her torso from side
to side to dodge, causing the WiiMote to tilt side to side, we're going to be using the joystick. I've been struggling for a while to get dodging working,
and after finally figuring out how to use the MotionPlus last night to some degree, I ran into another major issue that was the last straw for dodging in
this manner. When I put together punching and dodging, my program wouldn't even run. The nunchuk usually plugs into the bottom of the WiiMote. When using
the MotionPlus, the nunchuk plugs into the MotionPlus, which then plugs into the WiiMote. It turns out that this means that the WiiMote references both
the MotionPlus and nunchuk with the same I2C address, and when using both, it interleaves the data. Because cwiid is basically someone's hobby code that
was reverse engineered, the option to interleave the data isn't there. The only way to get around this problem is to enable cwiid to read the MotionPlus
data for dodging and disable it while reading data from the nunchuk. However, this requires us to wait 0.2 seconds every time we enable or disable, which
ended up being extremely noticeable from the user's point of view. After talking to all of my teammates on their opinion of just switching to using the
joystick for dodging, they all agreed that they were perfectly ok with it. It takes a tiny bit away from the experience, it's acceptable, and at this point
in the game, something that works is all we really need. 10 mintues later, we had dodging code that works cleaner than what I had last night.
I also created a rough draft of our poster to be finished tomorrow with some pictures of our completed packaging.
April 18, 2013 (5 hours):
I improved our AI by coding in variable punching speed and adding dodges at intervals that might seem random during gameplay. The code essentially cycles
through a list of punch commands, the frequency of which is controlled by one speed out of a list of speeds, which themselves are cycled through. The
dodges are the same distance apart from each other, but with the punches changing so frequently, these will also seem a bit random. It's a practice mode,
so the AI doesn't need to be too complicated, so this will probably be the end of development on the AI code. The speeds might be adjusted based on results
that we get from testing with the actual robots if they end up punching too fast or slow.
Other things that were done: finished the poster, made skeletons on Google Docs for all of the final documents for maximum collaboration, and assisted with
random tasks that came up. We're close!
April 19, 2013 (0.5 hours):
I integrated the AI code I created yesterday into the full Raspberry Pi code. I commented out the part that actually sends the command, because we would like
to be able to test with just one person all of the other functionality without the AI going nuts and interfering with our tests.
April 20, 2013 (2.5 hours):
Work on the ECE Senior Design Semester Report.
WEEK 15 SUMMARY
Accomplishments: Finished dodging and AI in WiiMote software. Succesfully got robots to punch using WiiMotes in full system.
Weekly Work Total: 20 hours
Project Work Total: 165 hours
Week 16
April 24, 2013 (4 hours):
Worked on the Final Report and organized a way to divvy up the work between all of us.
April 25, 2013 (6 hours):
Worked on all of the final documents that I took responsibility for.
April 26, 2013 (2 hours):
Finished all of what I took responsibility for. It was great to present today, even though we
had some major bugs in performance.
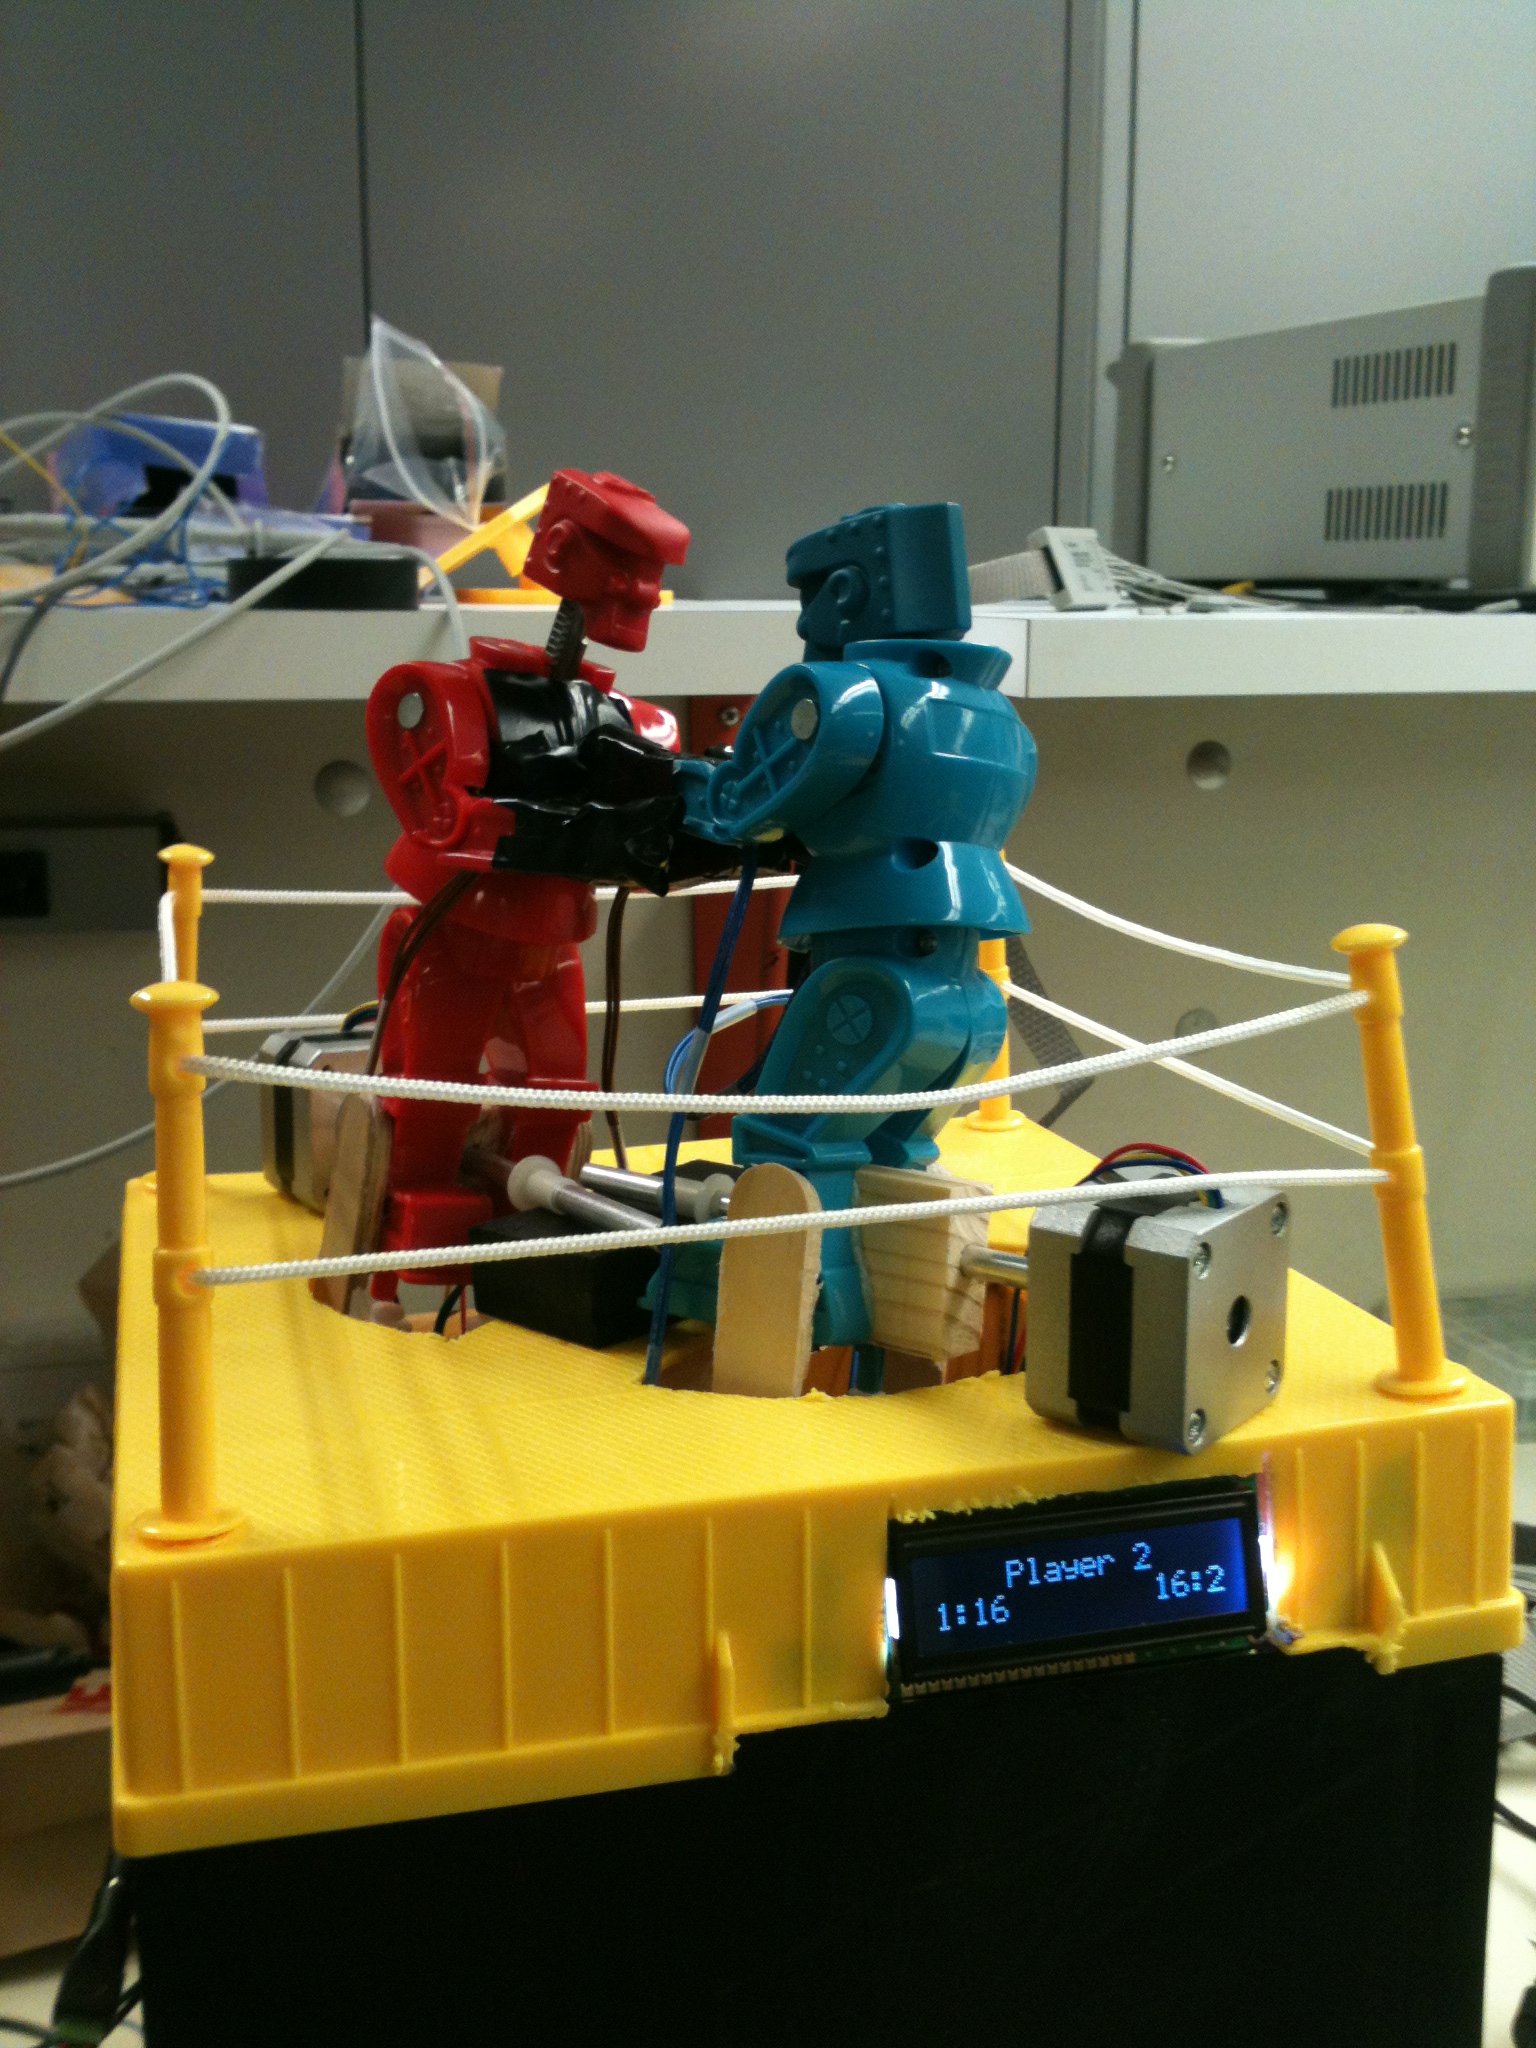
Finished Product
WEEK 16 SUMMARY
Accomplishments: Finished all final documents and presented our product at the design showcase.
Weekly Work Total: 12 hours
Project Work Total: 177 hours