The oscillator routing had to be changed because of irregular trace width. Some GPIO were changed on the schematic as there was too much crowding on one side of the microcontroller. The current schematic is shown below.
January 11, 2012 (1 hour):
Met as a team to discuss preliminary project proposal.
January 13, 2012 (2 hours):
Met as a team after class to finish writing preliminary project proposal.
WEEK 01 SUMMARY
Accomplishments: Submitted preliminary project proposal.
Weekly Work Total: 3 hours
Project Work Total: 3 hours
January 16, 2012 (1 hour):
Met as a team after class to discuss preliminary project proposal.
January 18, 2012 (2 hours):
Met as a team after class to finish writing preliminary project proposal.
January 20, 2012 (2 hours):
Looked up the Kinect SDK and started reading about various control methods
WEEK 02 SUMMARY
Accomplishments: PSSC and project proposal finalized.
Weekly Work Total: 5 hours
Project Work Total: 8 hours
January 23, 2012 (4 hour):
Created the website for the team
January 24, 2012 (1 hour):
Helped in integrating new PSSCs on slides
January 26, 2012 (3 hours):
Worked on making libraries for the HW2 plus the PCB layout
January 27, 2012 (1 hour):
Finished the PCB layout
January 28, 2012 (2 hours):
Went to Gamestop and Walmart to find out about Kinect bundles, researched online
WEEK 03 SUMMARY
Accomplishments: PSSC finalized after TCSP1. PCB Layout tutorial performed. Kinect research conducted.
Weekly Work Total: 11 hours
Project Work Total: 19 hours
February 2, 2012 (1 hour):
Found the problems associated with the Kinect sensor, and started looking at Xbox controller as primary input initially.
February 3, 2012 (2 hour):
Looked at applications using the Xbox 360 controller, found various ways to get it connected to PC.
February 4, 2012 (2 hour):
Installed XNA to create primary code base for controller, found a force feedback issue.
WEEK 04 SUMMARY
Accomplishments:Settled on Xbox 360 controller as initial input pad.
Weekly Work Total: 5 hours
Project Work Total: 24 hours
February 6, 2012 (2 hours):
Pepped up the website, took out some bugs and cropped the picture on top to make it fit.
February 7, 2012 (1 hour):
Went with Samit to a hobby shop o buy a the Apprentice hobby plane.
February 8, 2012 (3 hours):
Wrote simple code to see if the Xbox controller would connect to the PC. Did not work, isolated the problem to being the controller being a Wireless Controller, and the wire that comes with it being just a play-and-charge kit. Researched and found that a separate dongle was needed or a USB version (wired) of the controller was needed.
WEEK 05 SUMMARY
Accomplishments:Bought the main plane to be used. Improved website. Wrote code to recognize the Xbox controller on PC.
Weekly Work Total: 6 hours
Project Work Total: 30 hours
February 12, 2012 (3 hours) :
I tried to connect an Xbox controller via wireless bluetooth to the computer and found that to be not working. I identified that the problem is that I need a wireless transmitter/reciever and ordered it via Amazon.
WEEK 06 SUMMARY
Accomplishments: Problems with Xbox controller were identified and the requisite part was ordered.
Weekly Work Total: 3 hours
Project Work Total: 33 hours
February 21, 2012 (1 hour):
I worked with Samit on routing for the oscillator clock. Special attention was given to place the clock as close to the microcontroller as possible, without moving the decoupling capacitors around.
February 22, 2012 (5 hours):
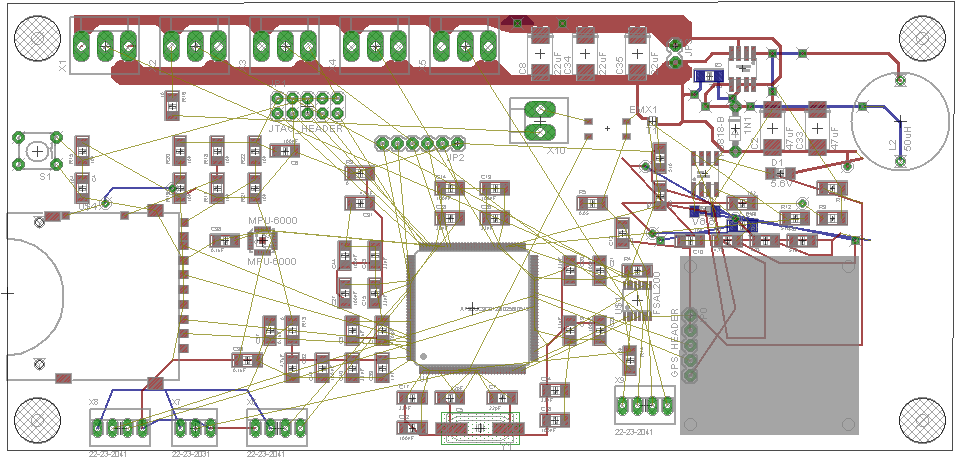
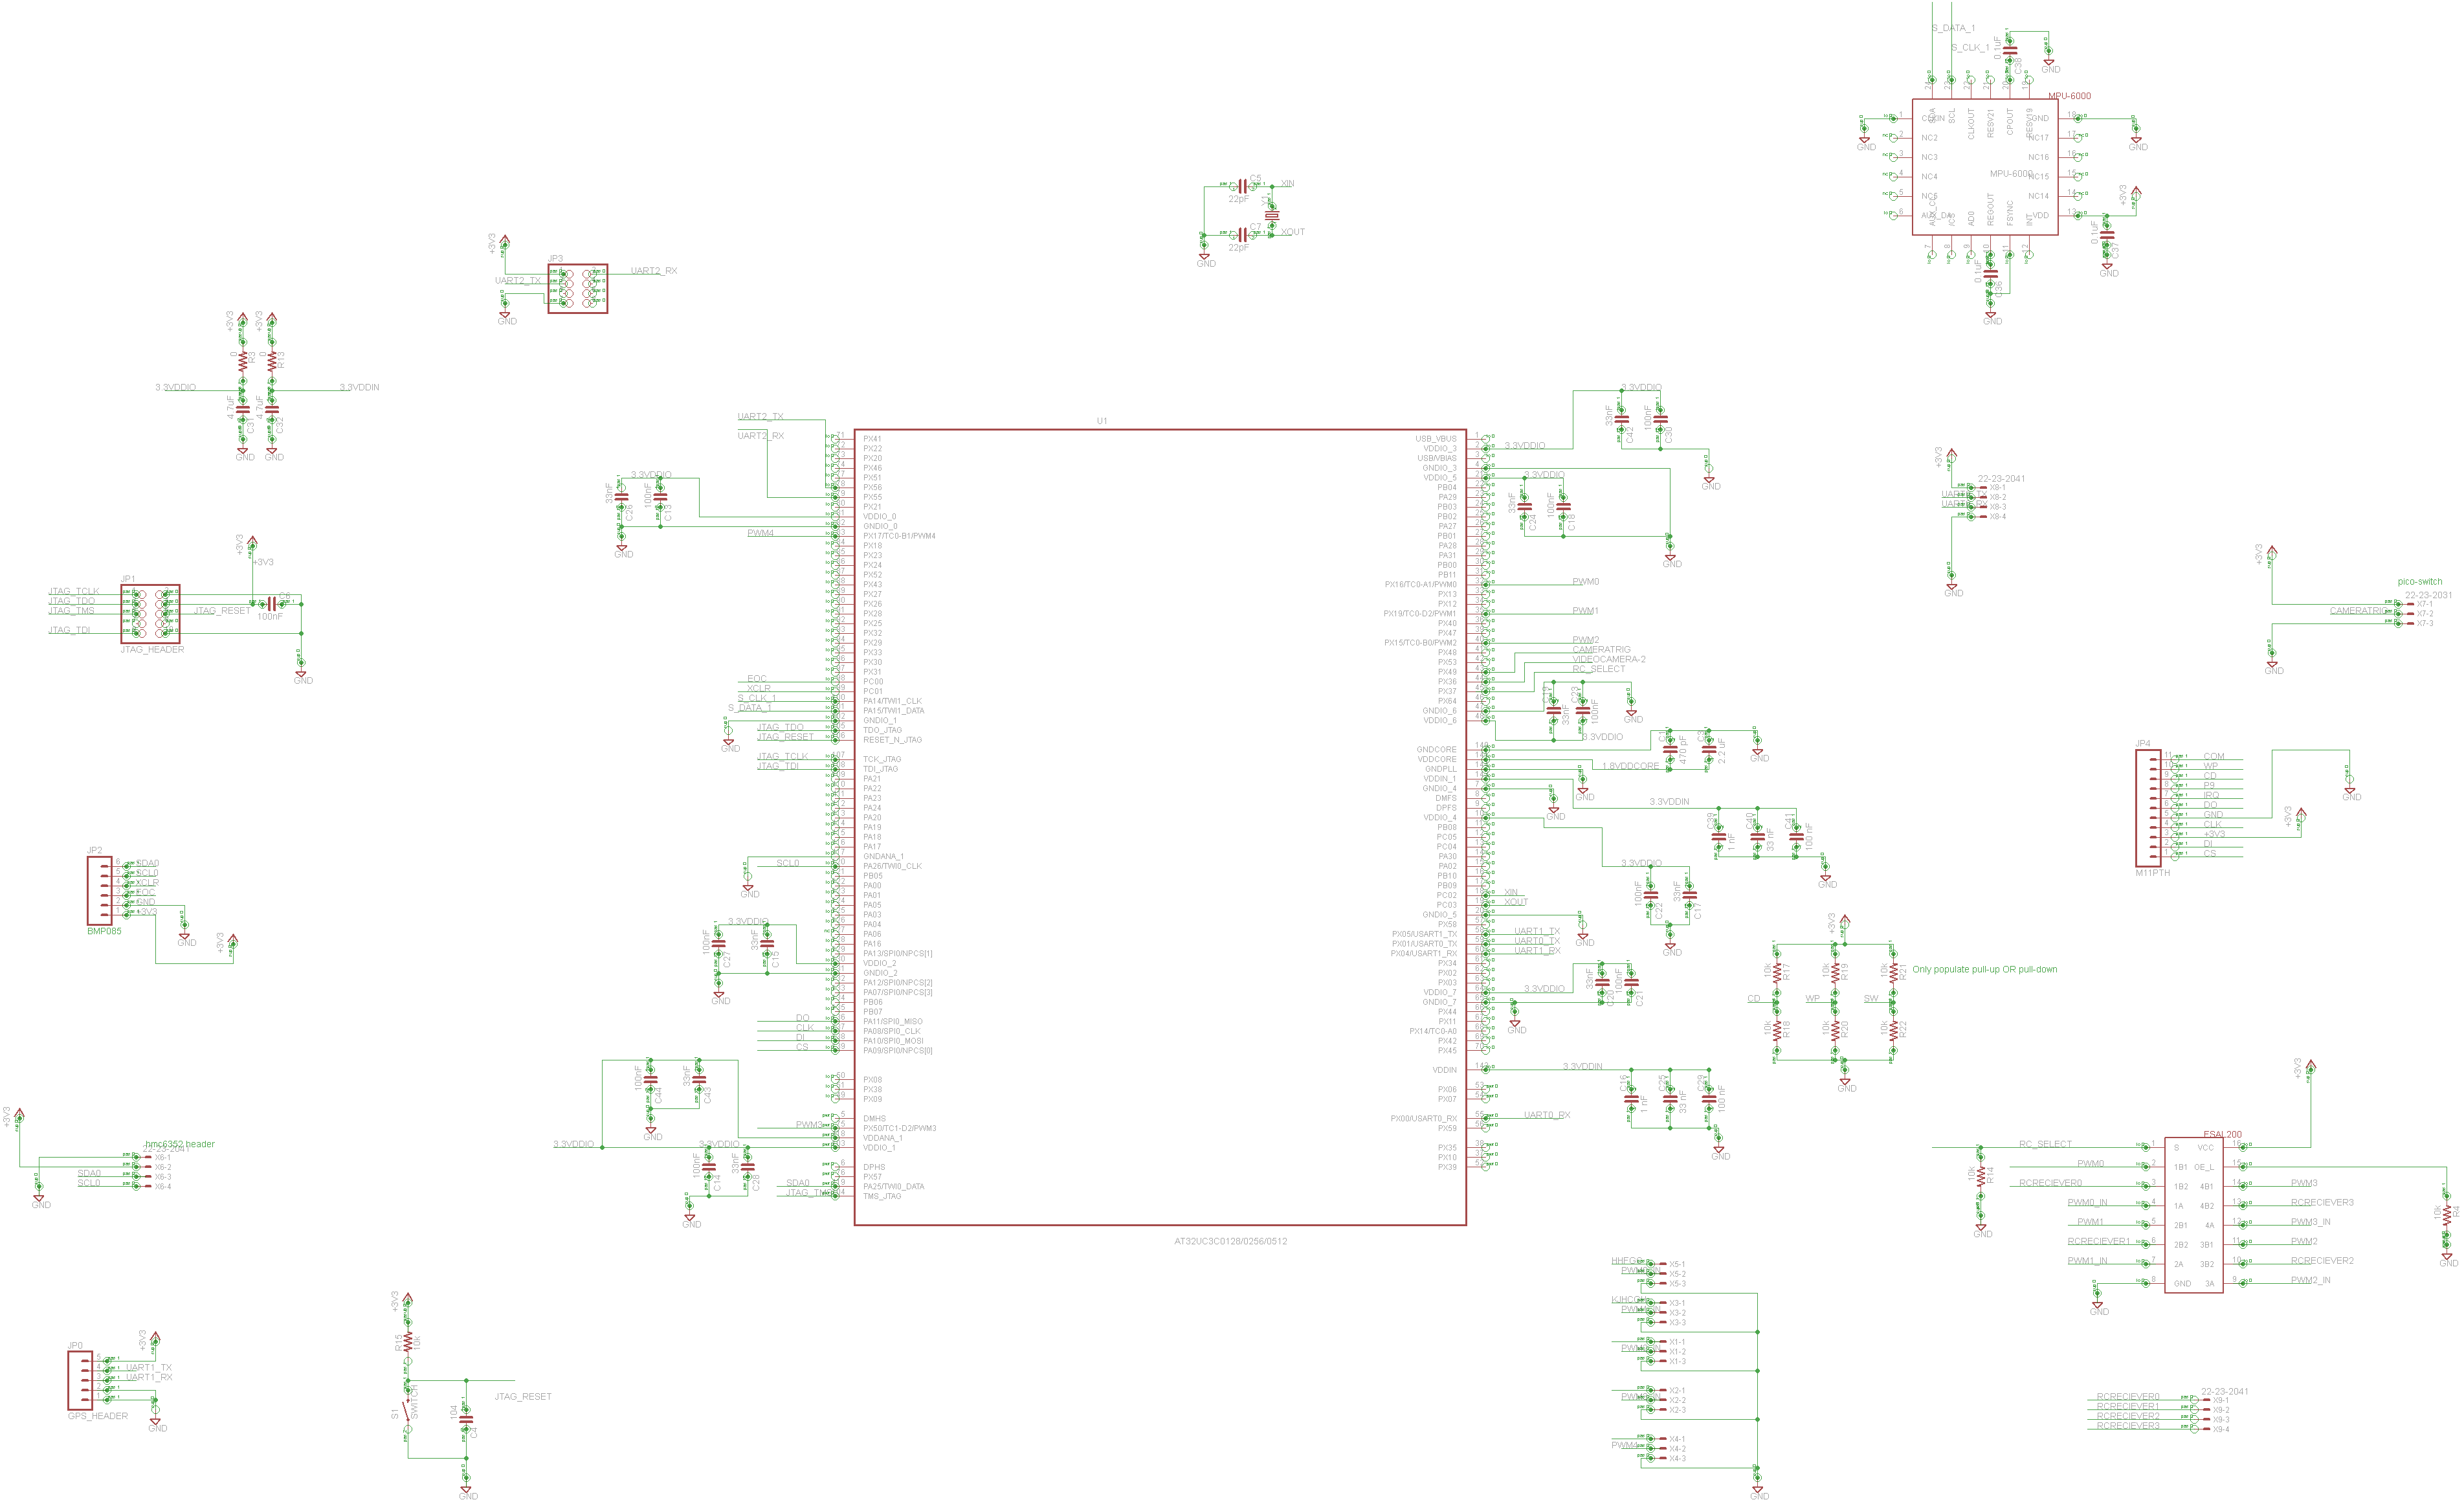
The oscillator routing had to be changed because of irregular trace width. Some GPIO were changed on the schematic as there was too much crowding on one side of the microcontroller. The current schematic is shown below.
February 23, 2012 (3 hours):
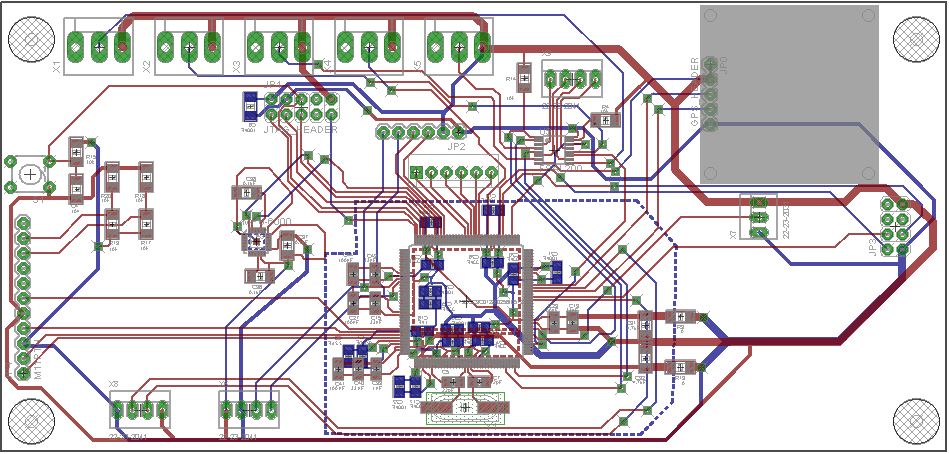
I finished the preliminary PCB layout with Samit. We have noted that the we are running out of space for routing the pins of the microcontroller. The decoupling capacitors near the microcontroller should be placed on the other side to prevent vias near the microcontroller. We have decided to get some more feedback on this layout design. 
February 24, 2012 (4 hours):
George Toh reckons we have lots of vias near the microcontroller. Also, errors were found in the layout after running a DRC check.
We will try to have uniform trace widths and reduce number of vias in the next iteration.
February 26, 2012 (5 hours):
The team has decided to split up thw power circuitry and the digital circuitry into 2 separate boards. This will make routing on the PCB easier and keep the analog and digital power separate.
The SD card breakboard will also be a third separate entity. Thus, the old routing will be ripped up and layout will begin anew..
The preliminary main board schematic is shown below.
The preliminary power daughterboard schematic is shown below.

The preliminary power daughterboard layout is shown below.

WEEK 07 SUMMARY
Accomplishments: The schematic has been finalised. Very minor changes, if any, required. The PCB layout for the main board is to be completed before the design review.
Weekly Work Total: 18 hours
Project Work Total: 41 hours
March 1, 2012 (4 hours):
We prepared slides for the design review, presented at the review, and discussed future course of action. Based on the feedback from the design review, we need to rework the battery monitor IC application circuit so it measures the total current from the battery.
March 3, 2012 (5 hours):
Samit and Ashwin started working on a simple "LED code", but they had little/no success. I decided to work on initializing the RTC and then using it to generate a heartbeat for the microcontroller. I finished the code and had a successfule heartbeat module ready.

Heartbeat Module
WEEK 08 SUMMARY
Accomplishments:
Started Software Development on the microcontroller, was able to initialize RTC and make a "heartbeat" for the microcontroller
Weekly Work Total: 9 hours
Project Work Total: 50 hours
March 7, 2012 (5 hours):
We met as a team to finalize the final schematic and PCB layout. Also installed AVR32 to try to interface with the microcontroller.
March 9, 2012 (1 hour):
The final PCB and Schematic for were submitted!

The final microcontroller schematic

The final digital sensors schematic
The final digital board schematic

The final power schematic

The final power board schematic
WEEK 9 SUMMARY
Accomplishments: We have submitted the PCB. Our software development has begun and a basic heart-beat program has been completed. There is some progress on the Xbox controller front as well
Weekly Work Total: 6 hours
Project Work Total: 56 hours
March 12, 2012 (5 hours):
I read in detail about abstraction in the provided Atmel libraries, viz. Atmel Software Framework, for the SD Card and SPI. There do not seem to be any examples for our microcontroller.
This datasheet is helpful as it gives out the pinout for the STK-600.
March 13, 2012 (8 hours):
I worked worked on the UART to find that on-chip debigging is NOT available for the STK and our micro. This is very disappointing. It is important to get the UART to work to get debug messages printed on screen. I worked with Ashwin to get this done, and we have debug messages via the RS-232! We are using TeraTerm to debug with a 9600 baud-rate.A sample debug screen is shown below.

The debug screen
The GPIO pins can be controlled as well, and hence LED's can also be used to debug.
Serial code
March 17, 2012 (4 hours):
I read up on the SD card module and found that I needed a wat to read the FAT32 filesystem and write in the correct format. I found FatFs C libraries which would be helpful and read up on them.
I have started on the code. Gpio pins and Tera-Term will be used for debugging.
WEEK 10 SUMMARY
Accomplishments: Software development is in full swing. There are lot of setbacks because of poor documentation and ambigious nature of Atmel Software Framework. I have realised there is a steep learning curve for understanding the code provided by Atmel. I was able to get the UART working with Ashwin, so atleast we have on-ship debugging
Weekly Work Total: 17 hours
Project Work Total: 73 hours
March 19, 2012 (4 hours):
I was able to help Ashwin get his I2C code working completely. The code is found below.
March 19, 2012 (2 hours):
I started the actual coding for the SD Card. The code did not seem to work and I could not figure out why.
March 20, 2012 (4 hours):
I asked Ashwin about the code and he pointed out that I might need to connect a DI pin on the SD card. I soldered the SD card pins and spent time reading the data sheets and connecting them appropriately
March 23, 2012 (5 hours):
I again worked on the code and was able to get initialize the SD card. It was a proble with switching the oscillator using the pcl_switch_osc function. The code can be found below.
SD
March 23, 2012 (4 hours):
Had to spend time in getting the Software Narrative report done. Needed to understand everyone else's code completely
WEEK 11 SUMMARY
Accomplishments: The SD card code has some progress. I submitted the Software Design Narrative Report. Also, got the I2C to work with Ashwin.
Weekly Work Total: 19 hours
Project Work Total: 92 hours
March 27, 2012 (4 hours):
I started work on a C# app that is able to do SerialPort communications
March 30, 2012 (6 hours):
I am able to get Serial Port communications via the Serial Port library and an Xbee module and Xbee explorer board. However, the code fails to fire an interrupt even when data is recieved on a serial port. The reason for this is unknown at this time. The GUI is very basic and can be seen in the photo below.
March 31, 2012 (4 hours):
Having worked on it more, I have working Serial Port transmission and reception. This can be done by reading either all available bytes off the serial port or by reading data line by line (seprated by newline ascii character). The code can be accessed below. It is a full Visual Studio project in a rar form.
Serial Code
WEEK 12 SUMMARY
Accomplishments: I have a basic C# app that can do serial communications perfectly via an Xbee explorer board. Also, submitted the Patent homework and did the TCSP.
Weekly Work Total: 14 hours
Project Work Total: 106 hours
April 3, 2012 (16 hours):
I spent a lot of time in integrating the code with GPS to recieve GPS data as specified by Ashwin. I am able to get data and write it to a file. Access the code below.
GPS code
April 4, 2012 (10 hours):
I spent time debugging the code to make it more reliable. Also, Ashwin's USART from the micro does not have reliable communications so a lot of parsing has to be done on my PC's end. I have this done fully.
April 6, 2012 (1 hours):
Samit has gotten the PWMs to work, and I am in lab to see how they will function so that I can start writing logic to convert Xbox input into requisite signals.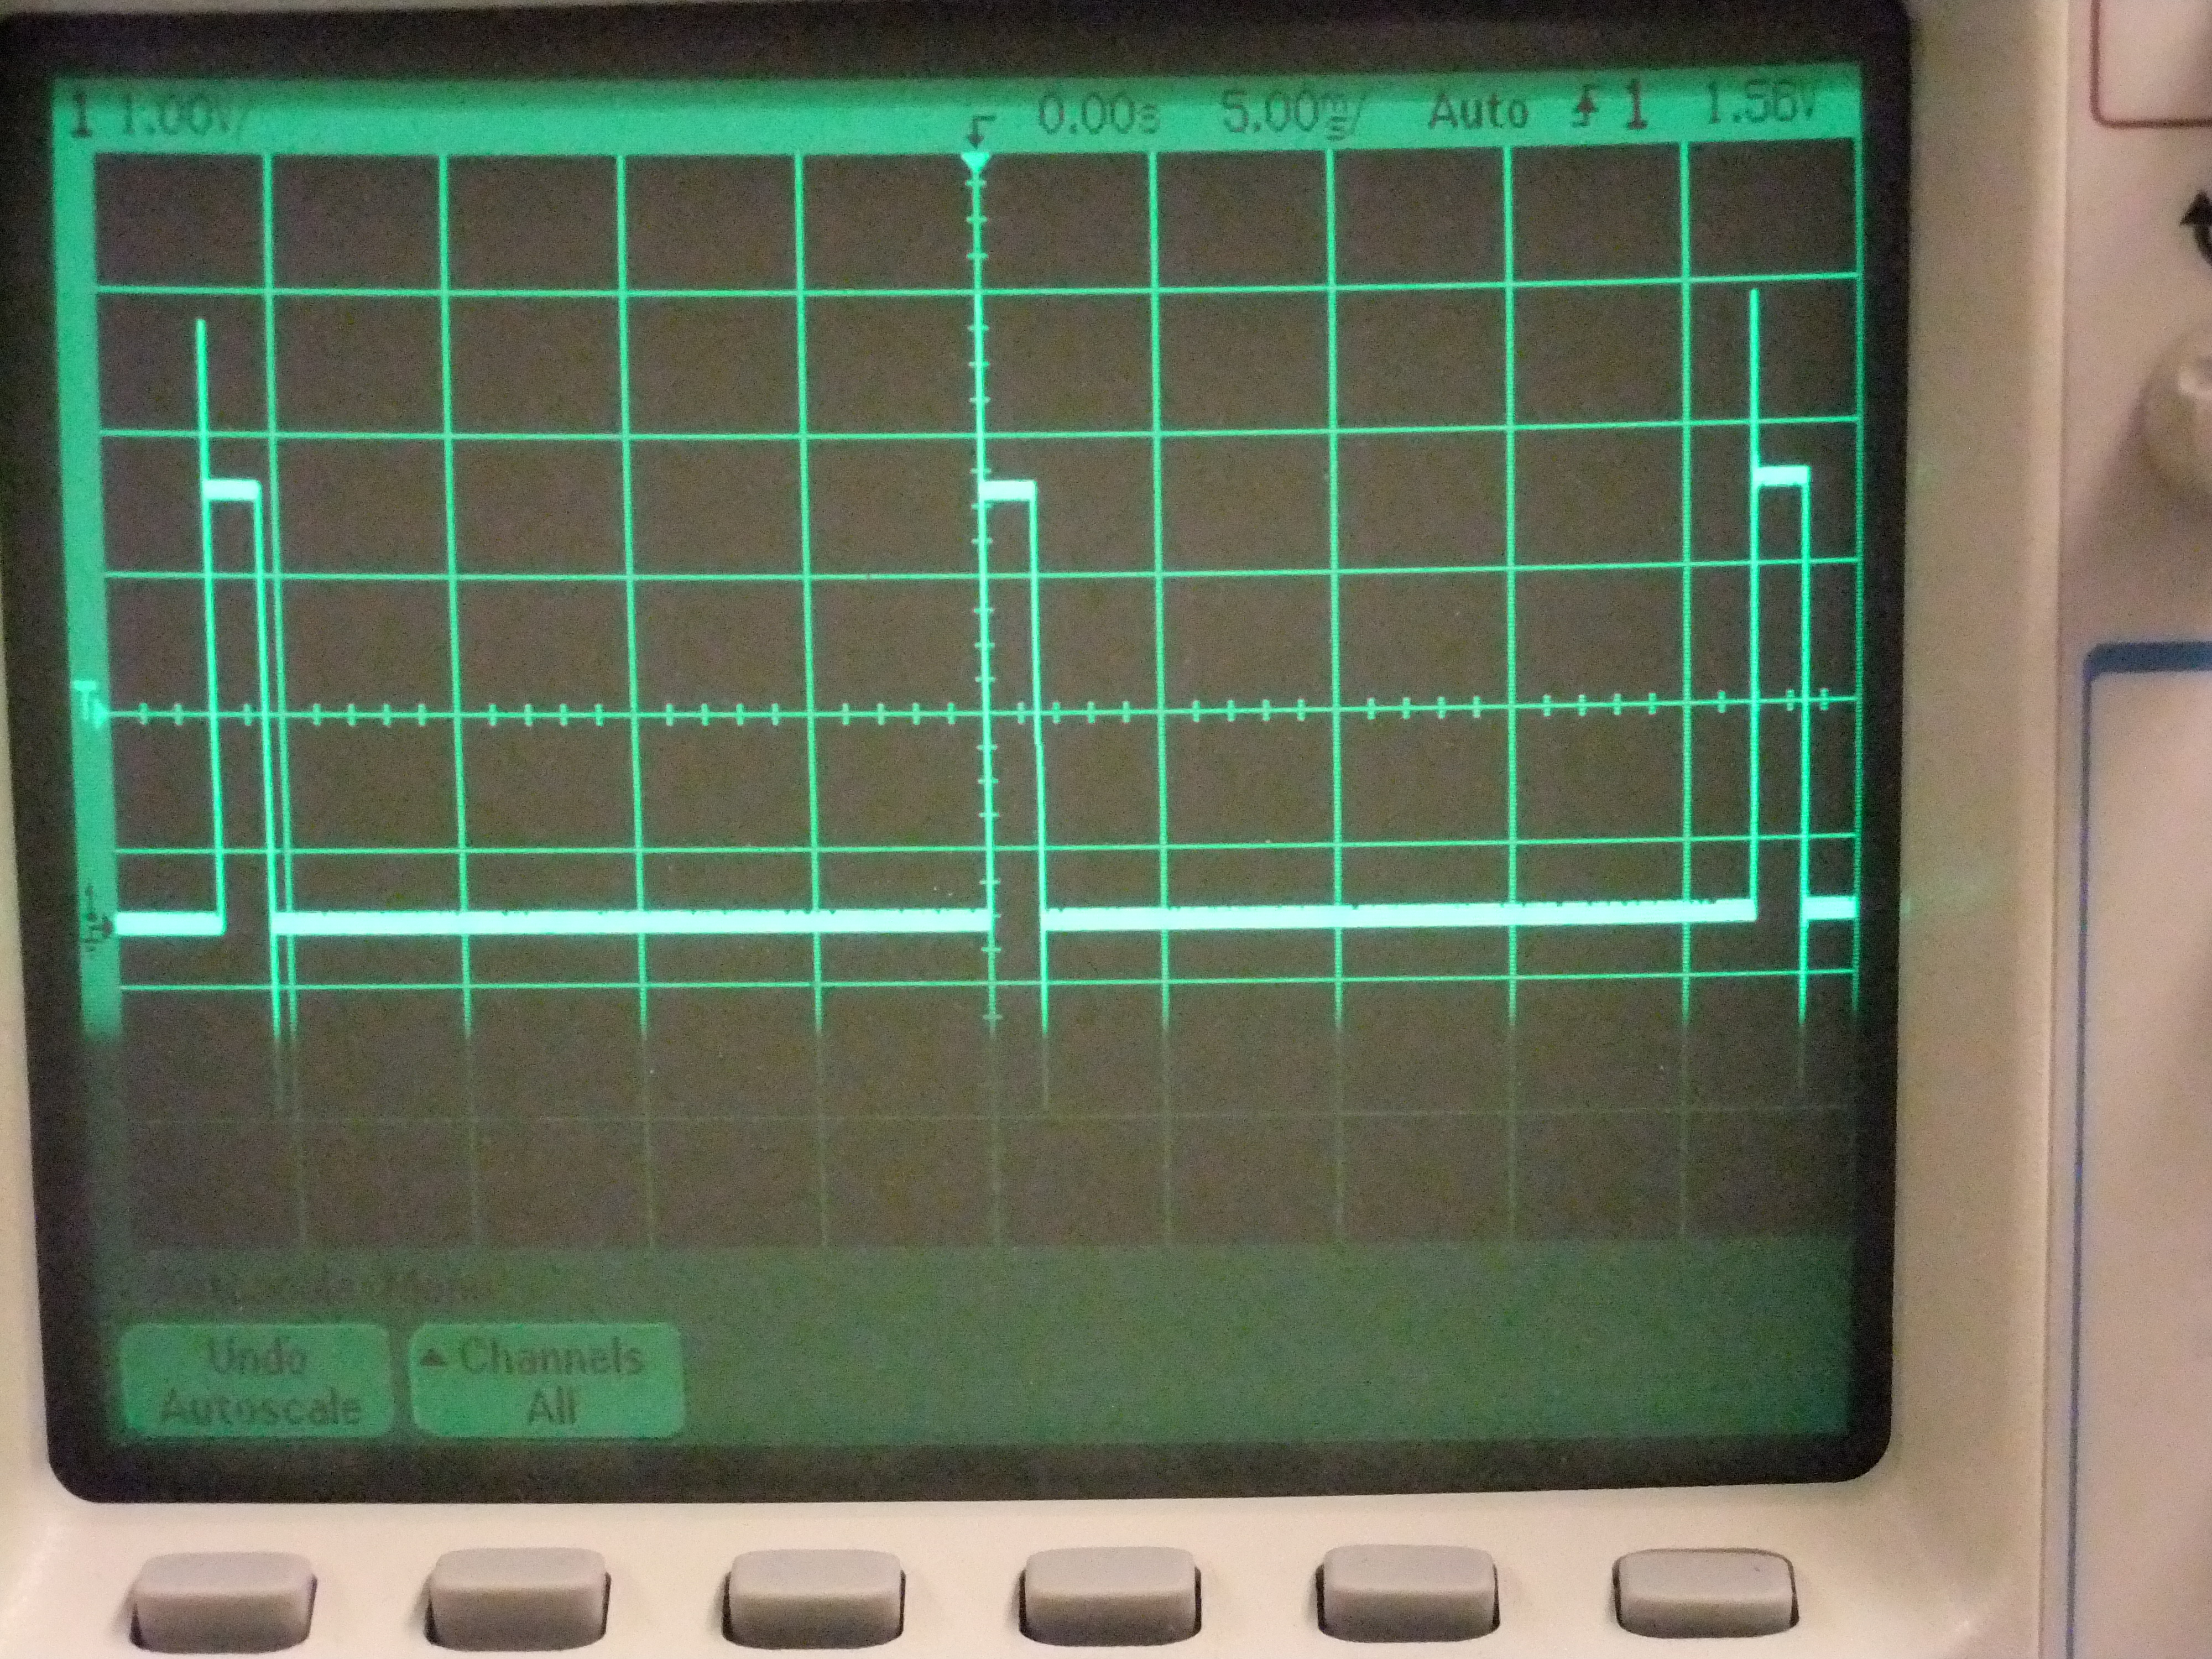
WEEK 13 SUMMARY
Accomplishments: The code on the on PC is able to parse and get GPS data and convert them into coordinates reliably. Also, the PWMs work on the microcontroller.
Weekly Work Total: 27 hours
Project Work Total: 133 hours
April 10, 2012 (20 hours):
I added quite a few graphical components to the GUI. I also added an updating Google maps component which looks kind of cool. Additionally, I drew controls for throttle and compass. Have a look in the photo below!>
April 11, 2012 (8 hours):
I worked with Samit to interface the PWM's with the wireless data he was sending over. Every 10ms, the PWM's are updated as per the commands sent by the base station via XBEE.
The default timer value is 5145 and that it can be changed up to 5245 or down to 5245 for minimum or maximum power. Now, commands sent over the XBEE are changing the PWM's. This can be verified by
observing duty cycle changes as the Xbox controller sends different commands. This is the first step in the final hierarchy which is shown below.
April 15, 2012 (5 hours):
I helped Samit in getting and verifying IMU data. Everything looks to be in order here. The code can be found below.
I2C code for IMU
WEEK 14 SUMMARY
Accomplishments: The PWM's have been interfaced to Xbox controller. Also, a lot of graphical impovements have been done to the GUI.
Weekly Work Total: 33 hours
Project Work Total: 166 hours
April 16, 2012 (6 hours):
Integration has begun. I worked with Samit in sending and recieving data. Right now, we are having difficulties trying to sync up the microcontroller
with the base station computer. We need to make sure that the XBEE are synced to set up at 9600 baud.Our flowchart is shown below: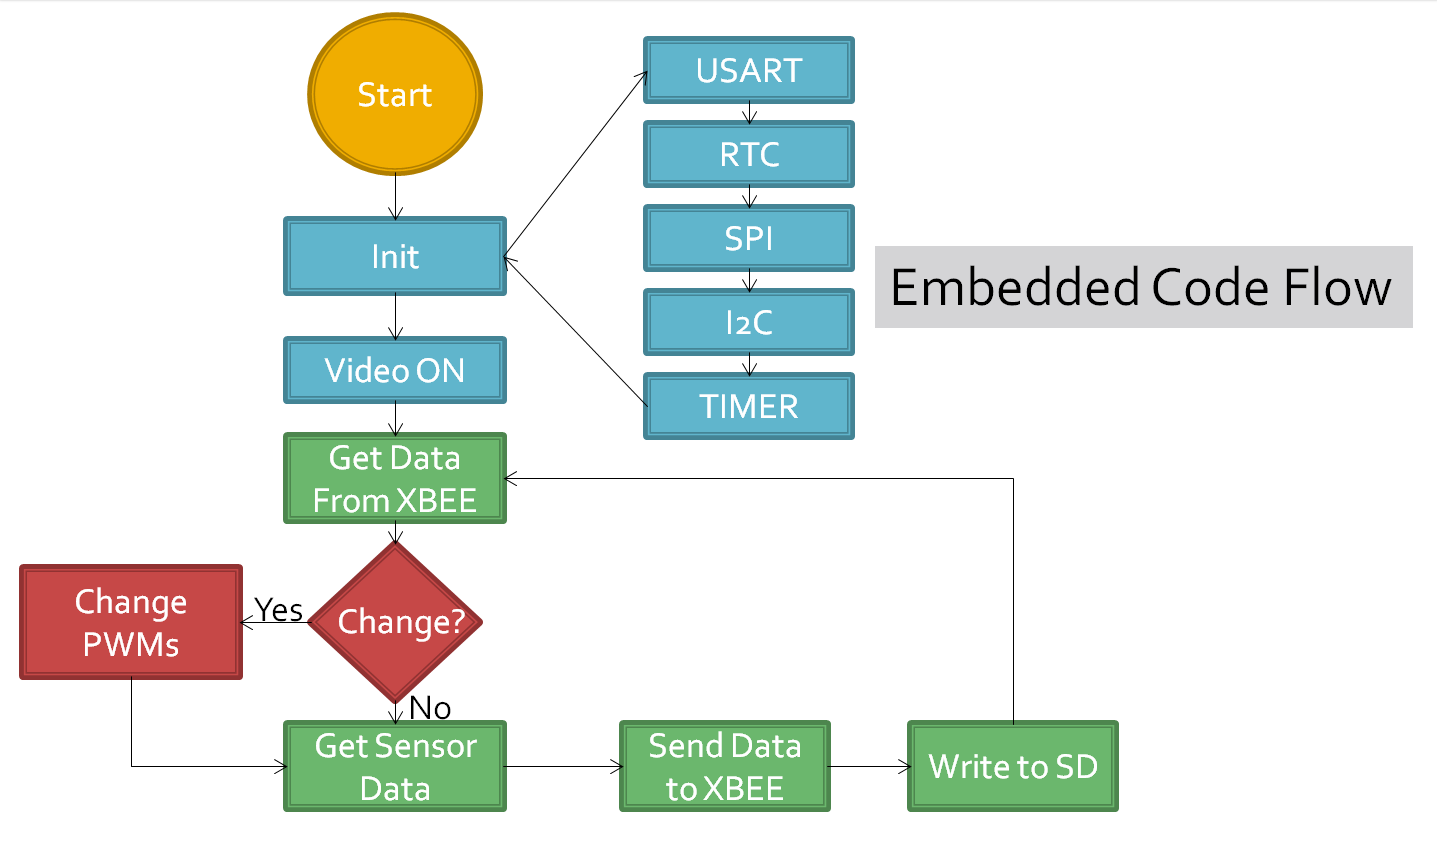
April 17, 2012 (4 hours):
I helped Samit in finishing interfacing the external oscillator to the circuit. Now, the system can be run at 32MHz. The power manager module had to be modified.
The I2C's can run at 400 KHz run. The UART has been set up to talk at 57600 bps. This should reduce the lag. The timer channel register values have been changed to acommodate for the new CPU speed. Now, the main counter should run upto 2475 and the duty cycle register should count upto any
value between 2262 to 2352 for minimum or maximum movement.
External Oscillator code
April 19, 2012 (8 hours):
We have decided to change the operating style. Now, the UART has been configured to operate in interrupts mode. So, the microcontroller will keep transmitting data from I2C and GPS. But when
it recieves data, it goes in interrupt mode and modifies the PWM control values to give the appropriate duty cycle.
April 21, 2012 (10 hours):
Samit and Joe were able to get the camera to work and have created a click() function. However, when I send more data while the click function is working, the Xbee communication errors out. Unfortunate. This means that I have to introduce a 7 second delay in my software to yank control away from the user. The delay function called in this function is contributing to system communication errors.
We have decided to not accept any commands from the XBOX controller during the time the camera takes a picture. This way, the system does not crash.
The disassembled camera is shown below.
Front.
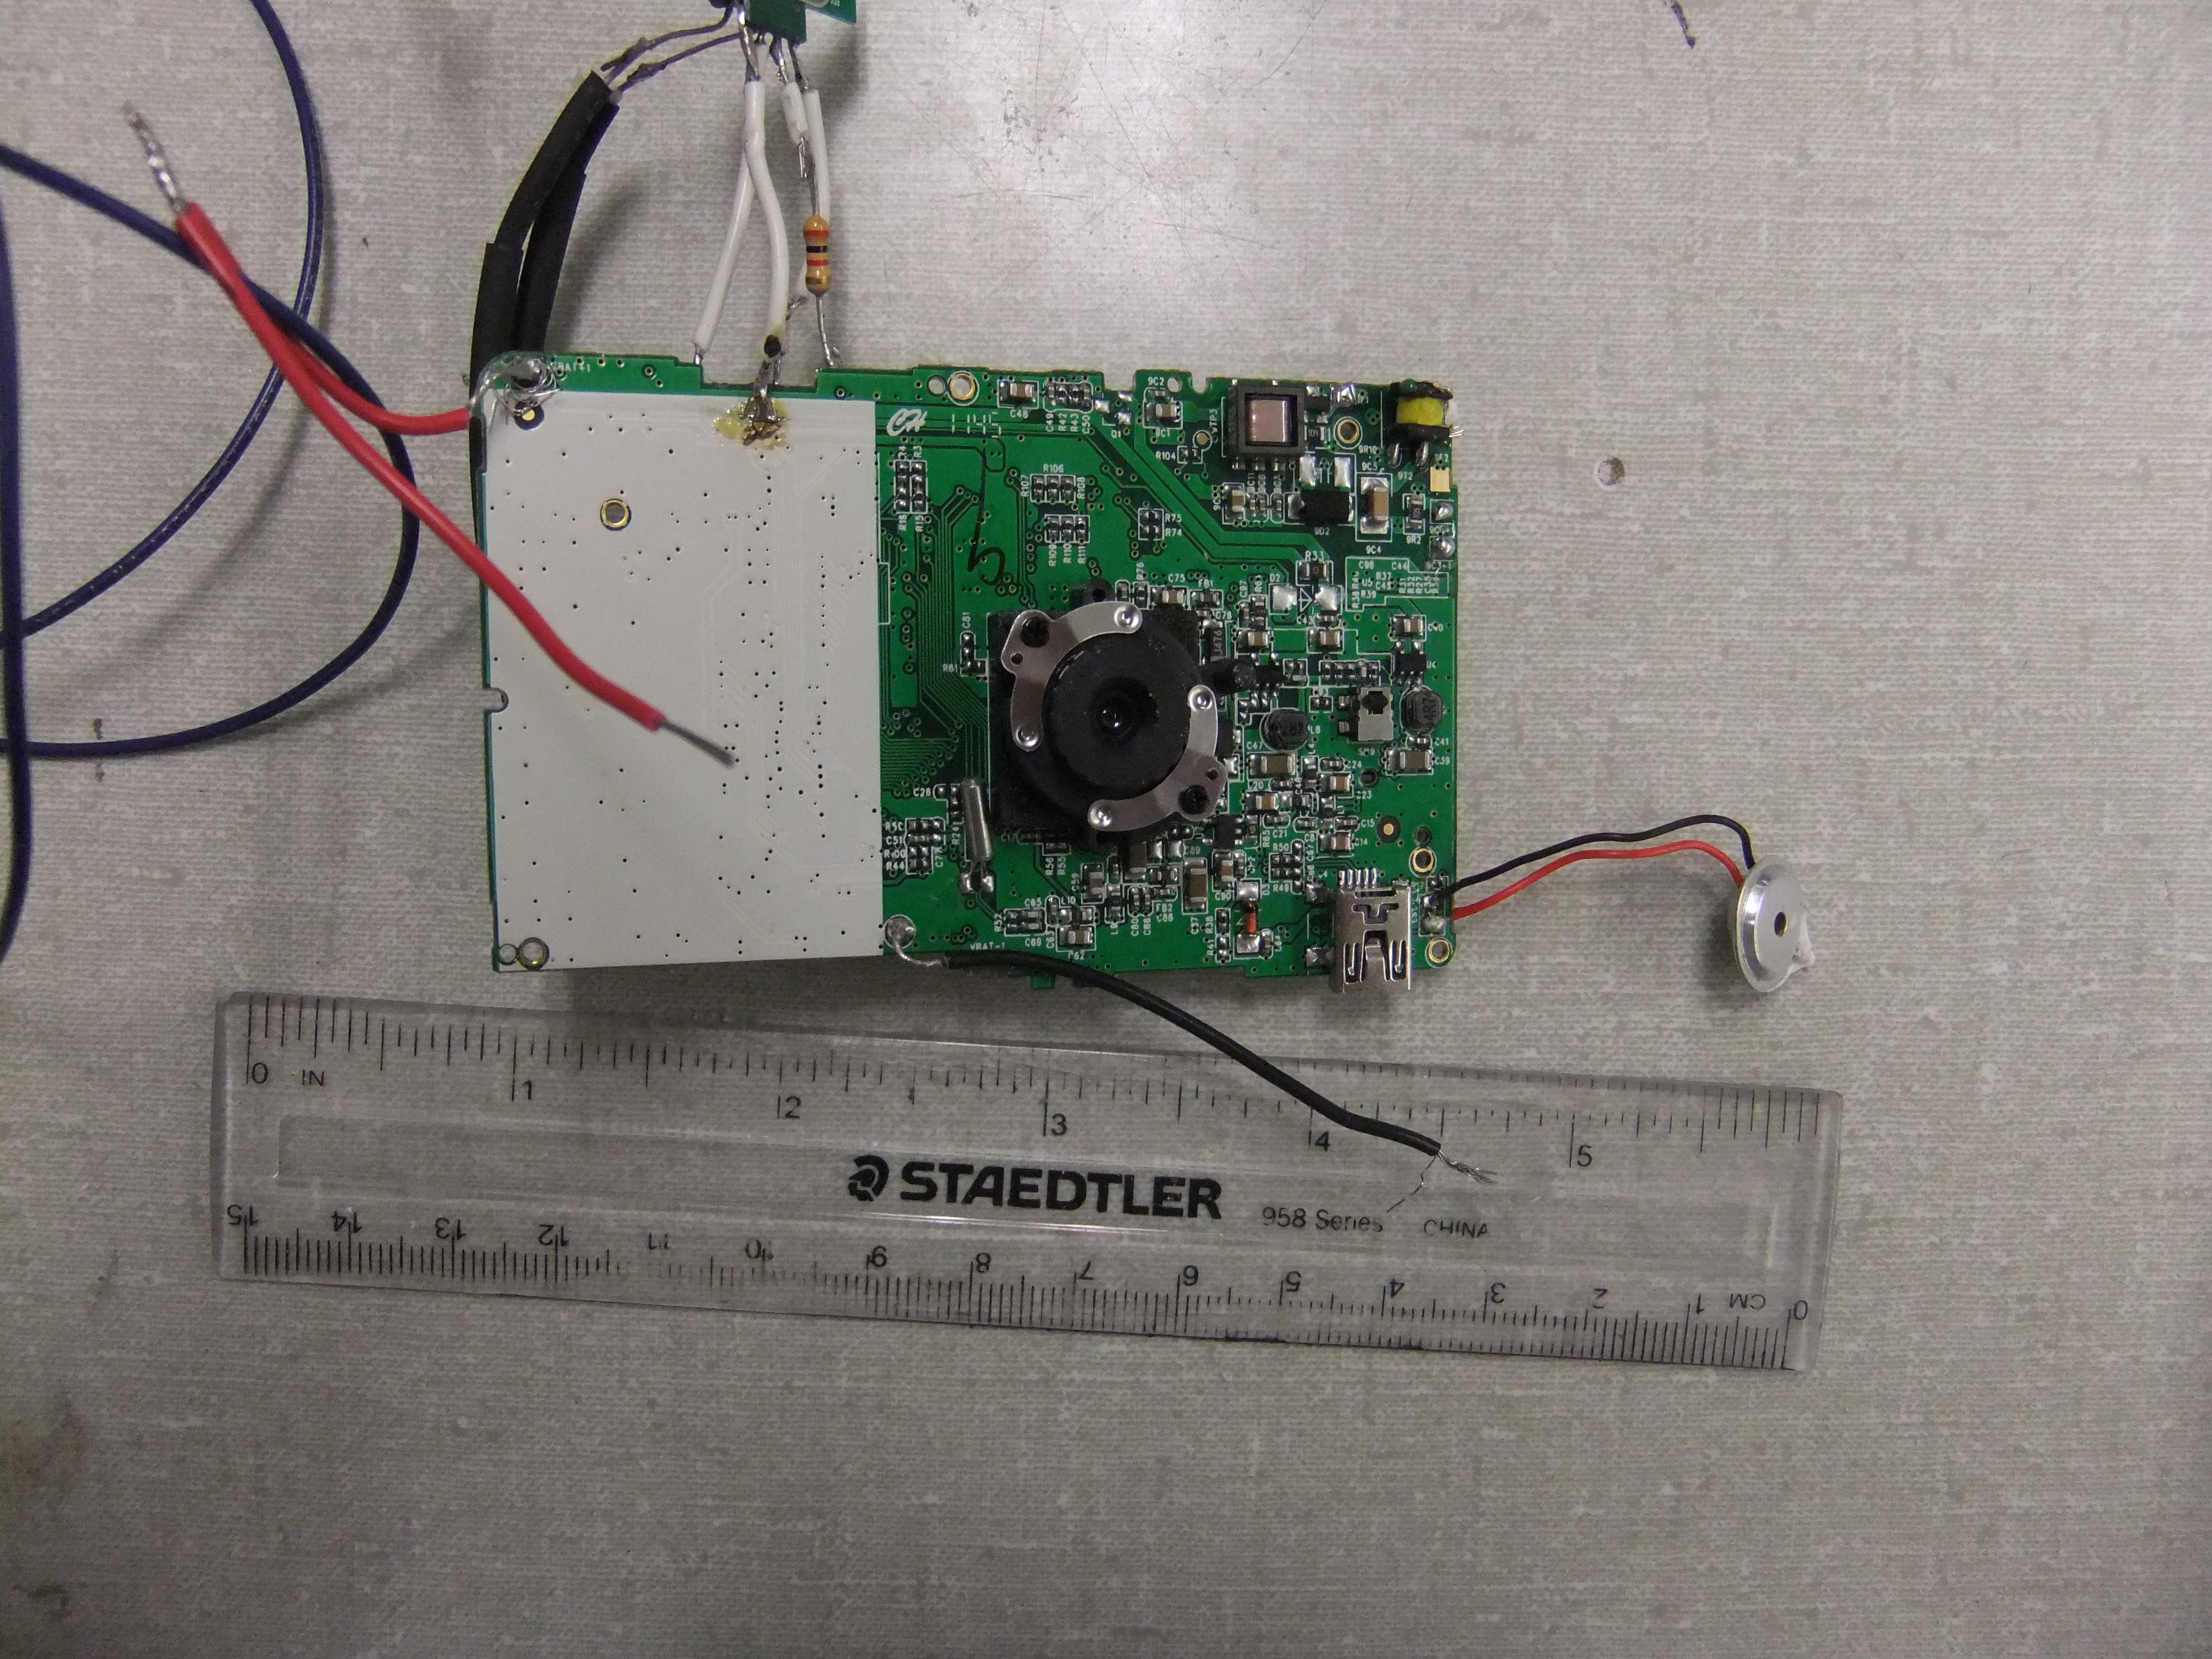

The first pulse was given to the power wire (blue wire) and the second pulse was given to the red wire.
April 21, 2012 (1 hours):
I have made a splash screen to disable user input for 7 seconds while the camera clicks photos. The photo of the app in action can be found below!
April 22, 2012 (12 hours):
Samit and I worked on rx/tx for the overall communication. There seems to be a substantial data loss in transmitting data from microcontroller to the laptop. The baud rate is too high. It seems that
we shall have to implement a handshaking protocol. This is impossible as the RTS pins will be required which, in our case, have not been padded out on the PCB. So the only way out is
lowering the baud rate to 9600 bits / second.
WEEK 15 SUMMARY
Accomplishments: Software integration is nearly complete. Ashwin is working on the SD card, while Samit and I work on getting a reliable communication protocol in action. Also, the still-image camera integration is complete!.
Weekly Work Total: 43 hours
Project Work Total: 209 hours
April 23, 2012 (10 hours):
The multiplexer functionality has been added to our code. Now, control of the plane can be switched between the Xbox controller and the original RC plane controller.
There was a minor bug in the BMP085 code. Turns out that the temperature calculations have to be done before pressure calculations. This was fixed by Samit on the micro side, and I put in the requisite changes on the PC side. The final code can be found here.
The final Micro code
April 24, 2012 (6 hours):
Worked on beautifying the GUI. The final GUI can be found below! Also, the final code is below.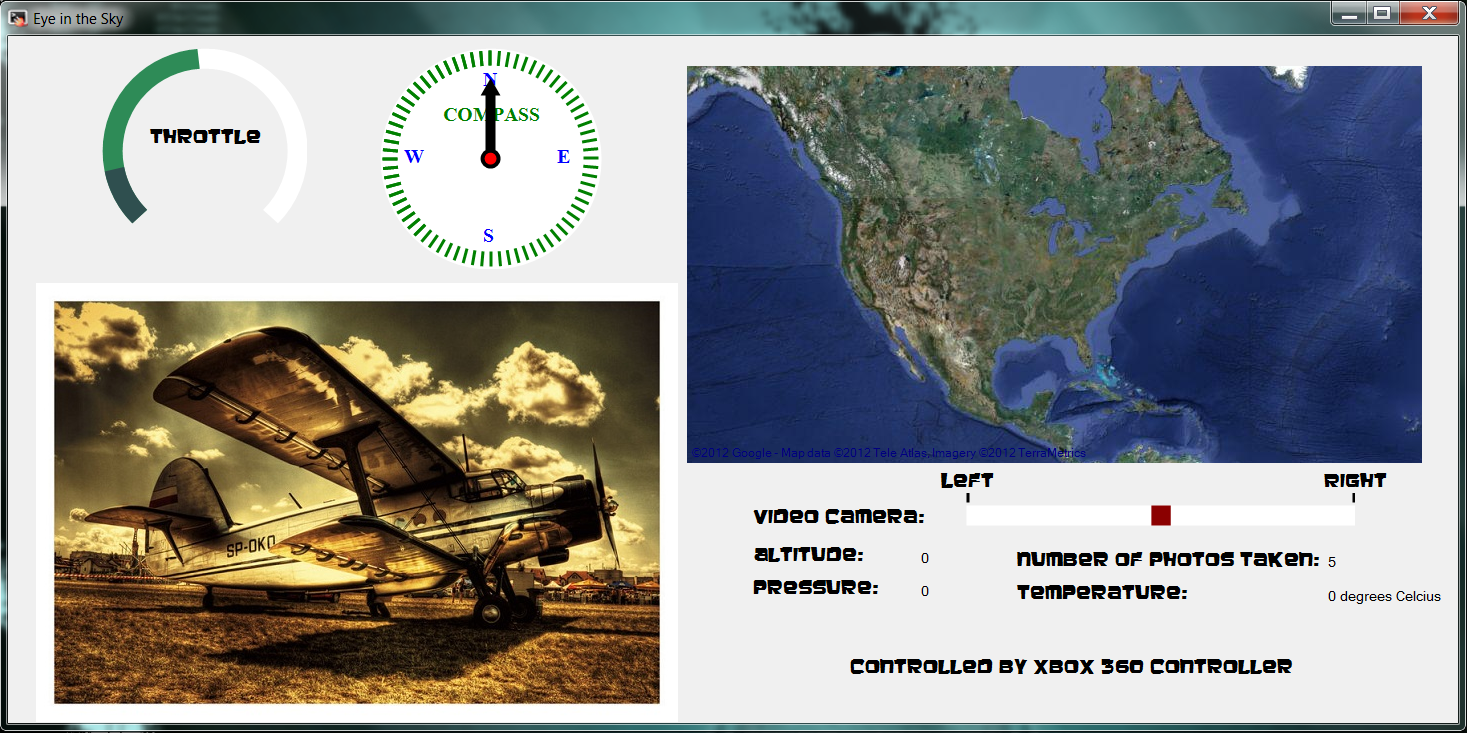
The final PC code
April 25, 2012 (1 hours):
The packaging is complete. Find a picture of the internal fuselage with the circuitry below!
WEEK 16 SUMMARY
Accomplishments: The project is complete. All the PSSC's have been checked off. The GUI is complete. We are waiting for a sunny day when we can take the plane out to fly.
Weekly Work Total: 17 hours
Project Work Total: 209 hours