Learn to use the Vim text editor to efficiently move around a code
file and make changes.
Practice improving the style of poorly formatted code.
Get to know how grades will be calculated in this course.
Setup
In this course, you will work on the ecegrid server. That's where you will
get your starter files (if any), pre-test your submission (when possible), and
submit your code. This gives everyone the same environment, with the same version
of the tools (e.g., gcc, vim, etc.), and the same platform for testing code.
This assignment is your chance to get good at editing code in Vim, before we get
to the more challenging C programming assignments. You should take
this opportunity to learn it well.
Bare minimum: Go through vimtutor
vimtutor is an interactive tutorial that is installed on ecegrid and every
computer where Vim is installed. At the command line, just enter
vimtutor and follow the instructions.
This will take about 15-30 minutes, and will make the rest of this much easier.
The Resources page has some web-based options, which look nicer but
are less complete.
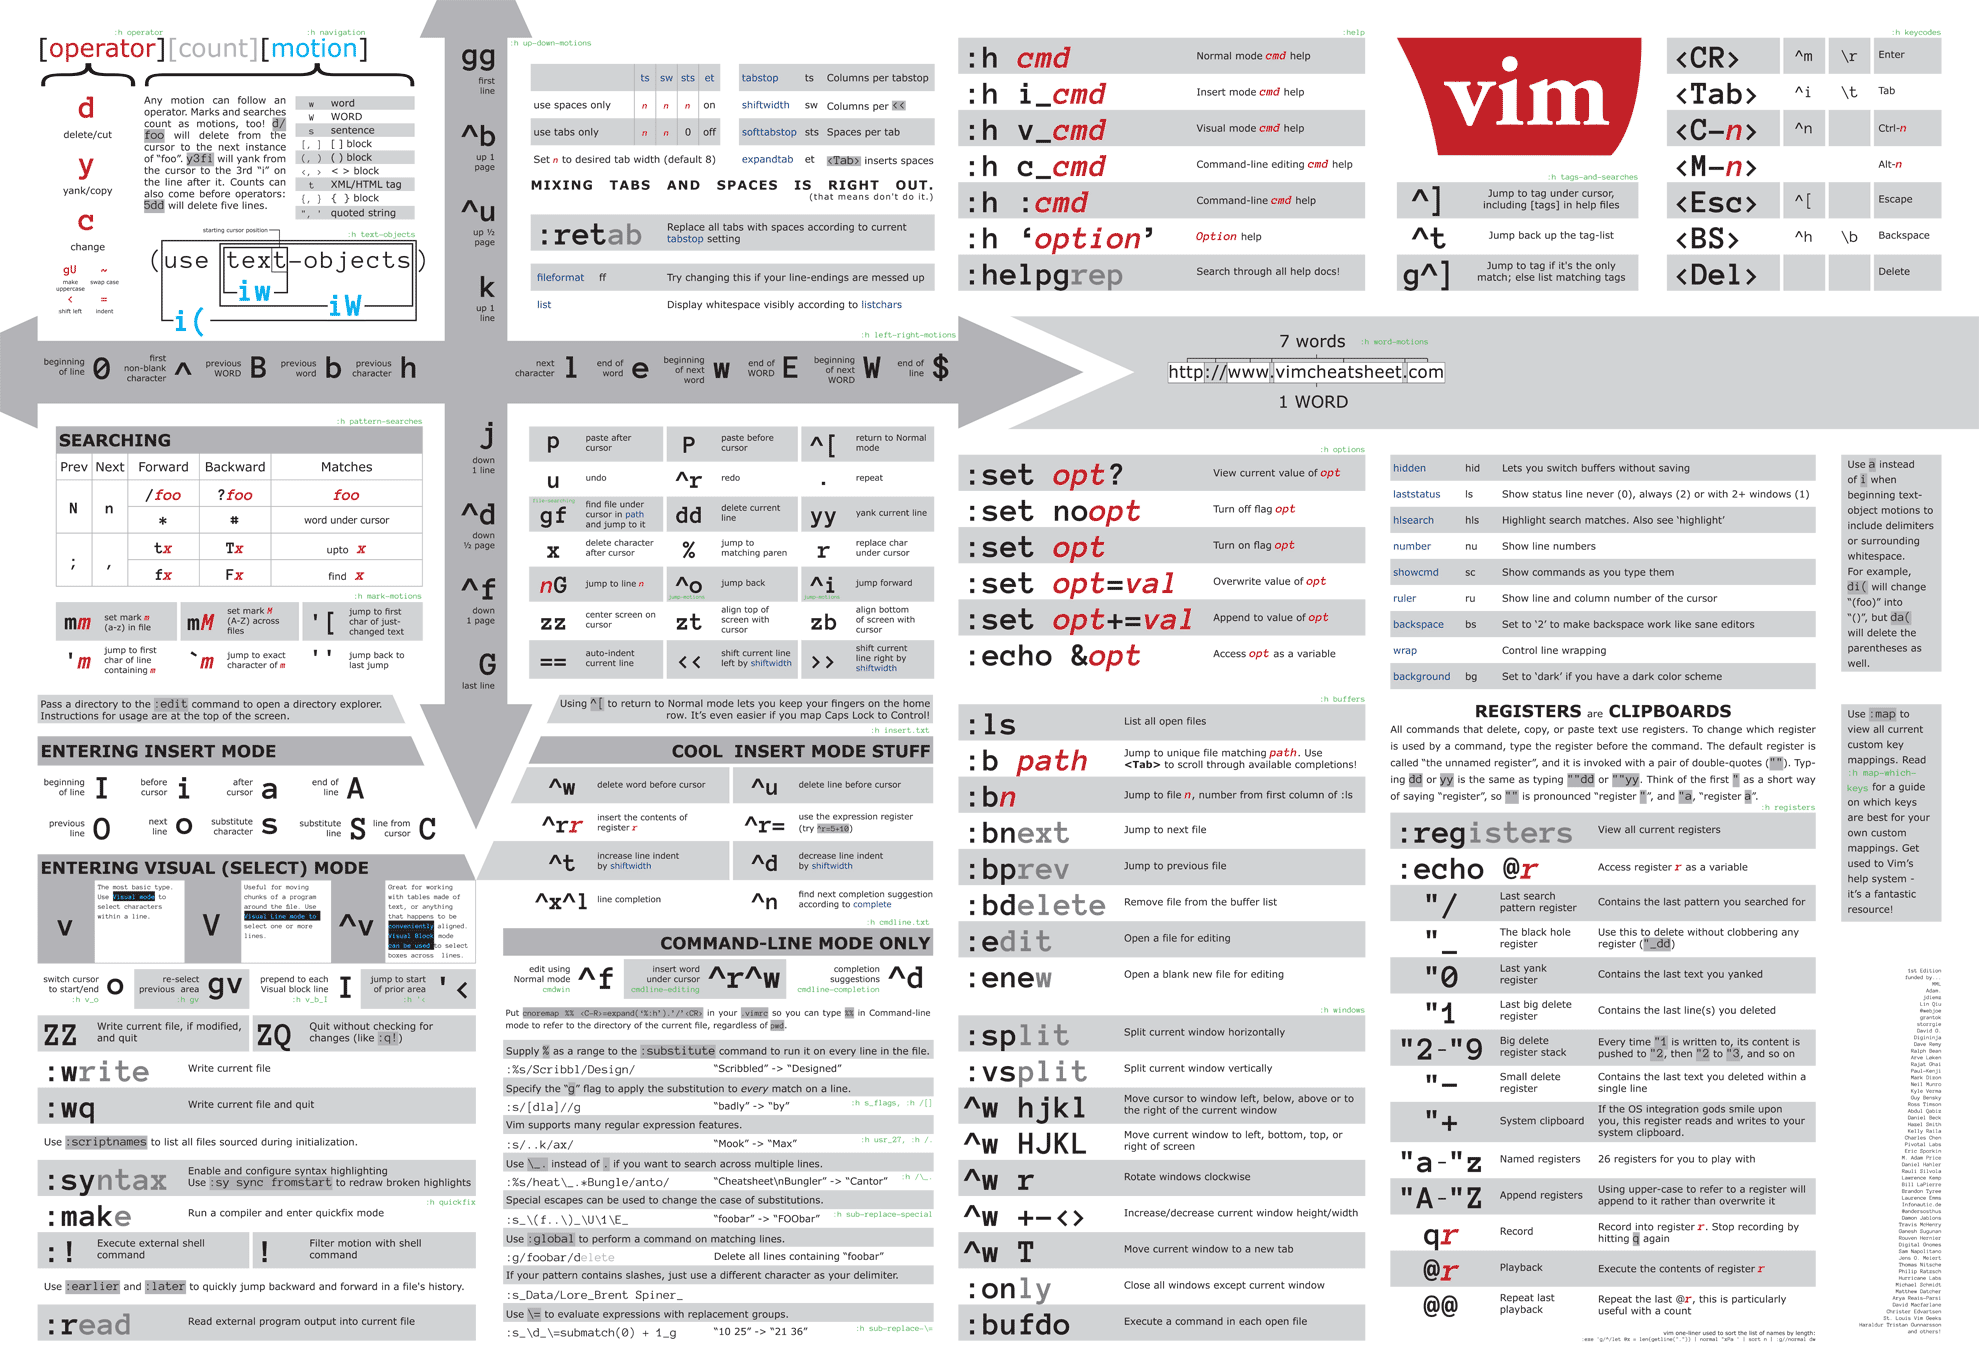
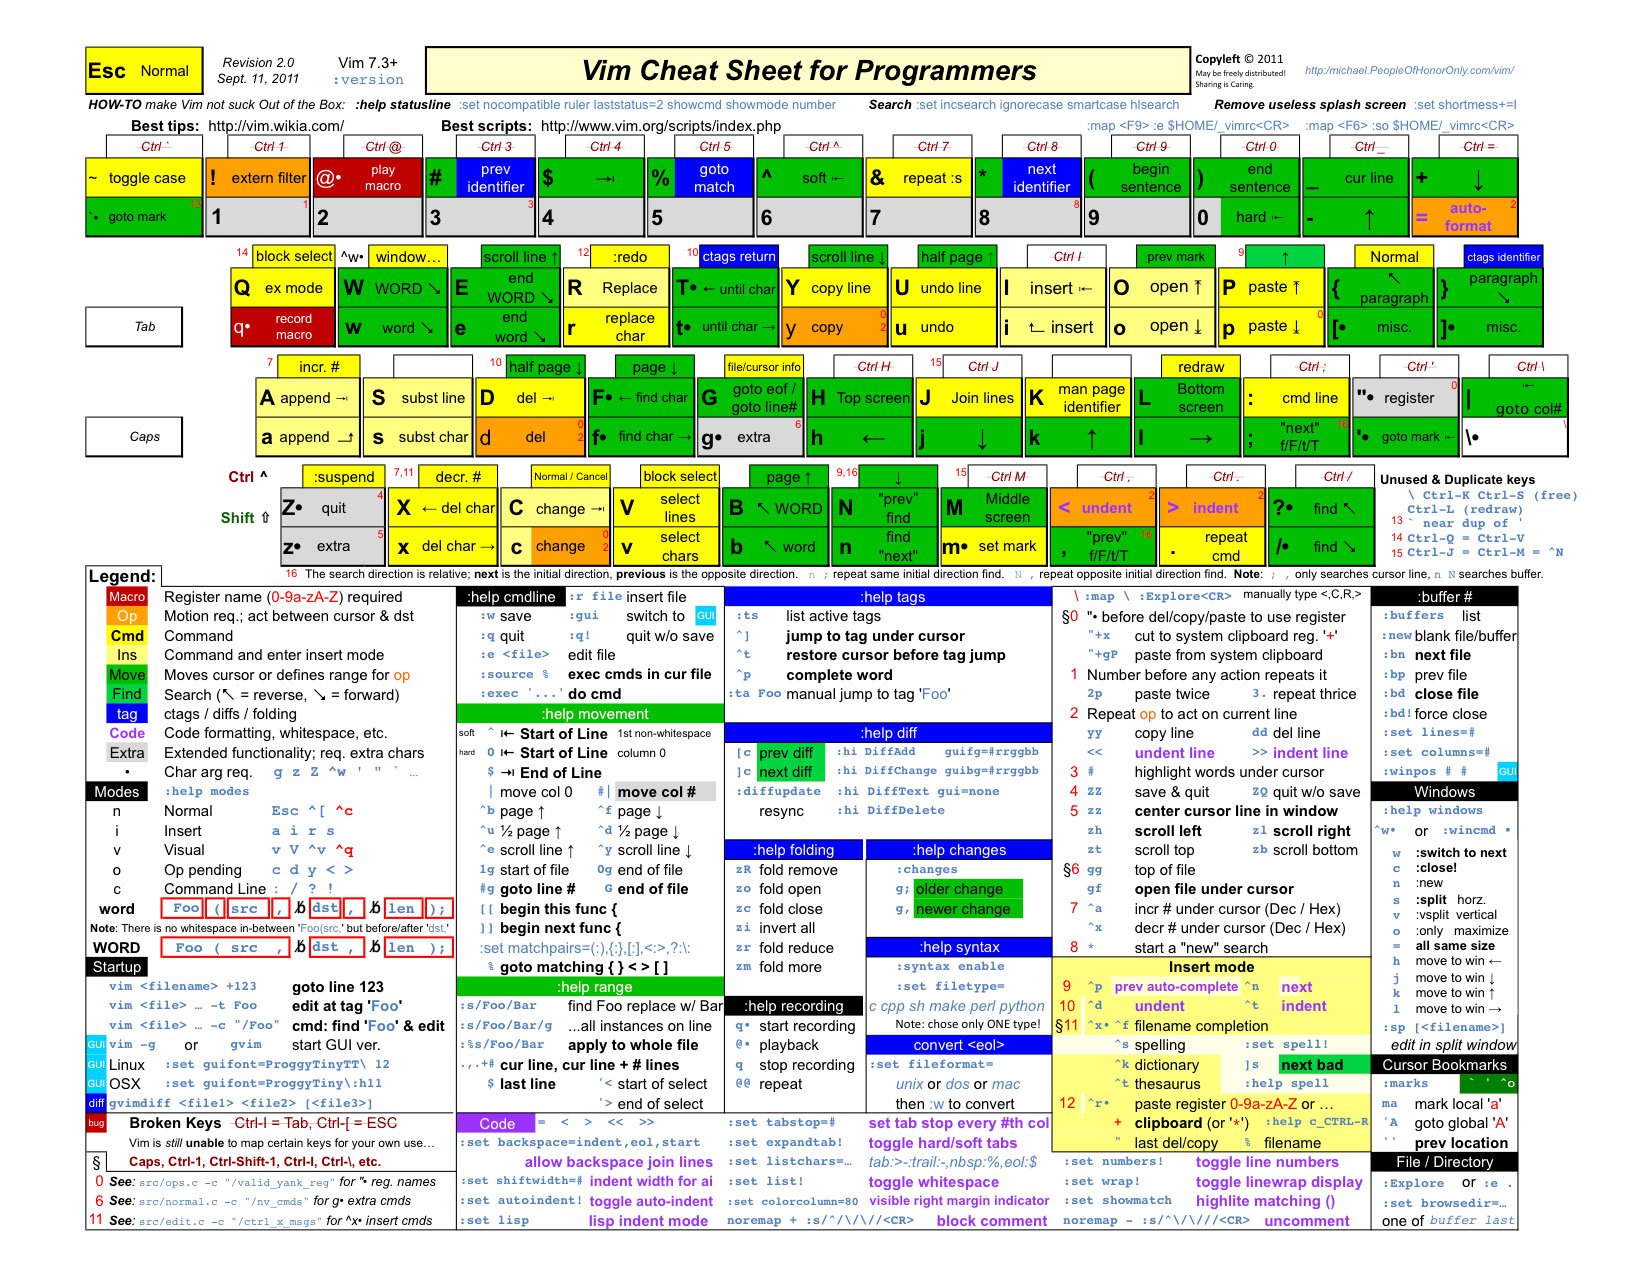
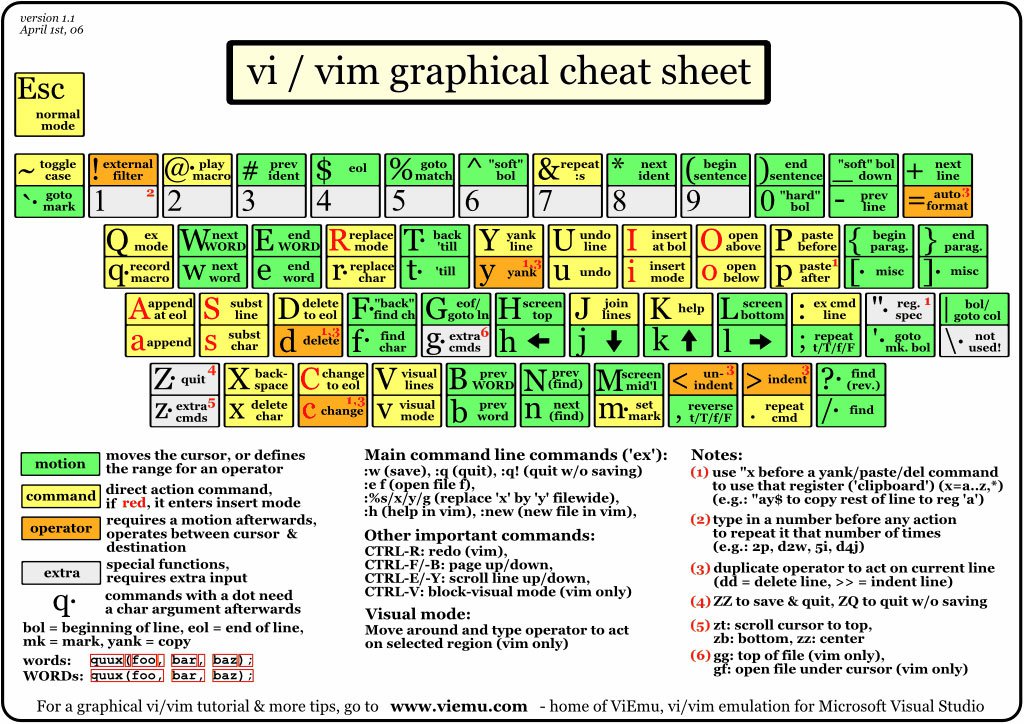
Recommended: Print out a reference sheet (or two or three)
Vim Training Class 1 - Basic motions and commands – 58:15
Get the homework files
To fetch the files for this assignment, enter
264get hw01
from bash. That should create a new directory called
hw01. To see the directory enter
ls . Next, enter
cd hw01
to enter the directory and start working.
Do the homework
Here's the scenario: You have been given a partially-working calculator for
ECE 264 grades. However, the code is very messy. First, you will fix the
formatting. Next, you will complete the code. Finally, you will finish the
code so that it prints out a course grade.
For this assignment, we will record the keys you type into vim. When the
assignment is scored, we will play the keys back to verify if you reached the
intended result. You will start with before.c
and finish with goal.c. Do not modify
goal.c or before.c. You may need those.
Do not use the arrow keys or mouse.
As with any tool, your coding will be most efficient if you use Vim in the
way that it was designed (e.g., j for down, k for
up, etc.). For this assignment, you are required to work in this way.
We will give you hints in purple
for some steps. For the others, you will need to use what you learned
from vimtutor and/or the reference sheet. In this explanation,
<esc> refers to the Escape key,
<enter> refers to the Enter key,
<tab> refers to the Tab key, and
<space> refers to the spacebar.
Tips
One session.
You must do the entire process in one vim session.
Repetition.
If you exit vim before
the files match, you will need to start over. For that reason, you may end
up doing the whole process several times. The repitition will serve as good
practice. Once you are very comfortable with vim and understand what you are
doing, it shouldn't take more than about 10 minutes to edit before.c into
goal.c.
⚠ Pitfalls
Do not use the arrow keys or mouse.
You will not receive credit if you do. To avoid accidentally using them, enter the
following command in vim (from normal mode):
:DisableMouseAndArrowKeys
and press enter. Do not depend on that command completely as it might not catch
all arrow keys.
Spacing.
Pay close attention to the spacing in goal.c. For example, all of the
// hw# and // exam# comments
start in column 11. The comma in those lines is in column 8. Vim shows the
current line and column in the lower-right corner of your screen.
Splits.
Opening a split while editing your after.c and recording your recorded.vim
will probably work out okay, but it isn't recommended. We suspect it
might lead to inconsistencies when the keystrokes are played back, but
we haven't verified this. If your recorded.vim is passing the HW01
pretester (264test_special_vim), then you should get 100% credit.
-W not -w.
When typing vim -W recorded.vim -n -i NONE after.c
, the -W must be uppercase
(i.e.,
-W not -w).
-W only for recording.
If you want to look at the files after you are done, be sure to not use
the -W recorded.vim argument to vim. Otherwise, you will overwrite
your recorded.vim and you will have to start over.
File size.
Your recorded.vim will be likely be >1500 bytes, and probably much more.
If it is very small (e.g., 0 bytes), you probably overwrote it.
(Type ls -l from bash to see the file sizes.)
Get the homework files
From bash, enter cp before.c after.c to
make a copy of the pristine starter file.
Next, enter vim -W recorded.vim -n -i NONE after.c
to open it in vim.
The extra parameters (-W recorded.vim -n -i NONE) are only for this assignment.
For those who are curious…
The -W recorded.vim parameter makes it
record your keystrokes. The -i NONE parameter tells Vim to
start fresh (i.e., forget macros and marks leftover from previous sessions). That way,
when we replay your session, we will get the same result you got.
The -n parameter turns off the swap file.
Fix the missing semicolon on line 4.
Move to line 4.
4G
Append a semicolon at the end. A;<esc>
Indent the body (everything inside the curly
braces) of the average function, which starts on line 15.
Search for "average".
/average<enter>
Go down one line (to get to the beginning of the body of this function).
j
Select the current line using visual mode.
V
Extend the selection to include the rest of the body of this function.
jjjj
Indent everything that is selected.
>
Indent the body of the for loop inside the average function.
Move to line 19 16.
Indent the current line.
>>
Indent the bodies of the weighted_sum, weighted_average,
and main functions, as well as any for loops
inside them.
Add a blank line after the second #include statement at the top.
Jump to the beginning of the file.
gg
Move your cursor to beginning of the second #include statement.
jj
Start a blank line below the current line.
o (lowercase letter)
Exit insert mode (to get back to normal mode)
<esc>
Add a blank line between the declarations of HOMEWORK_WEIGHTS
and NUM_EXAMS.
Add a blank line above the declaration of the average
function.
Search for "average".
Enter a blank line above the current line.
O (uppercase letter)
Exit insert mode (to get back to normal mode).
Ensure that there is exactly one blank line above all function
declarations.
In the const arrays declared at the top of the file (HOMEWORK_SCORES,
HOMEWORK_WEIGHTS, EXAM_SCORES,
EXAM_WEIGHTS), put each number on its own line.
Jump to the top of the file.
Move down to line 6 5.
Move to the beginning of the line.
0
(zero)
Move right by 4 words.
wwww
Insert a carriage return, and then immediately exit
insert mode (back to normal mode)
i<enter><esc>
Start creating a quick macro so you don't have to do that so
many times.
qq
Move right by words until the cursor is at the beginning of a number.
www
Insert a carriage return and then immediately exit insert mode
(back to normal mode).
Stop recording the quick macro.
q
Replay the macro once.
@q
Replay the same macro several more times.
@@@@@@@@@@@@ (…and so on)
Insert a carriage return just before the ending curly brace (})
and ensure that it is flush with the left side (i.e., not
indented).
Follow a similar procedure for HOMEWORK_WEIGHTS,
EXAM_SCORES, and EXAM_WEIGHTS.
Right align all of the numbers.
Move to the first 2-digit number in HOMEWORK_SCORES (70).
Insert one space before the line beginning.
I<space>
Go down one line (to get to the number 80).
Repeat the last action.
(period)
Do likewise for the rest of the two-digit numbers in HOMEWORK_SCORES.
Add a comment after every number in each of the const arrays
declared at the top of the file (HOMEWORK_SCORES, HOMEWORK_WEIGHTS,
EXAM_SCORES, EXAM_WEIGHTS),
to indicate which homework or exam they refer to.
Move to the first number in HOMEWORK_SCORES.
Append the text " // hw" at the end of the line.
A<space><space>//<space>hw<esc>
Move back to the first number in HOMEWORK_SCORES.
Append the number "1" at the end of the line so that the comment
reads " // hw1".
Append the numbers "2" to "15" at the end of the remaining lines
in HOMEWORK_SCORES.
Follow a similar procedure for HOMEWORK_WEIGHTS,
EXAM_SCORES, and EXAM_WEIGHTS.
Ensure that there is exactly one space after every comma in a
function parameter list.
Ensure that there is exactly one space before and after every
arithmetic operator, as shown in goal.c.
For the very long arithmetic expressions (exam_score, and
summary_score), break them into two lines but align the
equals sign in the first line with the plus sign in the second line,
as shown in goal.c.
There is a bug. The print_grade(…) function is used in
main(…) but is never defined. Add the following function just
above main(…):
Modify the print_grade(…) function so that instead of printing the
summary score, it prints the letter grade. You will need an if
statement (or if else) for each possible letter grade. Do not
type all of these repeatedly. Instead, you will use
copy-paste. (In vim parlance, these are called yank and put.)
Move to the definition of the print_grade(…) function.
Move to the end of the line.
$
Move to the corresponding closing curly brace.
%
Move up one line.
Delete the current line ("printf(…"). You should now
be back on the closing curly brace.
Add a line above this closing curly brace. This is where you
will enter the code to print the letter grade.
Type the following code.
if(summary_score >= 85) {
    printf("A\n");
}
Select the ending curly brace using visual mode.
Extend the selection upward to include all 3 lines of this if
statement and its body.
Yank (copy) the selection.
y
Move back to the ending curly brace of the if statement.
Put (paste) the text that you previously yanked directly below
the if statement.
p
Insert the text "else " at the beginning of this line.
Change "85" to "82" and change "A" to "A-" so that you have the
following:
Using a similar method, copy these 9 lines to insert the code for
"C+", "C", and "C-". Repeat for "D+", "D", "D-".
Add the else clause for the “F” grade.
Fix the two for loops so that they conform to the
Code Quality Standards, especially with respect to curly braces and
for loop counter scope
Make any other changes needed so that your after.c file is identical
to goal.c.
Save.
Exit vim.
:q<enter>
Test
There is a special pretester for HW01. From your hw01 directory, type 264test_special_vim . That will replay your keystrokes (recorded.vim) in vim and display any differences with goal.c. If there are no differences, then you are done. Your task is to edit before.c after.c to make it identical to goal.c. If it prints a "Congratulations..." message, you should receive 100%, once scores are posted (probably next week).
HW01 is special in that it is the only homework that
offers a pretester with a guarantee. On all future assignments, you will
be solely responsible for testing your code. If a pretester is offered,
it may be only a partial check, and it may not be available all the time.
Submit (or save)
In general, to submit any assignment for this course, you will use the following command:
264submit ASSIGNMENTFILES…
For HW01, you will type
264submit hw01 recorded.vim
from inside your hw01 directory.
You can submit as often as you want, even if you
are not finished with the assignment. That saves a backup copy which we can
retrieve for you if you ever have a problem.
Before you consider this done, you may want to look over the section on
pitfalls above.
How much work is this?
For those who do not know vim (or don't know it very well), we estimate it may take
about 2 hours to go through the tutorial(s) and another 2 hours to edit the
before.c to make it identical to goal.c, including time for several
repetitions.
If you already know vim well, this assignment should be very easy.
Q&A
Purpose of this assignment
I already know an editor. Why should I learn Vim?
Even if you know and love some other editor, learning Vim will make you a
more versatile programmer. Unlike most other editors, Vim can be used
through a terminal (e.g., PuTTY, ssh), which will make your life a lot
easier for all homework assignments in this course.
this course
In ECE 264, you will find the workflow for homework assignments a lot
simpler and less error-prone if you work directly on ecegrid through an
SSH terminal. The course is optimized for working in this way. You will
fetch starter files, test your code, and submit—all through an SSH
window. Although it would be possible to write your code in another
editor on your computer (e.g., Sublime, TextMate, etc.), and transfer the
files to ecegrid, that would be inefficient and error-prone. Once you
are comfortable editing code through an SSH terminal, you will not need
to transfer any files anywhere. Out in the world, that comes in
handy when editing code that runs on a server, as well as some embedded
systems.
Why not Emacs?
Emacs is the only
other viable choice for coding in a terminal. Like Vim, it is a very
powerful tool for programmers who take the time to learn it well.
We chose Vim for this course because (a) it is introduced lightly in CS
159, (b) its key replay features makes this assignment possible, and
(c) it is available and usually pre-installed on practically every
Linux/UNIX-based system in the world.
For decades, there was an ongoing debate over which of the two was better.
(Search for [editor war]
or [vim vs. emacs], or just read this
great article on Slate.)
In recent years, several online polls
(here,
here, and
here)
have found Vim to be more “popular”, by a ratio of around 4 to 1.
However, both have unique features and virtues that appeal to different
people. Those who prefer Emacs have plenty of great reasons to do so.
The choice of Vim for this class was borne of pragmatism.
Why are we learning any editor? Why not just focus on C?
This class is about “Advanced C Programming (verb), not “The C Language” (noun).
As such, the focus is on doing. When you finish this course, you will be expected
to know how to write programs. All serious code editors require some learning.
In the past, we found that many ECE students were so focused on the assignments
that they never took the time to learn any tool well. We created this assignment
to ensure that everyone knows at least one editor well enough to be productive.
Typically, very few students come in know some other editor well. Those that
do will still benefit, by becoming ambidextrous, and will most likely find this
assignment easy anyway.
Do I always have to use vim?
No. Everyone must learn Vim, and use it for this assignment. After
that, you are free to use whatever you like.
Are there any drawbacks to using some other editor?
Yes. If you use a local editor (i.e., running on your laptop or desktop computer),
you will need to transfer the starter files from ecegrid to your computer. Then,
every time you want to test them, you will need to transfer your code back to
ecegrid. Your code must compile and run on ecegrid using our version of the gcc,
so it is important to test on ecegrid. Finally, when you are ready to submit,
you will again need to transfer your files.
If you already know Emacs well, there is no drawback to using
that for future assignments. Emacs is installed on ecegrid, and works
well through an SSH terminal.
How can I possibly learn to use Vim while simultaneously solving challenging programming assignments?
This assignment is for you. Learning to use Vim—or any other serious
programming editor—well takes effort, so we are giving you this
assignment to focus on just that. After this, you will move on to C
programming. (There will be one more tool-focused assignment, in which
you will learn the Gdb debugger.)
Doing this assignment
How do I know if I have used any arrow keys?
Open your recorded.vim file in vim. (Be careful not to have the -W
flag!) The arrow keys will show up as any of the following:
<80>ku
<80>kd
<80>kl
<80>kr
What if I accidentally click the mouse in the window?
Press gg right afterward to put the cursor on
the top line. Then continue. That will make sure that accidentally
repositioning the cursor with the mouse doesn't throw off the line that you
are editing.
If I quit and come back, can I start where I left off?
Short answer: No.
It's easiest if you can do the whole thing in one session. If you quit, it
will leave a :q (or similar) command in your recorded.vim
file. We looked into possibly filtering those out, but it gets complicated
to do properly. Editing your recorded.vim file to remove the
:q<enter> is a possibility. You might try doing
:vert diffsplit goal.c to see
differences and fix them. (You would open your
after.c and then enter that command from
inside Vim.)
May I edit my recorded.vim file directly?
Yes. However, the script you turn in should be able to transform
before.c into
goal.c. If you can find a way to edit
your script to make that work, that's fine. However, it may be easiest to
just start over. Once you've learned the commands that this assignment
uses, the process of transforming
before.c into
goal.c should be relatively quick.
Scoring
How will this be scored?
We will run it with our tester, which works in a very similar way to the
pretester (264test_special_vim). It starts with the pristine
before.c—just as you received when you ran 264get.
It then copies before.c to after.c, just as you did when you
ran the cp before.c after.c command in bash.
Next, it opens Vim and replays your keystrokes using the recorded.vim that you
submitted. That should transform before.c to be identical to goal.c.
Finally, the tester compares the resulting after.c to a pristine goal.c,
line by line. If they are identical, you get 100% credit.
We might forgive very minor differences, but do not count on that, and do
not ask course staff what will be forgiven. Your job is to make them identical.
How can I be sure I will get 100%?
If the HW01 pretester (264test_special_vim) prints
“Congratulations” (in green), you should receive 100% credit. This is special for
HW01.
Disclaimer: This assumes you submit your recorded.vim—the same one that
was in your directory when you ran the pretester—with no further
modifications, and that you did not modify before.c or .vimrc
files.
HW01 is special in that it is the only homework that
offers a pretester with a guarantee. On all future assignments, you will
be solely responsible for testing your code. If a pretester is offered,
it may be only a partial check, and it may not be available all the time.
What if I get the “Congratulations” (in green) but I do not
receive 100% credit?
It is unlikely that our tester would give a different result from the
pretester you were given (264test_special_vim), but if it happens, we will honor
the result from the pretester. (Note: This is the only pretester that offers
such a guarantee.)
You will have an opportunity to submit a regrade request. We will then
run the pretester you were given (264test_special_vim) in a directory with
a pristine before.c and the same recorded.vim that you submitted.
Alternative, we may ask you to come to office hours and do the same from your
account. If it prints “Congratulations” (in green), then we will make sure you get 100% credit.
If it does not print “Congratulations” (in green), we will not negotiate the amount of
partial credit (if any). Please submit a regrade request only if you
got your after.c identical to goal.c, as evidenced by the
“Congratulations” (in green) message.
What if I get it close, but it does not print
“Congratulations” (in green)?
We may assign partial credit, based on the number of lines that matched.
A line that matches partially—i.e., different by a few characters—is not a
match.
We will not negotiate the right amount of partial credit.
Do not submit a regrade request asking for more partial credit.
About Vim
What is vim?
Vim is a code editor (a text editor designed for programming).
What's the difference between vim and vi?
Typing vi gives you vim in a "compatibility mode" that simply turns off
many of the newer features. It is actually the same program. There is no
reason to type vi. Type
vim instead.
Where can I use it?
Vim is almost always installed on Linux and UNIX machines. On Windows, you
can install gVim, which gives you GUI.
Can I use the mouse with Vim?
Yes. This works in PuTTY, but may not work in other SSH programs. (This
sample .vimrc enables this for you. If you are using your own .vimrc file,
you need to add
set mouse+=a to it.)
Can I use tabs?
Yes. To open several files using tabs, use the -p flag at the command line
(e.g., vim -p file1.c file2.c …). Within Vim,
use the :tabe command to open another file in a separate tabe (e.g.,
:tabe file2.c). With the sample .vimrc file,
you can also just press F2 to open a new tab, [ to move to a tab to the
left, and ] to move to the tab to the right.
Can I get syntax highlighting?
Yes. (The sample .vimrc file turns this on for you.)
Trivia
What do the codes mean that I see in recorded.vim?
In helping some students troubleshoot HW01, we have learned
a bit about the internal workings of Vim and these strange key logs (i.e., recorded.vim.
We are sharing this, in case anybody is curious.
This is trivia. You do not need to read or understand anything in this Q&A entry.
That said, here are what most of the codes mean.
<80>ku
↑ up arrow
<80>kd
↓ down arrow
<80>kl
← left arrow
<80>kr
→ right arrow
^M
Enter key
^]
Esc key
^I
Tab key (use set :list to show these
<80>kI
Ins key
<80>kN
PgDn key
<80>kP
PgUp key
<80>kb
Backspace key
<80>k1
F1 key
<80>k2
F2 key
<80>k3
F3 key
<80>k4
F4 key
<80>k5
F5 key
<80>k6
F6 key
<80>k7
F7 key
<80>k8
F8 key
<80>k9
F9 key
<80>k2
F2 key
<80>k3
F3 key
<80>k4
F4 key
<80>k5
F5 key
<80>k6
F6 key
<80>k7
F7 key
<80>k8
F8 key
<80>k9
F9 key
<80>k;
F10 key
<80>F1
F11 key
<80>F2
F12 key
<80><fd>▒
ignore − probably internal window events
<80>ý▒
ignore − probably internal window events
When reading one of these, it is best to run two commands:
:s/Ctrl v80Ctrl vfd.//g
:set list
The first one strips out the irrelevant window event codes. They do not correspond to
keys or mouse actions. They just make the file hard to read. The second command tells
Vim to show Tab keys as ^I. Otherwise, they may show as just a few spaces.
If you are trying to understand why a recorded.vim isn't working as you expected, it helps
to strip out the window event codes (e.g., <80><fd>`). Make a
“clean” copy of your recorded.vim without them using the sed command.
From bash:
sed '/\x80\xfd.//g' < recorded.vim > clean.vim
Next, submit and make a backup copy of your original recorded.vim.
Now, you can make a shorter version of recorded.vim using the head
command, to see where the problem started. This command copies all but the last
50 characters of clean.vim to recorded.vim.
head -c -50 > recorded.vim
Updates
1/14/2020
Fixed line numbers (6 → 5; 19 → 16).
1/16/2020
Added warning that -W is capital, not lowercase.
Added a section about Pitfalls.
Added Q&A items about scoring.