The content of this document may be incorrect or outdated.
Print this article Edit this article
Thunderbird for Windows IMAP Client Setup
| If your mailbox is on... | and your computer is... | and you'd like to use... | then follow these instructions: |
|---|---|---|---|
| an ECN server | an ECN-maintained Windows desktop PC | Thunderbird version 2.x | The page you're reading now; start at step #1, below. |
| an ECN server | a laptop, home computer, or self-supported on-campus PC | Thunderbird version 2.x | The page you're reading now; start at step #1, below. |
| an ECN server | an ECN-maintained Windows desktop PC | Outlook 2007 | Outlook should not be used; start at step #1, below, to set up Thunderbird instead. |
| an ECN server | a laptop, home computer, or self-supported on-campus PC | Outlook 2007 | Configure Outlook 2007 for IMAP to ECN |
| ITaP Exchange | an ECN-maintained Windows desktop PC | Thunderbird version 2.x | Please contact ECN to discuss your specific e-mail needs |
| ITaP Exchange | a laptop, home computer, or self-supported on-campus PC | Thunderbird version 2.x | ITaP's Thunderbird instructions; or follow ITaP's Outlook 2007 instructions for full Exchange functionality. |
| ITaP Exchange | an ECN-maintained Windows desktop PC | Outlook 2007 | Please contact ECN and ask us to run our Outlook setup script. |
| ITaP Exchange | a laptop, home computer, or self-supported on-campus PC | Outlook 2007 | ITaP's Outlook 2007 instructions |
Thunderbird is a popular free e-mail client for Windows and Macintosh. Download the latest version from Mozilla's web site. These instructions describe how to configure Thunderbird on a Windows-based PC as an IMAP client for a mailbox on an ECN server.
If your mailbox is on the ITaP Exchange server, ECN recommends that Windows users set up Microsoft Outlook. (Conversely, if your mailbox is on an ECN server, ECN recommends against using Outlook. Follow the instructions below to use Thunderbird instead.)
Macintosh users: For an ECN mail account, see our Thunderbird for Macintosh instructions. For an ITaP Exchange account, see our Thunderbird for Mac Exchange client instructions.
These instructions were written using Thunderbird 2.0.0.9 running in Windows XP SP2. Any version of Thunderbird 2.x will probably work the same or similarly.
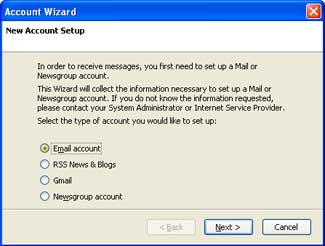 Configuring Thunderbird for a mailbox on an ECN server
1. Launch Thunderbird. The first time you launch Thunderbird, the program will likely take you into its Account Wizard dialog (see the illustration, right).
- If Thunderbird asks you about importing settings and mail folders, select "Don't import anything" and click the "Continue" button.
- If Thunderbird does not take you into its Account Wizard dialog, click on the Tools menu and select "Account Settings"; then click the "Add Account" button.
Select the "Email account" option.
Then click the "Continue" button.
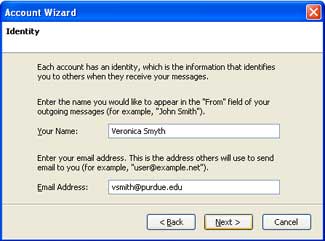 2. Identity.
2A. In the "Your Name" field, type your name as you'd like it to appear in outgoing messages.
2B. In the "Email address" field, type your address in this format, specifying your own Purdue Career Account username:
username@purdue.edu
2C. Then click the "Continue" button.
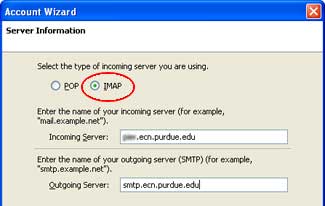 3. Server information.
3A. For the incoming server type, select "IMAP". (It is very important not to miss this! The dialog should appear only as shown in the illustration at right. ECN does not recommend using "POP".)
3B. In the "incoming server" field, type the specific name of your ECN home server in this format:
server.ecn.purdue.edu
There are many ECN mail servers (including dynamo, fairway, gilbreth, min, shay, and many others), but only one specific server name is valid for you. If you're not sure which server your mailbox is on, please contact us before proceeding.
3C. In the "outgoing server" field, type exactly the following:
smtp.purdue.edu
Regardless of the server name you used in step 3B, everyone should use smtp.purdue.edu for step 3C.
(If you're adding the ECN server as a second e-mail account, Thunderbird might not ask for an outgoing server value here. You'll need to tweak outgoing server settings later.)
3D. Then click the "Continue" button.
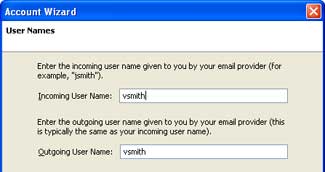 4. User Names.
Thunderbird should have already filled in the "incoming user name" and "outgoing user name" fields for you. Your Purdue Career Account username is the correct value.
Click the "Continue" button.
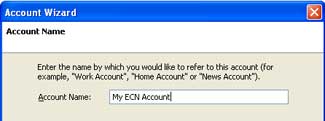 5. Account Name.
The "account name" field's setting won't have any effect on your ability to send or receive messages, but we suggest entering the following value in this field:
My ECN account
Then click the "Continue" button.
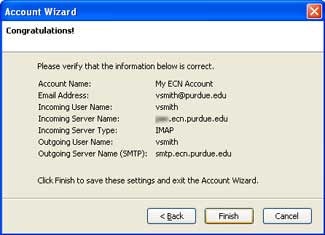 6. Verify information.
Thunderbird presents a dialog with a summary of the information you've entered so far.
If you see no obvious errors, click the "Finish" button.
 7. Disabled login alert.
Thunderbird will likely present a dialog which reads "You cannot log in to server.ecn.purdue.edu because the server has disabled login. You may need to connect via SSL or TLS. Please check the account settings for your mail server."
This alert message is normal.
7A. Click the "OK" button.
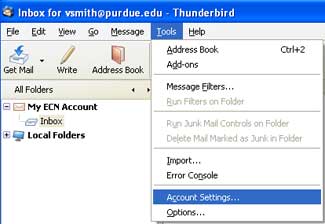
7B. Then click on the Tools menu and select "Account Settings."
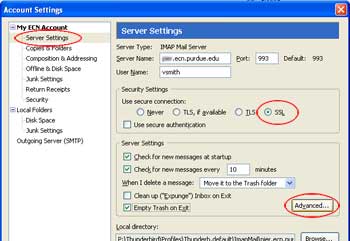 8. Account settings dialog.
8A. In the left-hand column beneath "My ECN account,", click on "Server Settings."
8B. In the "Security Settings" area, select "SSL".
8C (optional step). Enable the "Empty Trash on Exit" option. This tells Thunderbird to erase the messages you had previously deleted from your Inbox or other folders.
8D. Click the "Advanced" button. A new dialog will appear.
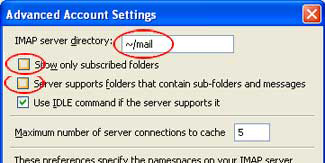 9. Advanced settings.
9A. In the "IMAP server directory" field, type exactly the following:
9B. Disable (uncheck) the "Show only subscribed folders" and the "Server supports folders that contain sub-folders and messages" options.
The default values on all other options in this dialog are fine.
9C. Click the "OK" button.
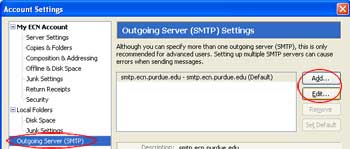 10. Adding or editing the outgoing server.
10A. In the left-hand column, click on "Outgoing Server (SMTP)".
10B. Click the "Edit" button. (If the outgoing server "smtp.purdue.edu" is not already listed in the dialog, click the "Add" button instead.)
The "SMTP Server" dialog (see the illustration, below right) will appear.
10C. In the "Description" field, type (or verify) the following: smtp.purdue.edu
10D. In the "server name" field as well, type (or verify) exactly the following: smtp.purdue.edu
10E. In the "Security and Authentication" area, near the lower right corner of the dialog, select "SSL" or "StartTLS". Enter the port number: 587
10F. Then click the "OK" button.
10G. Finally, click the "OK" button to dismiss the account settings dialog.
11. Setting your ECN account's outgoing server.
This step is necessary only if you're setting up a second e-mail account in Thunderbird. If your ECN account is your only mailbox, skip to step #12.
11A. In the left-hand column, click on "My ECN account."
11B. On the right-side, there is a pop-up menu next to "Outgoing Server (SMTP)". From this menu, select the entry which begins with "smtp.ecn.purdue.edu". (An entry which begins with smtp.purdue.edu, if it exists, is not the one to use here.)
11C. Finally, click the "OK" button to dismiss the account settings dialog.
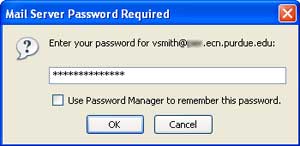 12. Check mail.
12A. Click the "Get Mail" button on Thunderbird's toolbar.
12B. When prompted, type in your Purdue Career Account password and click the "OK" button.
If you'd like, before clicking "OK," you may enable the "Use Password Manager to remember this password" option so that you don't have to type your password each time you launch Thunderbird. The next time you run Thunderbird after changing your Purdue Career Account password, you will see this password prompt again.
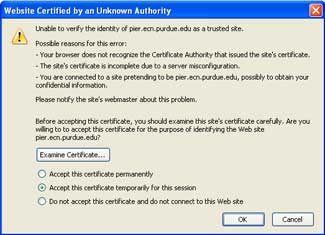
12C. If you see an "unable to verify server.ecn.purdue.edu as a trusted site" message (see the illustration, below right), you may select the "Accept this certificate temporarily for this session" option and then click the "OK" button.
This issue will be corrected in a moment (beginning in step #13).
12D. In the folder list on the left, click on the Inbox. Your e-mail messages will appear at the right.
This completes the minimum steps required to receive e-mail in Thunderbird from your ECN account.
The first time you send an outgoing message, Thunderbird might prompt for a username and password again. This is normal, and you may optionally enable the "Use Password Manager" option again (as in step #12B). In ECN's environment, different network servers are used to process incoming and outgoing messages. Thunderbird prompts separately for valid passwords for each, even though both servers use your same Purdue Career Account password.
 ECN security certificate
Security certificates on ECN servers are valid for six months. You can either expect to see an alert like the one described in step #12C about that often ... or you can follow these steps to prevent the alert messages.
14. Advanced options.
14A. You'll need to download a file to your computer. Right-click (click with the right mouse button) on the following link, and then select the menu option which allows you to save the file. (The menu option might read "Save Target As" , "Save Link As", or something similar.)
https://engineering.purdue.edu/ECN/Resources/Documents/UNIX/cert/ecn.purdue.edu.crt
Save the file to a convenient location on your computer such as the desktop or "My Documents."
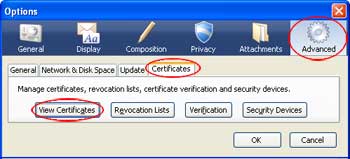
14B. Click on the Tools menu and select "Options."
14C. In the dialog which appears, click the "Advanced" icon on the toolbar (near the upper right corner of the dialog).
14D. Click the "Certificates" tab (in the middle center).
14D. Then click the "View Certificates" button.
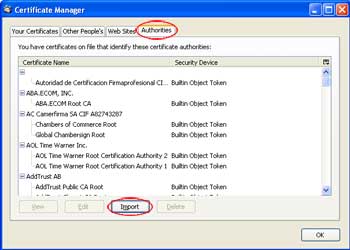 15. Certificate Manager.
15A. In the "Certificate Manager" dialog, click the "Authorities" tab.
15B. Then click the "Import" button.
15C. Navigate to the location where you stored the file during step #13A.
15D. Select the file "ecn.purdue.edu.cer" and then click the "Open" button.
(A common mistake: During the import, if Thunderbird appears to be looking for files of type "PKCS12" or if it asks for a password when you attempt to import the file, you are probably in the Certificate Manager's "Your Certificates" tab rather than the "Authorities" tab. Make sure that you didn't miss step #14A.)
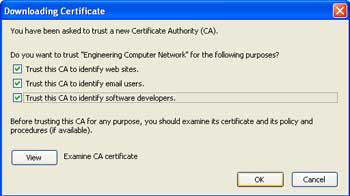 16. Certificate trust options.
16A. Enable (place a check mark in) all three "Trust this CA" options.
16B. Click "OK" to exit from the "Downloading Certificate" dialog.
16C. Click "OK" to exit from the "Certificate Manager" dialog.
16D. Click "OK" to exit from the "Options" dialog.
Thunderbird configuration is now complete!
Last Modified:
Aug 4, 2020 2:43 pm America/New_York
Created:
Oct 31, 2007 12:32 pm GMT-4
by
admin
JumpURL:
