Notice! This document is currently in
Archived
status.
The content of this document may be incorrect or outdated.
The content of this document may be incorrect or outdated.
Print this article Edit this article
Printing: TCP/IP Printing in Mac OS X (10.2+)
Printing services were greatly enhanced in OS X 10.2. This FAQ contains information not pertinent to previous versions of OS X, namely 10.0.x and 10.1.x. You should be running Mac OS X 10.2.0 or above to use this. To check what version of OS X you are running, click on the Apple menu in the top left corner, and select About This Mac. Under the Mac OS X logo will be the version of Mac OS X that you are running. See Figs. 1 and 2.
 Fig. 1 ===>
  Fig. 2
-
Once you have confirmed that you are running OS X 10.2, the first step is to understand some differences between the way that Mac OS 8/9 handled IP printing and how OS X does it. In OS X the Chooser is gone, and all printing is now routed through the Print Center. The Print Center application can be found in the Utilities folder, which is most commonly found in the Applications folder.
First, you should locate the Print Center application and open it. See Fig. 1
 Fig. 1
 -
After that, you will be presented with the main Print Center window. From here you can set up and manage your printers and print jobs. See Fig. 2.
 Fig. 2
-
The first step is to add a printer. Before you can add a printer you must know the name and IP address of the printer. This can usually be found on the printer itself; if not, you will have to ask your local network administrator for more information. Once you have the name and IP address of the printer, click the Add button. See Fig. 3.
 Fig. 3
-
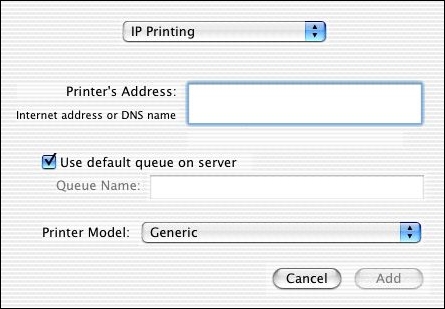
At the pop-up menu at the top, make sure IP Printing is selected. Here you can enter the IP address of the printer. The printer may or may not have a unique queue name. Again, see your local network administrator for details. See Fig. 4.
 Fig. 4
-
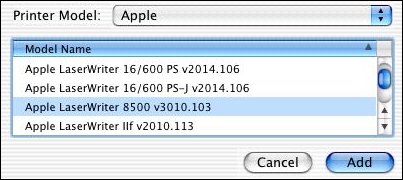
In the Printer Model pop-up, select the manufacturer of the printer you will be printing to. A large number of printer drives come installed with Mac OS X. After the manufacturer is selected, you can select the printer model. See Fig. 5.
 Fig. 5
-
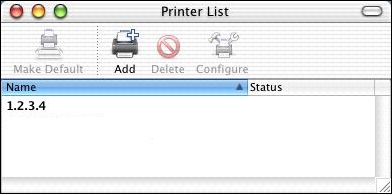
After you have selected the model of th printer, click Add. This will enter in the name of the printer into the Print Center window, with the name of the printer equaling the IP address you entered for the window. See Fig. 6.
 Fig. 6
-
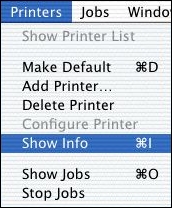
The next step is to add printer options and to rename it. If you double-click on the printer you can get a status report on it and manage jobs; however, we want to change some properties about the printer; so, we will instead type command-I, or select Show Info from the Printers menu. See Fig. 7.
 Fig. 7
-
In this menu, the first thing we will do is change the name of the printer. Highlight the name (it should still be the IP address) and change it to what would make it more recognizable (eg. Undergrad Office HP 8100, etc.). Note that since you cannot change the IP address in this menu, there is no fear of erasing the IP address information. Please note that whenever you make a change, click Apply Changes before proceeding, to ensure that your changes are saved. See Figs. 8 and 9.
 Fig. 8 ===>
  Fig. 9
-
The last options we will set will be Installable Options. Navigate to that menu in the pop-up at the top of the Printer Info window. See Fig. 10.
 Fig. 10
-
Once there, you can select options based on what printer you have. The options listed will differ between printer models. If your printer does not have access to a certain option it will probably not be listed. Be sure to always click Apply Changes before closing the window.
- You will have to repeat this operation for each printer you wish to use. Also, if you make a mistake in entering in the name, address, or manufacturer/model of the printer, you will have to add a new printer; you will not be able to edit the current one.
Last Modified:
Dec 19, 2016 11:12 am US/Eastern
Created:
Nov 6, 2007 1:46 pm US/Eastern
by
admin
JumpURL:
