The content of this document may be incorrect or outdated.
Print this article Edit this article
ITaP VPN - Manual Setup via L2TP for MacOS
Deprecated: Please use the Cisco AnyConnect client from webvpn.purdue.edu
Manual VPN Setup using L2TP For MacOS
Mac OS X includes a native VPN client. You can use the Mac OS X VPN client to make an L2TP VPN connection to Purdue.
Configure the L2TP Network Settings
To prepare a Mac OS X device to make an L2TP VPN connection, you must configure the L2TP connection in the network settings.
1.) Open System Preferences and select the Network icon
2.) Click the '+' icon in the lower left-hand corner
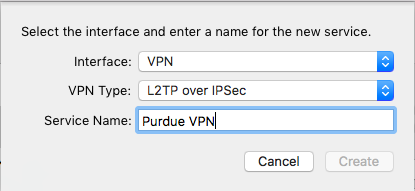
3.) In the Interface section, select VPN
In the VPN Type section, select L2TP over IPSec
For the Service Name, use something like ‘Purdue VPN'

4.) Click Create, and this will create a new adapter on the left side. Select the new Purdue VPN adapter.

5.) Check the Show VPN status in menu bar option near the bottom of the window.
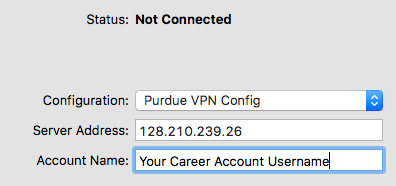
6.) In the Configuration section, select Add Configuration… and name it something such as “Purdue VPN Config”.
For the Server Address, input: l2tp.purdue.edu
For the Account Name, use your Purdue Career Account username.

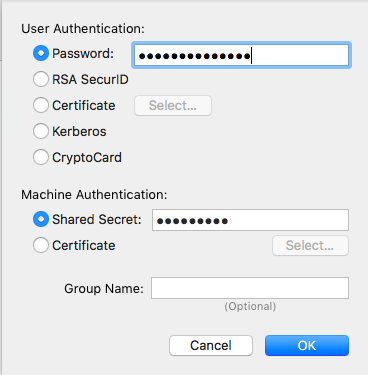
7.) Click Authentication Settings…
8.) Input your Purdue Career Account password in the Password section, you can also leave this blank and you will be prompted for your password when you connect.
In the Shared Secret section, input: PurdueVPN
Click OK

9.) Click Apply in the lower right corner
10.) Click Connect, and the Purdue VPN connection should be green and the Connect Time will be counting up.

After the initial setup to start the L2TP connection:
- In the Apple menu, select System Preferences.
- Click the Network icon.
- Select the VPN connection you created in the Network dialog box.
- Click Connect.
- To make the connection easier to replicate in the future Click on the checkbox in the bottom of this panel "Show VPN status in menu bar".
- You should be able to start/reconnect the VPN connection from the Apple Menu from this point on.
- IF/when your career account password changes you'll need to follow these steps again but only 13 and 15 above if you entered a password in step 13.
After the VPN connection is started, the Connect button changes to Disconnect.
NOTE: In order to get "all the traffic" to be routed via L2TP/IPSec, you need to go to the "Advanced" setting once you create the VPN connection and tick the "Send all traffic over VPN connection" box under the "Options" tab. It may be unchecked by default.
Last Modified:
Nov 13, 2018 2:40 pm US/Eastern
Created:
Oct 17, 2017 8:59 am GMT-4
by
admin
JumpURL:
