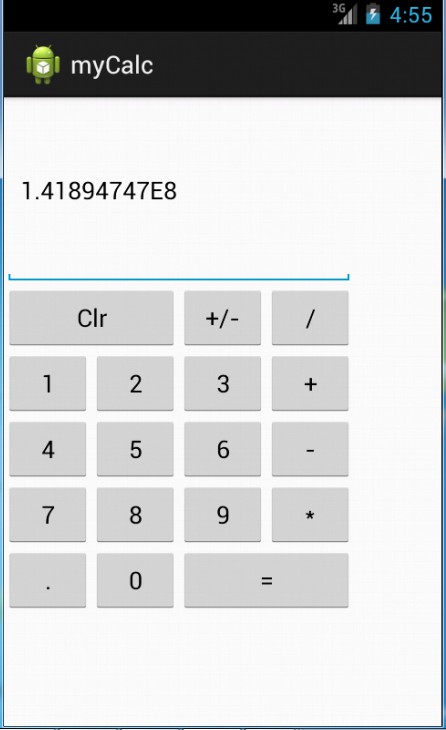
Download Android SDK and install it in Eclipse. Write a simple Android application to test on the android simulator. I wrote a simple calculator android program and tested on the simulator which works fine.
January 9, 2013 (1 hour):
Meet with teammates to discuss preliminary project proposal. We decided to make a mini google street car which can be controlled by android application
through Wi-Fi to move around and capture images.
January 10, 2013 (2 hours):
Meet with teammates to separate jobs to finish writing preliminary project proposal.
WEEK 01 SUMMARY
Accomplishments: Submitted preliminary project proposal.
Weekly Work Total: 3 hours
Project Work Total: 3 hours
January 12, 2013 (1 hour):
Build team folder on the course website.
January 18 2013 (2 hours):
Meet with teammates to finish final proposal for the 477 project.
WEEK 02 SUMMARY
Accomplishments: Complete final proposal.
Weekly Work Total: 3 hours
Project Work Total: 6 hours
January 24, 2013 (2 hours):
Learn Eagle tutorial and do PCB homework.
January 26, 2013 (4 hours):
Download Android SDK and install it in Eclipse. Write a simple Android application to test on the android simulator. I wrote a simple calculator
android program and tested on the simulator which works fine.
January 27, 2013 (2 hours):
Preliminary parts discussion with teammates. Limit choices of car selections.
WEEK 03 SUMMARY
Accomplishments: PCB homework and Preliminary parts review.
Weekly Work Total: 8 hours
Project Work Total: 14 hours
January 28, 2013 (1 hour):
Meet with teammates to analyze parts needed and discuss constrains of our projects.
January 30, 2013 (0.5 hours):
Review constrains homework for Libo.
February 3, 2013 (1 hour):
Meet with teammates to discuss and compare parts we found online.
WEEK 04 SUMMARY
Accomplishments: Design constrains homework Review, compare parts.
Weekly Work Total: 3.5 hours
Project Work Total: 17.5 hours
February 4, 2013 (2 hours):
Meet with teammates to finalize parts and decide which chassis to use for our project. Based on requirements for our project, we decided to make chassis by
ourselves. Libo will design and make the chassis by the end of next week.
February 7, 2013 (1 hour):
Help Chun-da to review packaging homework. I checked part of the homework to make sure every requirement listed on the homework document was included
and make sure the information was correct.
February 9, 2013 (1 hour):
Design the Android application interface and list all function we need for this application. We need a display window, a control panel, a battery
monitor window and a single map. We should be able to move our car and switch cameras using this application.
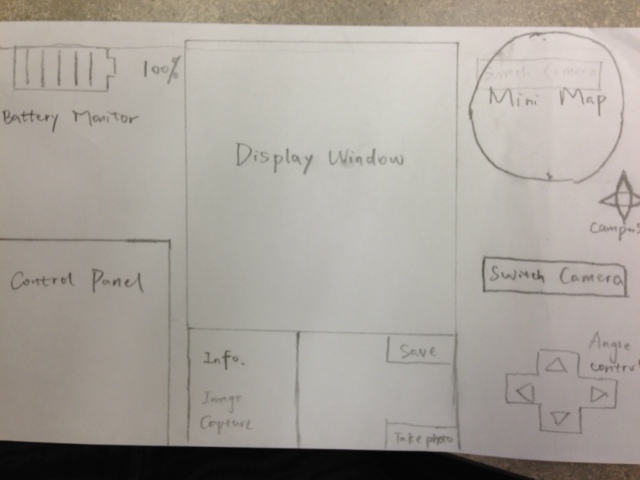
February 10, 2013 (1.5 hour):
Meet with Chun-ta and Zongyang to discuss my design of interface of our Android application. We added a function that this application will be able to
capture images and save on the applet. Check next week's homework requirements.
WEEK 05 SUMMARY
Accomplishments: Packaging design and Preliminary 3D design of the chassis, Android app interface design.
Weekly Work Total: 5.5 hours
Project Work Total: 23 hours
February 11, 2013 (4 hours):
Redesign the team webpage and update new information on it.
February 13, 2013 (1 hour):
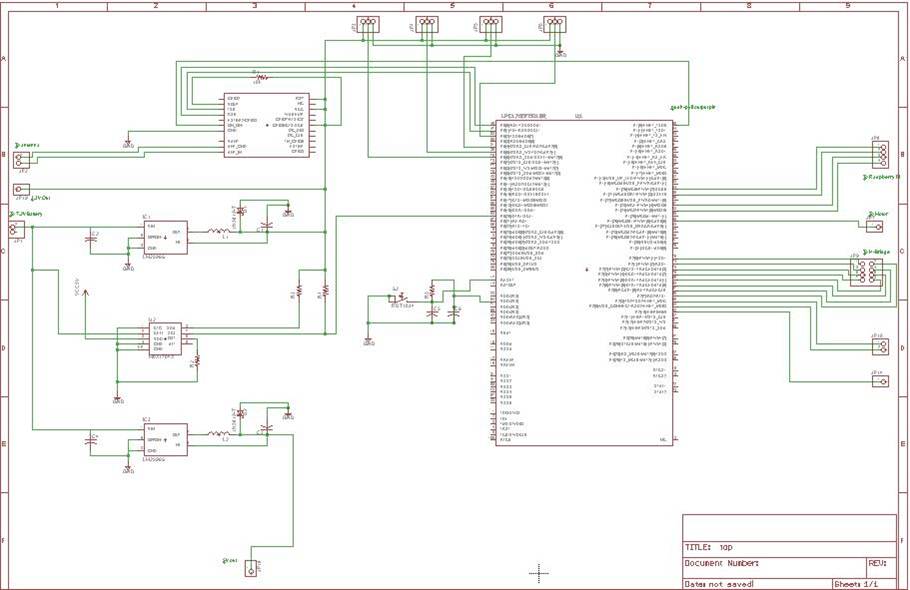
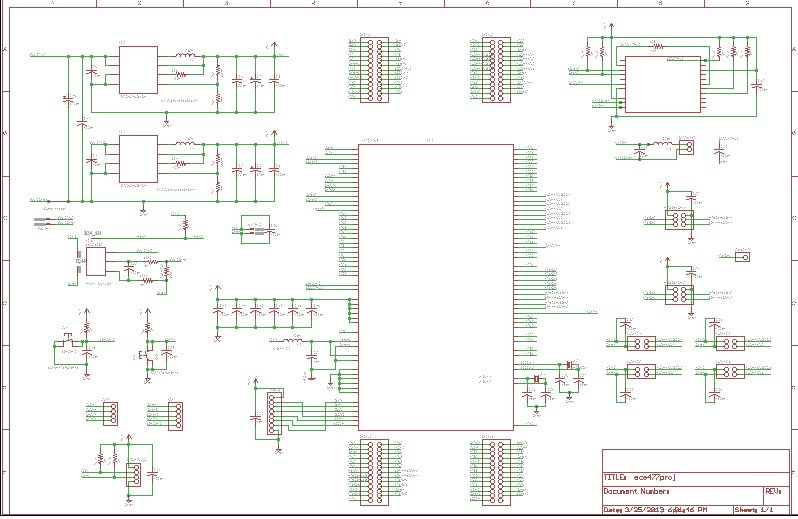
Preliminary block diagram design, analysis of function of each components and how they interact with each other.
The Raspberry Pi will function as a server to communicate with Android devices through a Wifi adaptor. It will also be connected to the mbed lpc 1768
microcontroller. Two cameras will be directed connected to Raspberry Pi and data will be transferred to Android devices through the server and Wifi. The
fuel gauge, H-bridage, CPS, compass, ultra sonic sensors and camera servo motor will all be connected the microcontroller.

February 15, 2013 (1 hour):
Have a team meeting dicussing on the final parts selection to meet specifications for the Raspberry Pi and mbed npc 1768 microcontroller. We were
struggling on which power and regulators to use to provide 3.3 V and 5 V power supply. We also decided each team's job for our project for the remaining
weeks. I was in charge of the whole Android section as well as the communication bewteen Android and the server on Raspberry Pi.
WEEK 06 SUMMARY
Accomplishments: Set up for the new team website, finalize each team member's job
Weekly Work Total: 6 hours
Project Work Total: 29 hours
February 18, 2013 (3 hours):
Use Eagle to modify the PCB schematics from last week's homework. We have changes our regulators and reposition all ultra sonic sensors.
February 19, 2013 (8 hours):
Use Eagle to do the PCB layout.
February 21, 2013 (6 hours):
Doing this week's homework: Printed Circuit Board Layout Design Narrative
WEEK 07 SUMMARY
Accomplishments: PCB schematic and layout, Homework6
Weekly Work Total: 17 hours
Project Work Total: 56 hours
February 26, 2013 (3 hours):
Meet with team to prepare the design review on Wednesday. We modified our PCB schematics as well as PCB layout.
February 30, 2013 (6 hours):
Doing research and learn on how to use java socket to set up an Android client.
WEEK 08 SUMMARY
Accomplishments: Formal Design Review, Research on how to build an Android Client.
Weekly Work Total: 9 hours
Project Work Total: 65 hours
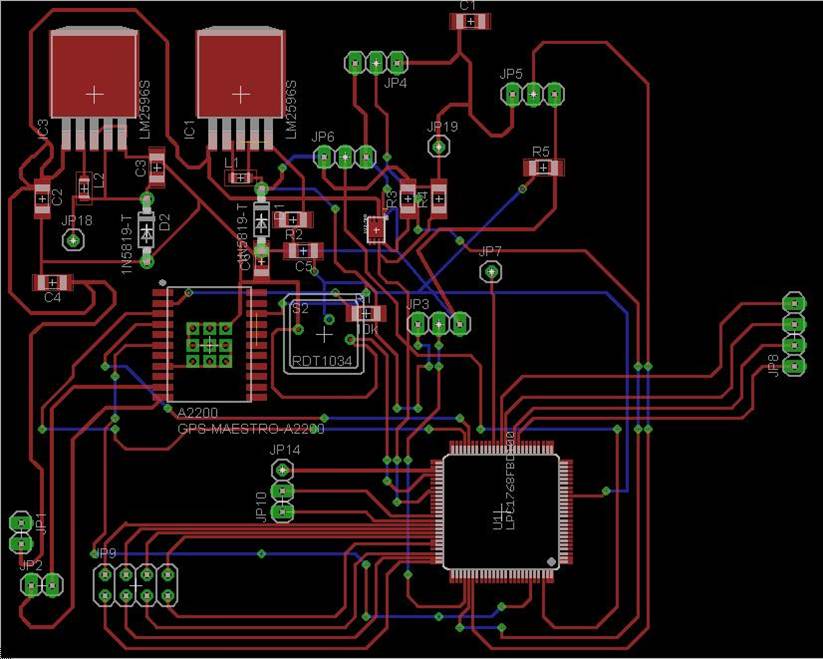
February 26, 2013 (2 hours):
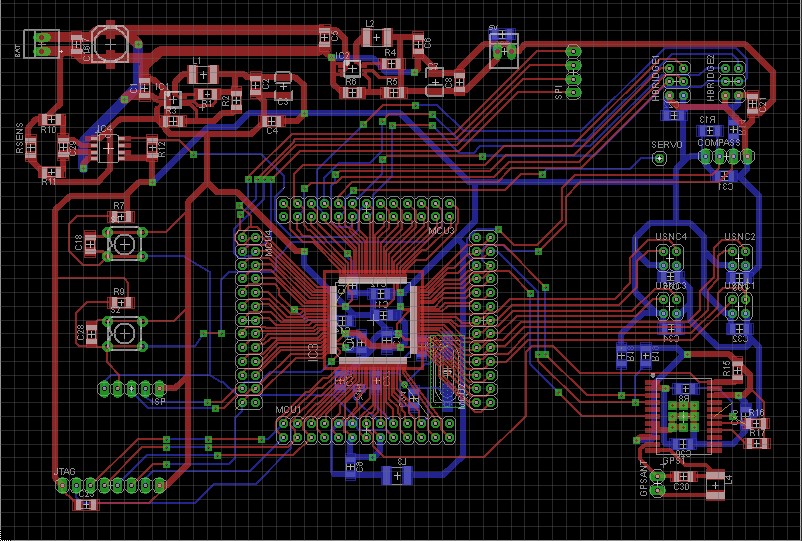
PCB schematic and PCB layout finalization.
Final PCB Schematic:
Final PCB Layout:
WEEK 09 SUMMARY
Accomplishments: PCB finalization
Weekly Work Total: 2 hours
Project Work Total: 67 hours
WEEK 10 SUMMARY
Accomplishments: Spring Break
Weekly Work Total: 0 hours
Project Work Total: 67 hours
March 11, 2013 (4 hours):
Android Real Device Connection and Wifi Module Test
Running programs on real Android devices:
"On Android 4.2 and newer, Developer options is hidden by default. To make it available, go to Settings > About phone and tap Build number seven times. Return to the previous screen to find Developer options."
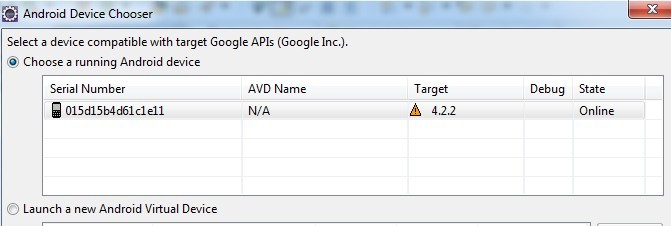
Initially my Eclipse was not able to detect Asus Nexus 7 and could only run applications on Android virtual devices. After searching solutions on the Internet, I updated the drive and set Nexus to debugging mode. Finally, the problem was solved and the device could be detected.
Notes about how to use Android WiFi :
1. Change WiFi connectivity state
a) Get WiFi service
WifiManager wfiManager = (WifiManager)Context.getSystemService(Service.WIFI_SERVICE);
b) Open WiFi adaptor
wifiManager.setWifiEnabled(true);
c) Close WiFi adaptor
wifiManager.setWifiEnabled(false);
d) Get current WiFi state
wifiMnagaer.getWifiState();
2. WiFi states defined in android.net.wifi:
public static final int WIFI_STATE_DISABLED:
Constant Value: 1 (0x00000001)
public static final int WIFI_STATE_DISABLING:
Constant Value: 0 (0x00000000)
public static final int WIFI_STATE_ENABLED:
Constant Value: 3 (0x00000003)
public static final int WIFI_STATE_ENABLING:
Constant Value: 2 (0x00000002)
public static final int WIFI_STATE_UNKNOWN:
Constant Value: 4 (0x00000004)
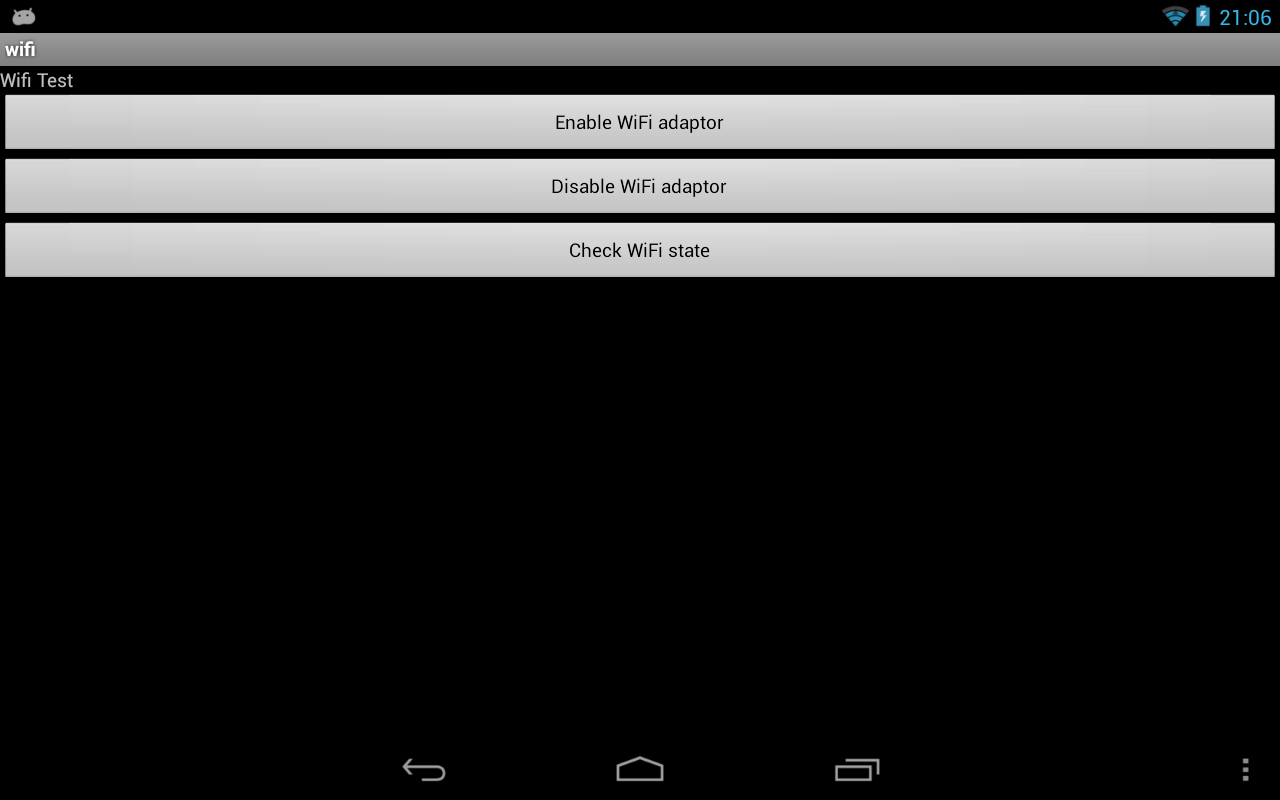
Testing in Nexus 7 and results in Log:
1. Initially enabled, click on 'Check...'
2. Click on 'Disable...', then 'Check...'
3. Click on 'Disable...', then 'Check...'
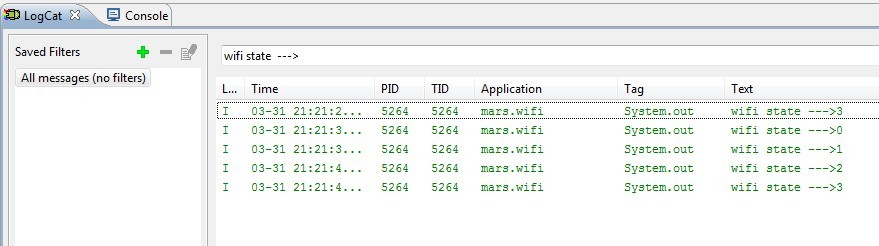
Wifi Test Android Program Interface
WEEK 11 SUMMARY
Accomplishments: For week 11, I was trying to test Wifi module on the Android table. Since there is no Wifi module supported for Android
virtual devices, I need to use a Android real device to test on the Wifi function. After reading the tutorial file on the Android developer website, I was still unable
to detect the device in my Eclipse window. I updated the Nexus 7 drive and turn the device to camera mode. Finally, I was able to find the device and run the
program on the device.
Weekly Work Total: 4 hours
Project Work Total: 71 hours
March 18, 2013 (2 hours):
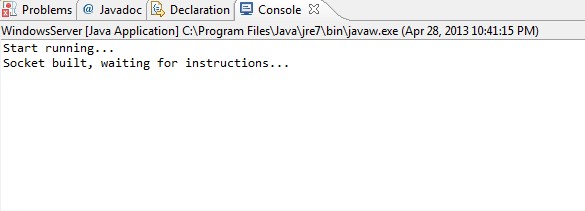
Windows Sever Built in Java
After doing some research on how to write sever code in Java, I wrote a simple program using Ecipse which will be used to test its functionality
later this week. Basically, I used a socket with a predetermined port number and implement a blocking function to wait for the data from the client, once the socked
sees the data, it will continue to run the code, otherwise, it will stop at the accept() method and keep waiting. The thread coding was used as well
Some code listed:
public void run(){
System.out.println("Start running...");
ServerSocket serverSocket = null;
try{
serverSocket = new ServerSocket(5665);
System.out.println("Socket built, waiting for instructions...");
Socket socket = serverSocket.accept();
System.out.println("Instruction accepted, start processing...");
InputStream inputStream = socket.getInputStream();
byte buffer[] = new byte[1024*4];
int temp = 0;
while((temp = inputStream.read(buffer)) != -1){
System.out.println(new String(buffer, 0, temp));
}
} catch (IOException e){
System.out.println("Error occurs...");
e.printStackTrace();
}
finally{
try{
System.out.println("Processing done, closing socket...");
serverSocket.close();
} catch(IOException e){
System.out.println("Error occurs...");
e.printStackTrace();
}
}
}
March 19, 2013 (2 hours):
Client Coding on Android
Since I wrote some sever code on Monday, I would like to write some code on client side that can be used to test if a connection can be built or not.
The sever code will actually be used for our project on the Android part. The sever code in Java will not be used in the future because the sever will be built
on Raspberry Pi which will be written in Python or C++.
Same as the sever code, the client also uses a TCP protocol and uses socket to build connections. Both two sides can send data and recevie data. The difference
is that the client side need to specify the IP address to connect while the sever does not need.
To check the IP address of the PC, if in Windows system, open Windows command prompt and type in ipconfig(In Linux system, use 'ipaddr show' as command)

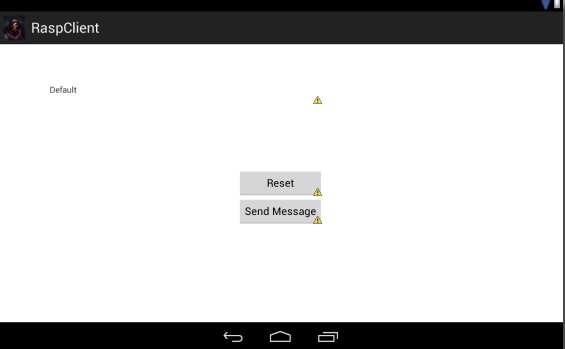
Since the client code was written for Android tablet, a simple GUI was also made for testing purpose.(see below)
March 22, 2013 (3 hours):
Connection Test Between Server and Client
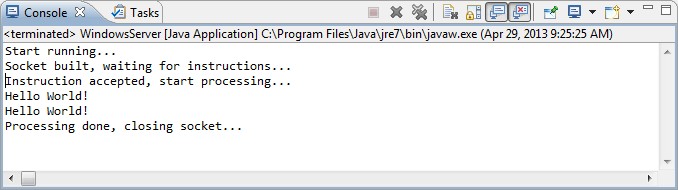
With the sever code and client code written on Monday and Tuesday, I am able to test and debug to see I can transfer data between my android device and my local PC
To make a simple test, I was trying to send a "Hello World!" message from Android tablet to my PC once I clicked the send button.
Initially the connection was not built. The client was blocked and kept waiting for the client.(See below)
I checked several things: 1) My android tablet and PC used the same network 2) The correct IP address and the same port number
were used. 3)Corrent stream was used. After checking all these stuff, I was able to build the connection between my tablet and PC. See below:
WEEK 12 SUMMARY
Accomplishments: This week is a huge step for the Android side of the project. Since it deals with the connection build between the sever
and client, it is the basic of the future research on how to send control signals and receive data of GPS, fuel gauge and ultra-sonic sensors
to and from the server built on Raspberry Pi and of course, the big part of our project: real time video streaming.
Weekly Work Total: 7 hours
Project Work Total: 78 hours
Mar 25, 2013 (4 hours):
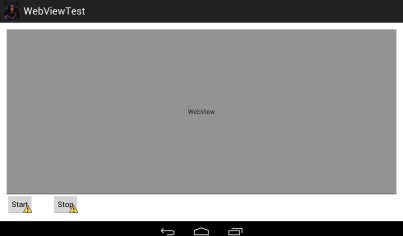
Android WebView
The initial method we thought of to do real video streaming is to build a video streaming sever on Raspberry Pi which we were able to find the video through
a http link. So to make it easy, I just need to use the WebView group on the android side so that I can open the use browser in the android application. For testing purpose,
I created a single interface with a WebView window and two buttons. One button was used to open the browser, another was used to close the browser.(see below)
After the video streaming sever was built, I could access the video through two URLs. One is http://172.16.17.1:8080/?action=stream, which is in Mjpeg format. Another is http://172.16.17.1:8080/?action=snapshot
which is a single jpeg format picture.
Using the first URL, I was not able to see the motion jpeg video on my Android device. However, when I tested using the web browser on my PC, I was able to see
the clear video. After doing some research on the website, I found that the Android does not support Mjpeg View right now in the WebView and we have to implement our
own MjpegView class.
The second method I found to do the video streaming is to use the snapshot URL which I could create a thread and reload the URL quickly so that it worked as a motion jpeg.
It worked after changing some code. However the frame per second was not acceptable and it required much bandwith which was very limited for Raspberry Pi.
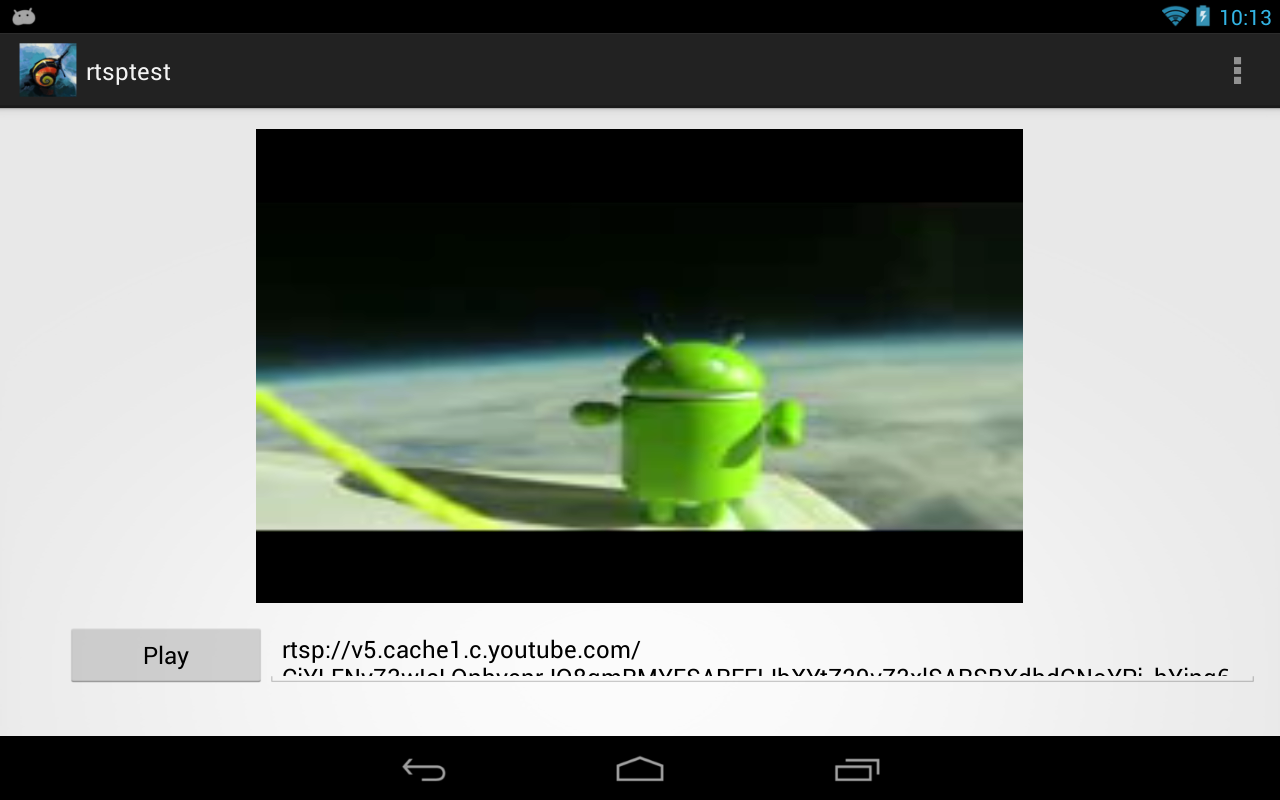
Mar 26, 2013 (3 hours):
Android RTSP Video Streaming Test
To test video streaming using rtsp protocol, I created another GUI window which used a VideoView, an EditText and a single button. The button was used to start playing the video
from the URL typed in the EditText box.
After searching an free rtsp sever URL, I was able to play the video.(see below)
While it was easy to use RTSP sever to do the video streaming, it turned out that this method was not suitable for our project. After the communication with Zongyang, we found that
building a sever with rtsp protocol was not as easy as I thought. Furthermore, we have to convert Mjpeg format to other format like MPEG or H.264. I finally gave up
the idea of using rtsp sever and plan to make our own MjpegView.
Mar 29 - Mar 30, 2013 (10 hours):
Implement Mjpeg View
It takes a bit long to write MjpegView class. But fortunately, the code works.
2 file listed:
MjpegView.java
MjpegInputStream.java
The Mjpeg View class can stream 320*240 Mjpeg video with unnoticeable delay and it can reach to 20 fps. However, the delay for a 640*480 Mjpeg video
is about 1 second.

WEEK 13 SUMMARY
Accomplishments: This week's effort was put mostly in the video streaming, which is the main pssc of our project. To get the final result we want,
I tried several different methods to implement video streaming although it was not really hard in the end. I tried to use embedded web browser in Android app, the rtsp video streaming and finally new MjpegView
class. Although these extra step might not need to be taken, the experience of trying something new really makes me satisfied.
Weekly Work Total: 17 hours
Project Work Total: 94 hours
April 1, 2013 (3 hours):
Control Panel Design
Besides the MjpegView window that will be used to do real time video streaming, we need a control panel that can be used to send commands to Raspberry Pi which
then tranfers the command to H-bridge to move the vehicle.
I designed a rocker control panel which looks like the following.
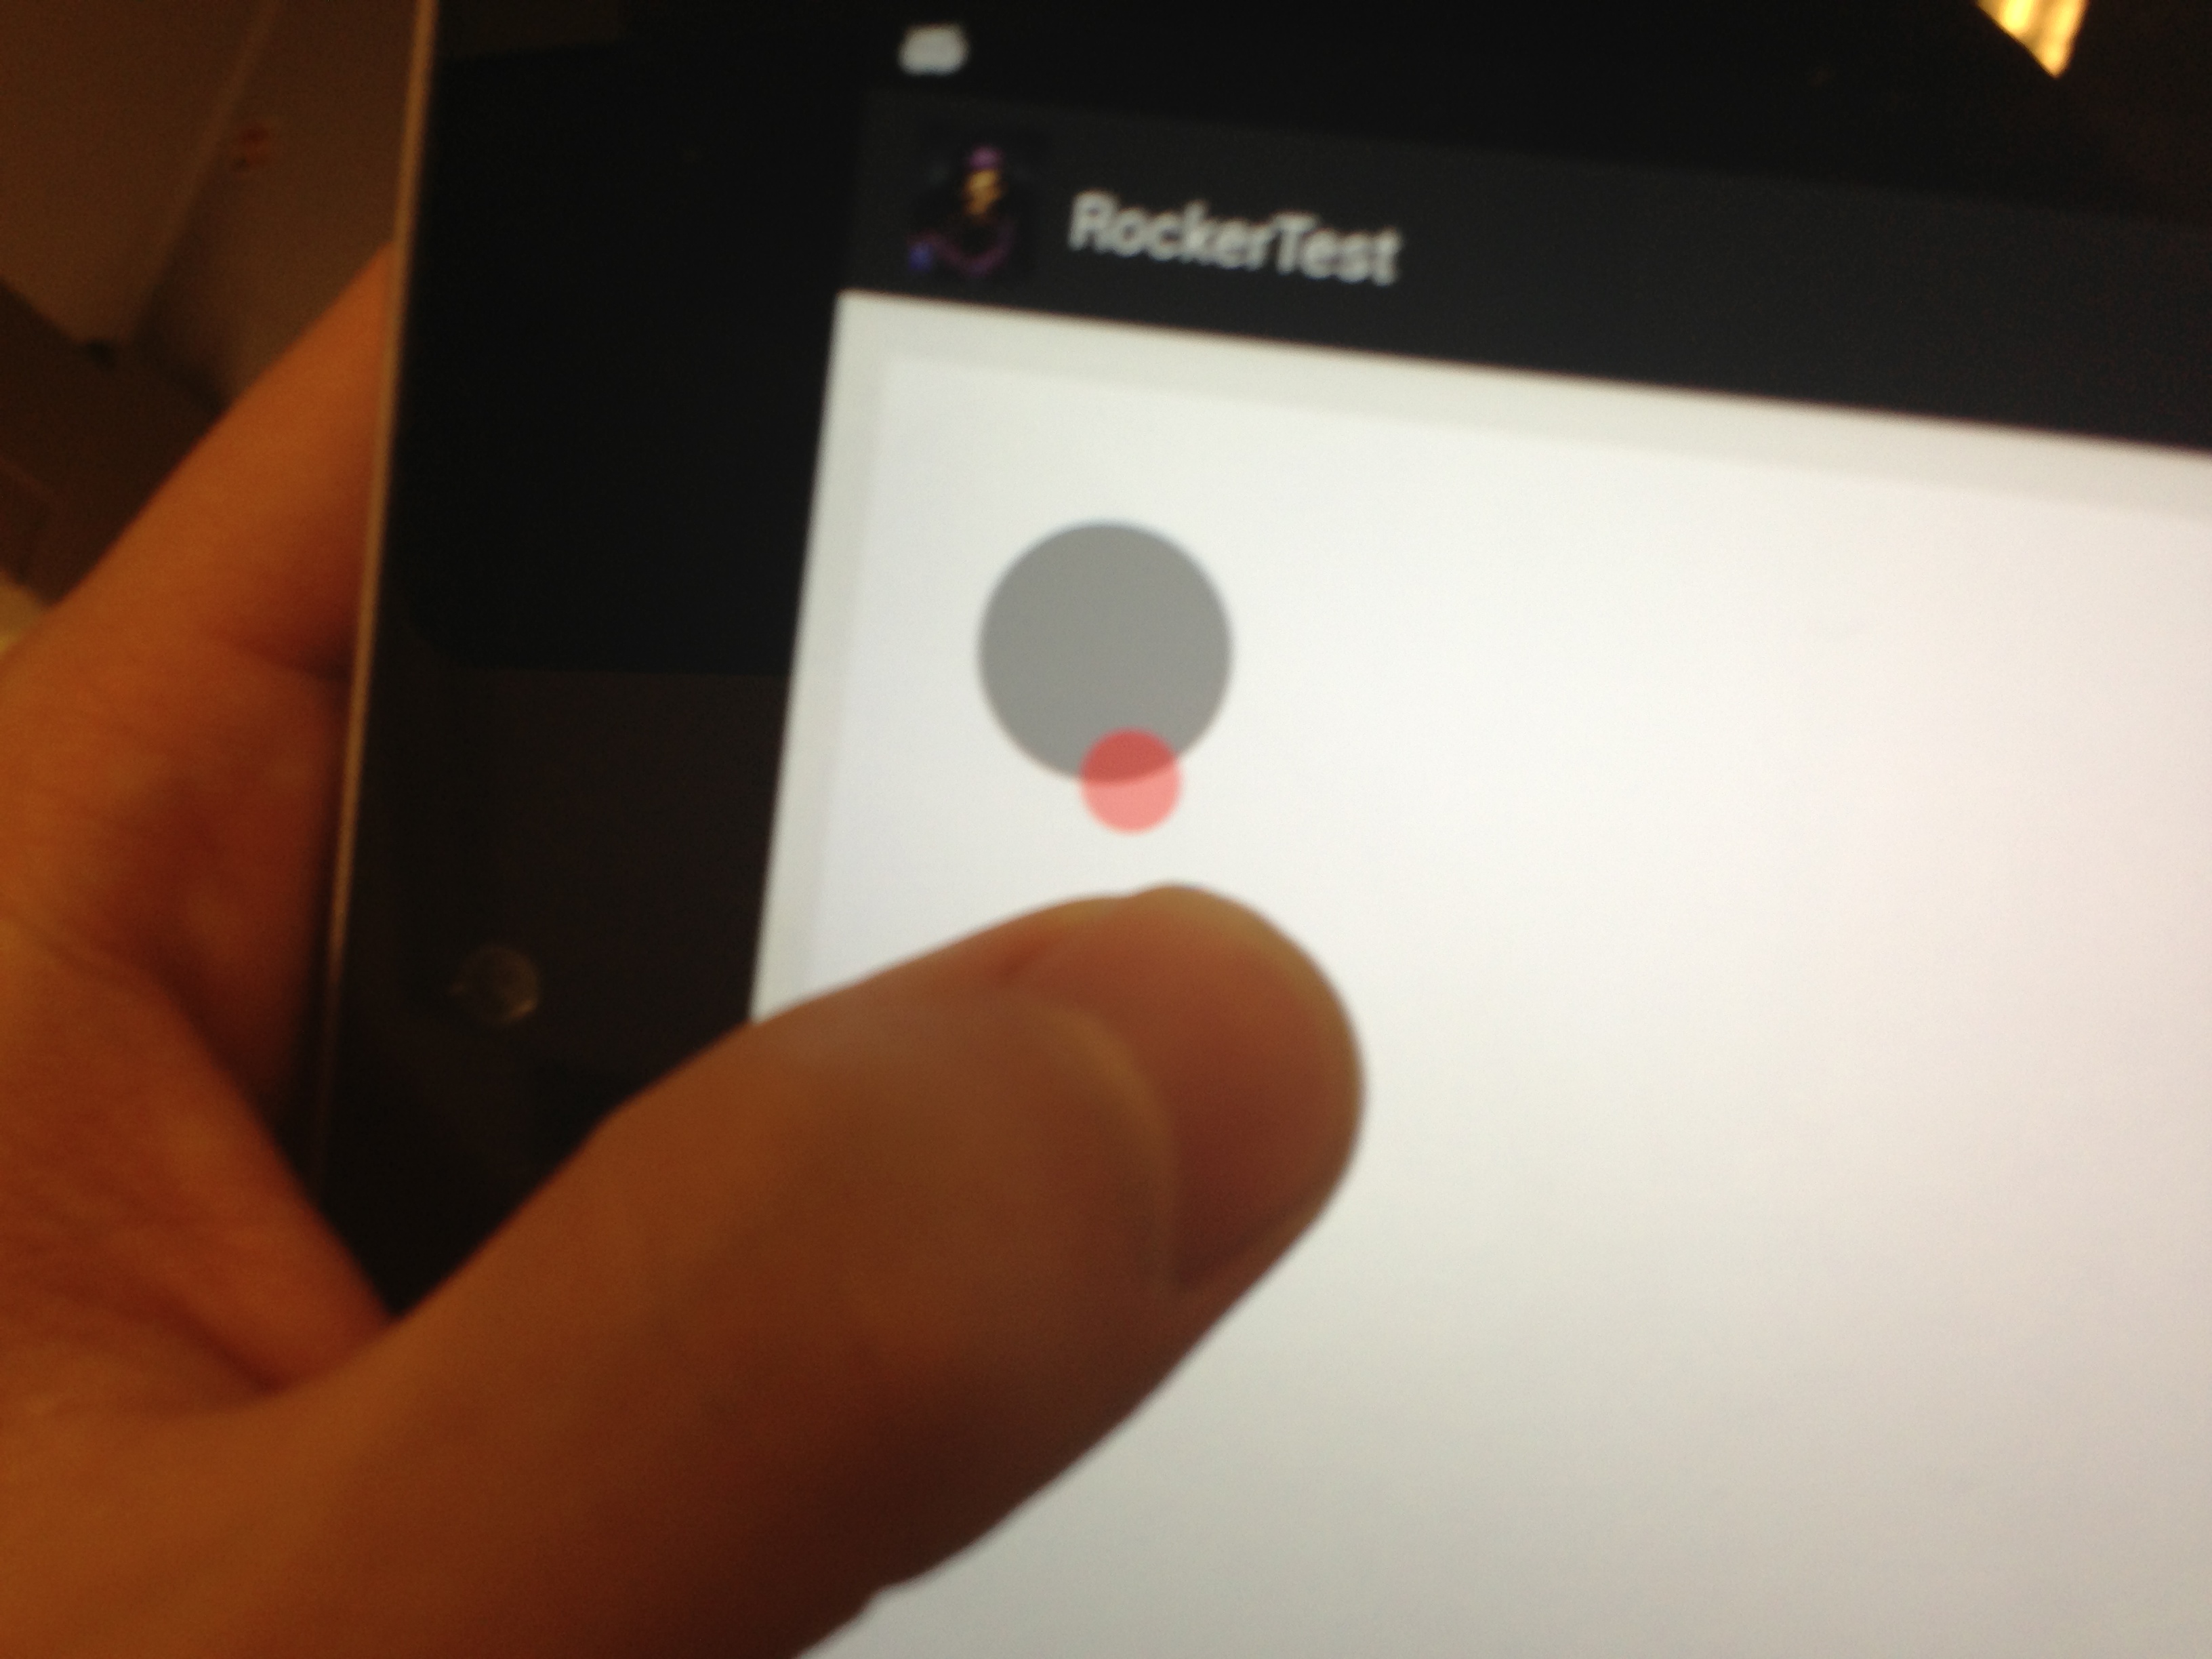
The source code can be found
here.
April 5, 2013 (2 hours):
Second Control Panel Design
We need another control panel which can control the angle of our 360 degree camera. Similar to the Rocker control panel, I created a Slider control panel.
The MySlider Class' code is listed here.
The preliminary interface design looks as following:
WEEK 14 SUMMARY
Accomplishments: This week's job was mostly put in the design and testing of the control panel. To make our control panel fancier
, instead of using 4 bottons to control the direction of vehicle and 2 buttons to rotate the camera, I wrote a MyRocker class and a MySlider class
to implement the control panel.
Weekly Work Total: 5 hours
Project Work Total: 99 hours
April 8, 2013 (3 hours):
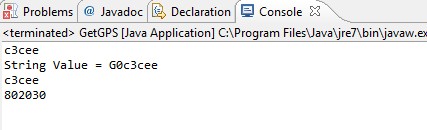
GPS Decoding Test
After communication with Zongyang, we decided to receive GPS data with the following format:
A singal character 'G' following with 8 characters indicating the GPS location data.
To test if the GPS data was decoded correctly or not, I wrote a testing code as following:
public class GetGPS {
public static void main(String[] args) {
int a = 802030;
char c[] = new char[4];
System.out.printf("%x \n", a);
for(int i = 3; i >= 0; i--){
c[i] = (char) (0xFF & a);
a >>= 8;
}
System.out.print("String Value = "+"G");
for(int i = 0; i <4; i++){
System.out.printf("%x", (int)c[i]);
}
System.out.println();
int b=0;
for(int i=0; i<3; i++){
b |= c[i];
b <<=8;
}
b |= c[3];
System.out.printf("%x \n", b);
System.out.println(""+b);
}
}
April 9, 2013 (3 hours):
All data decoding method and set Text box value.
Code for other data decoding methods and TextView box update method are listed
here.
WEEK 15 SUMMARY
Accomplishments: This week's major work focuses on the processing of the received data, including GPS location, battery remained
and ultra-sonic sensor data.
Weekly Work Total: 6 hours
Project Work Total: 105 hours
April 25-27, 2013 (22 hours):
Final Debugging and putting everything together
I have to admitted that putting everything together and make it compile and work is a long long process...
A lot of bugs occurred that I may even not notice when I implemented them separately. One major problem is about event loop and multi-threading. For a long
time I could not set the text message box and let it display the message I need for the application. Even when I called the setText method explicitly, the
message of the text box does not change at all. Finally, I figured out that this problem was due to the conflict between the event loop and the setText method.
The Android activity class itself is an event loop, when I was trying to write my own event loop and call the setText() method inside my loop, it would mostly not work at all
I have to creat a new thread to do the setText() separately.
Another main issue I have encountered is that sometimes I changed the layout of the application, I would not be able to run the program. The way to fix this problem
is to clean the project and recompile it again. (Really awful design for Eclipse...)
Anyway, after two whole nights, I finally made it work and I was happy with the interface design.
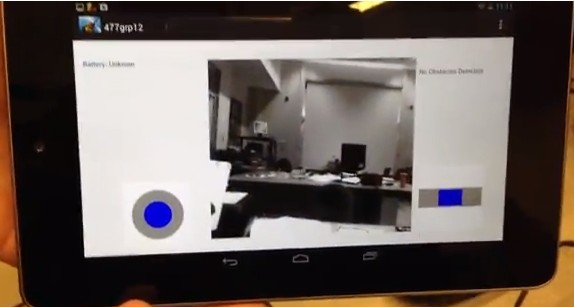
These are several screenshots of our final interface:
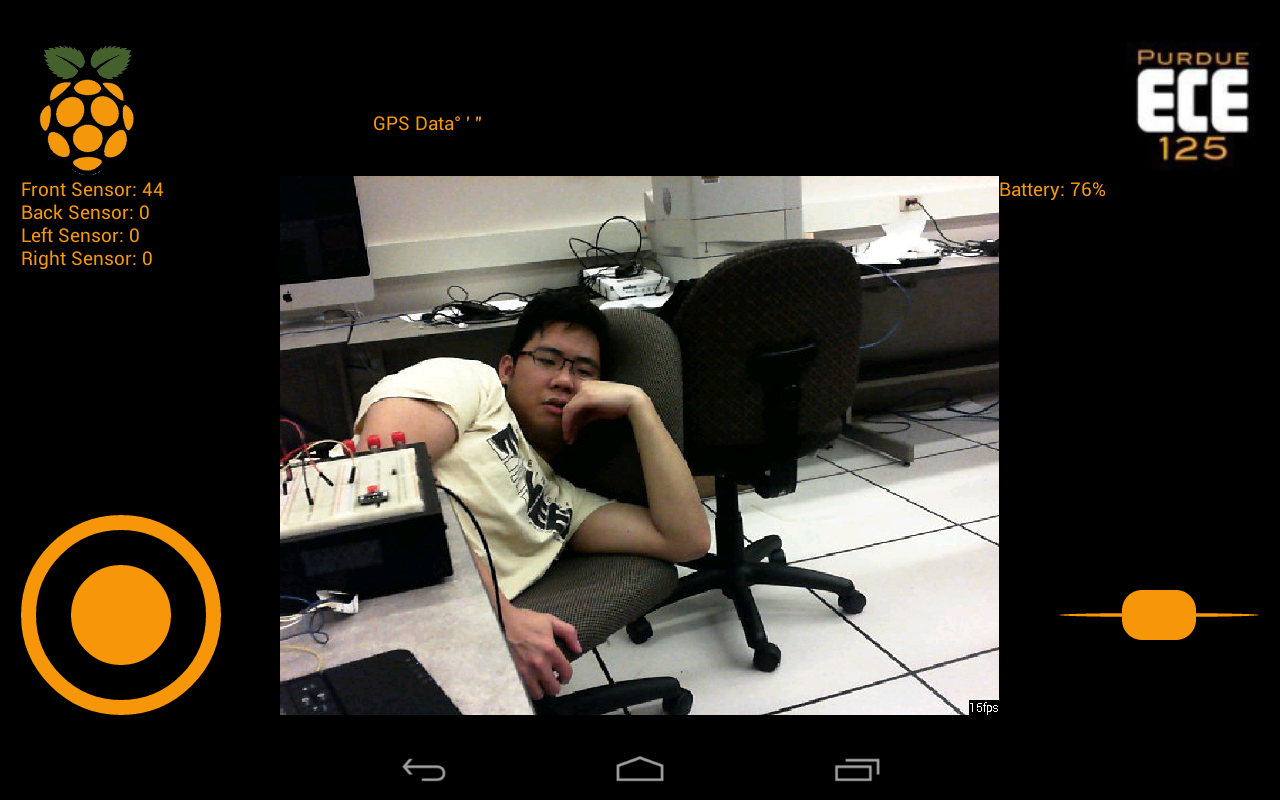
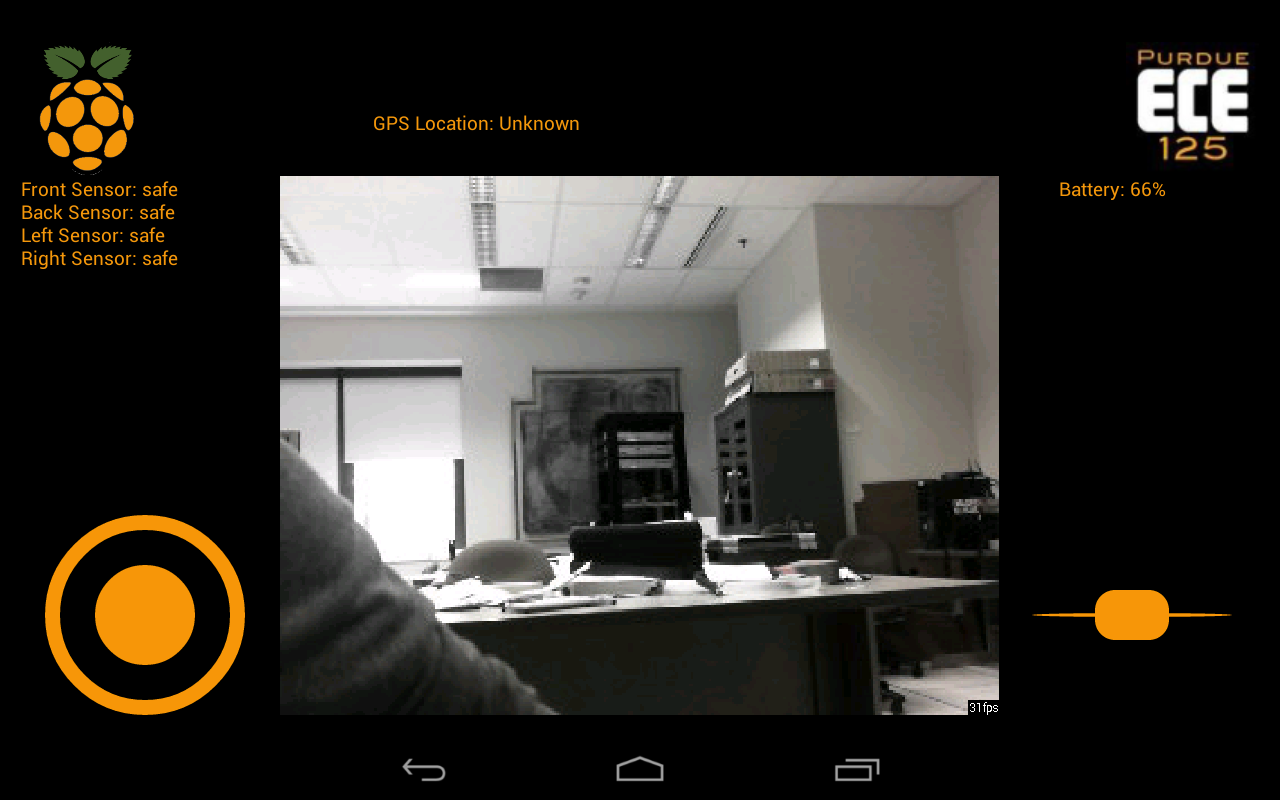
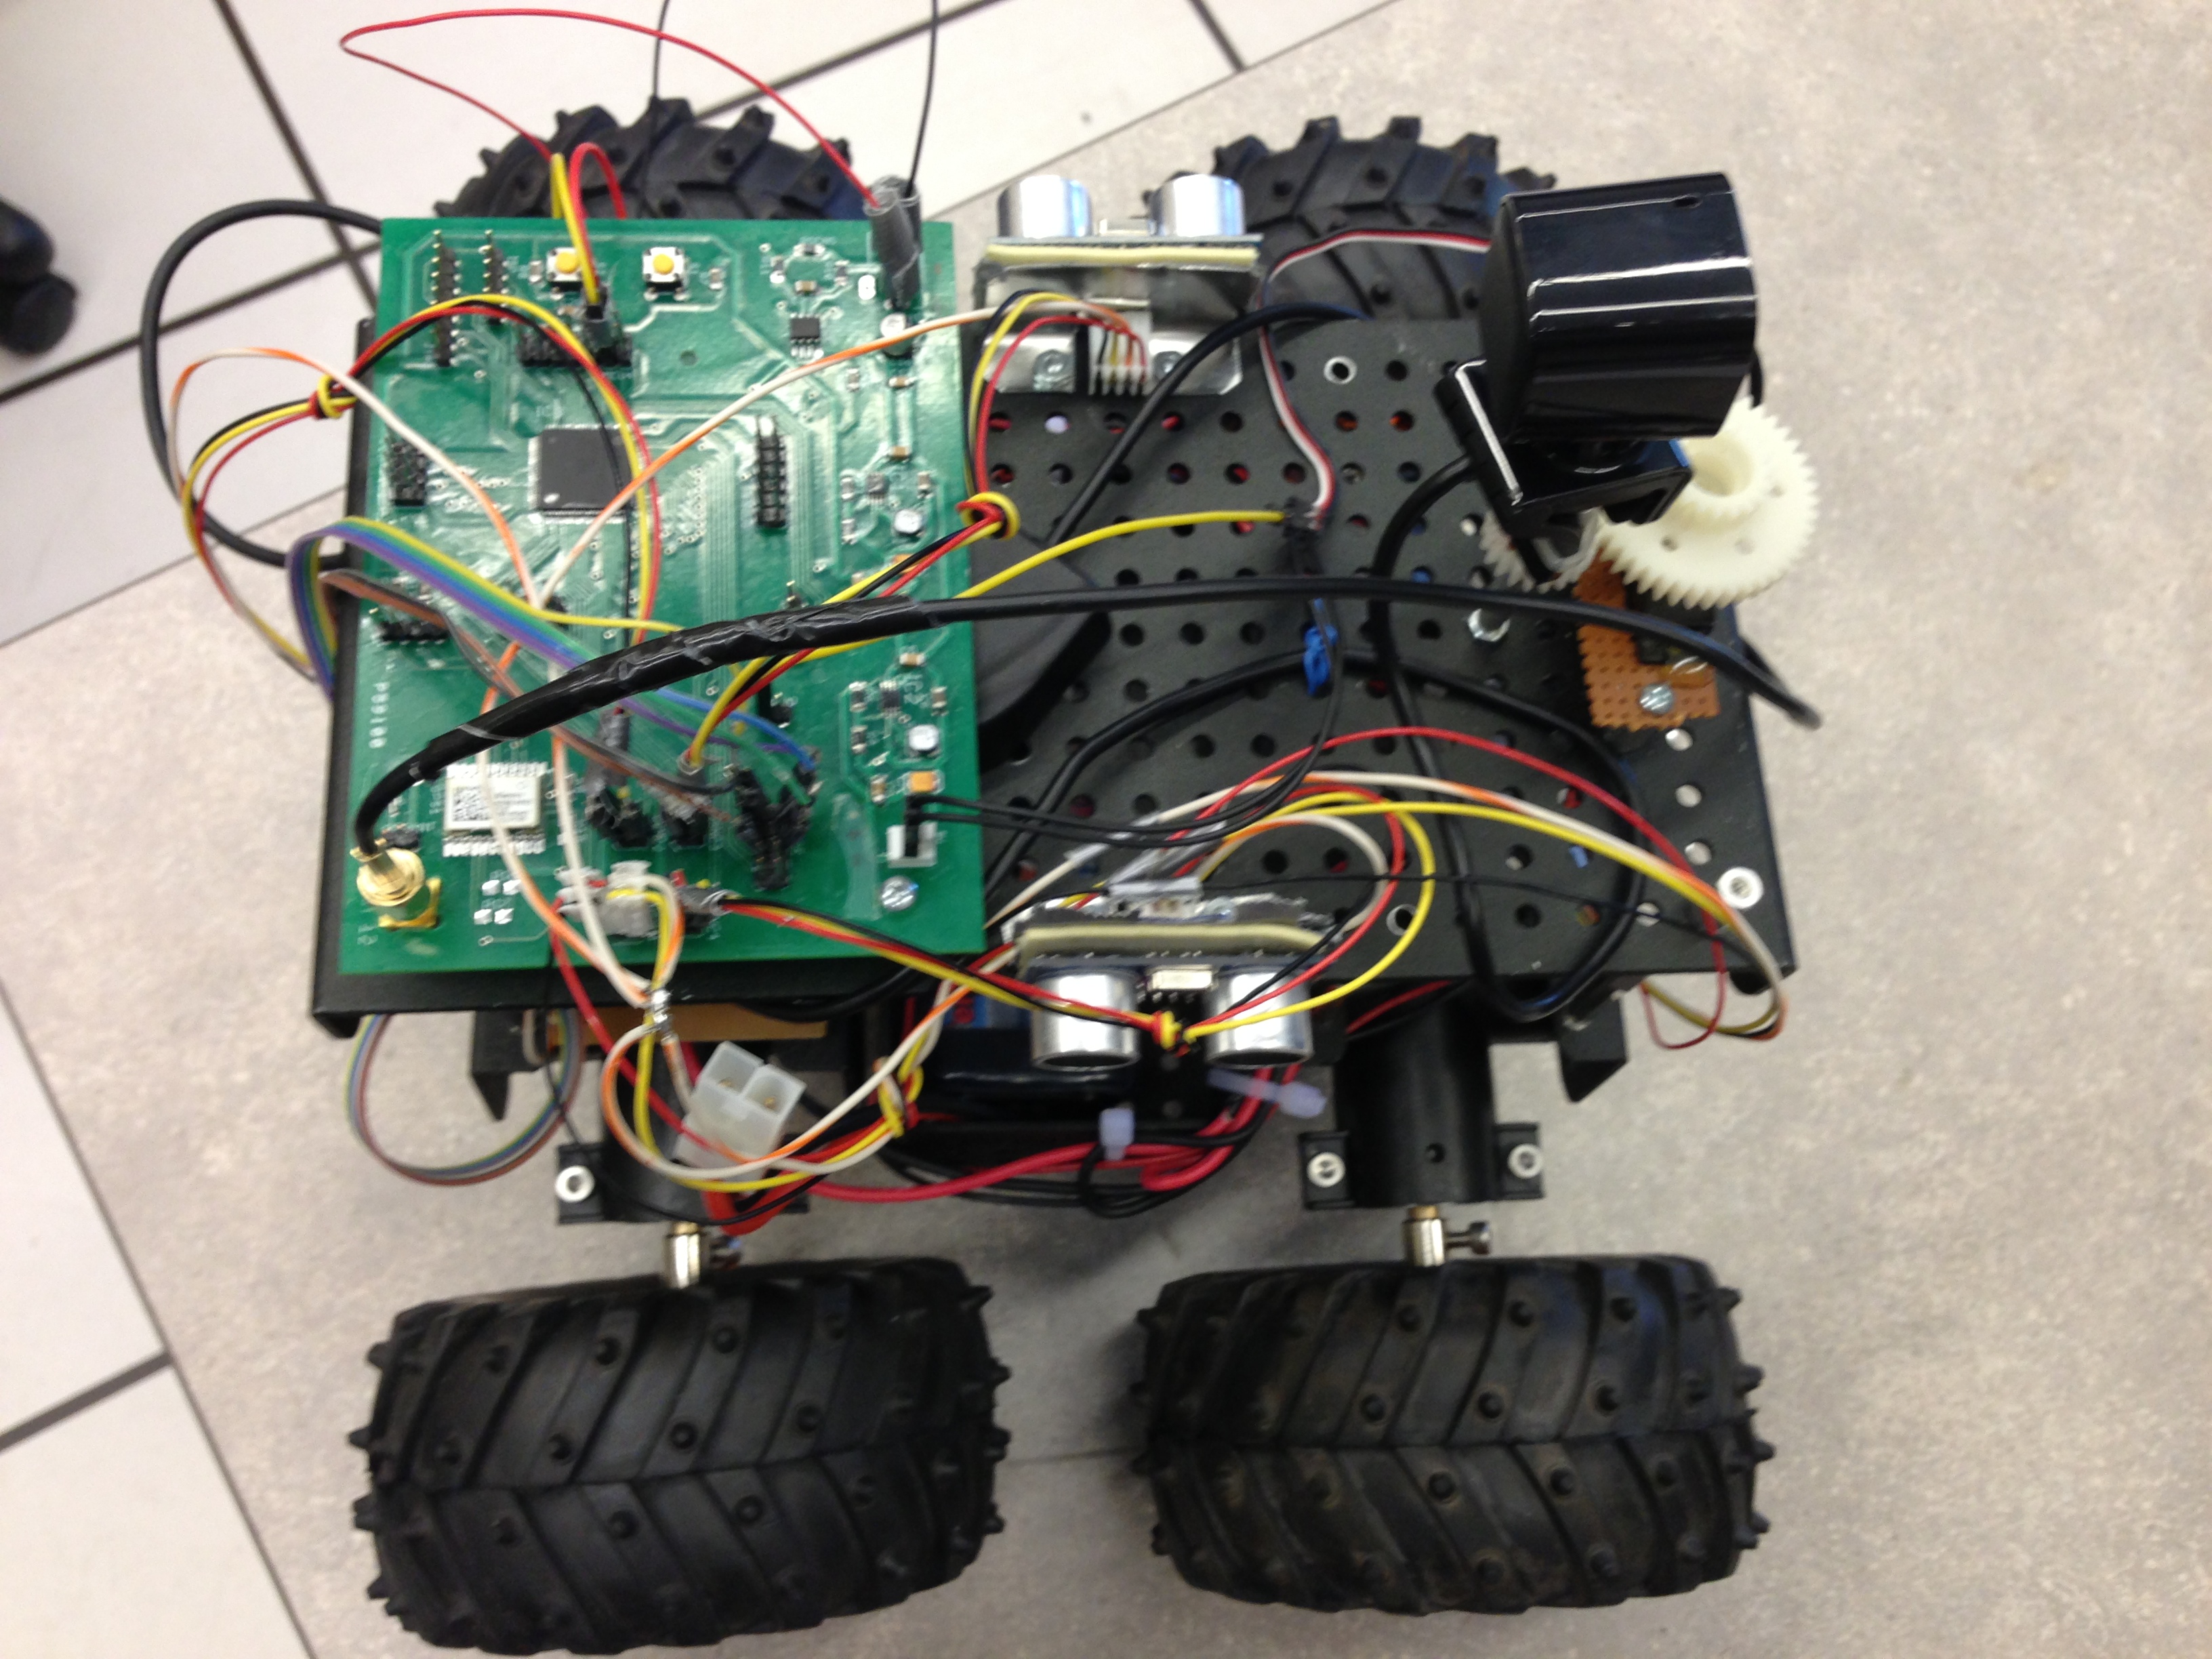
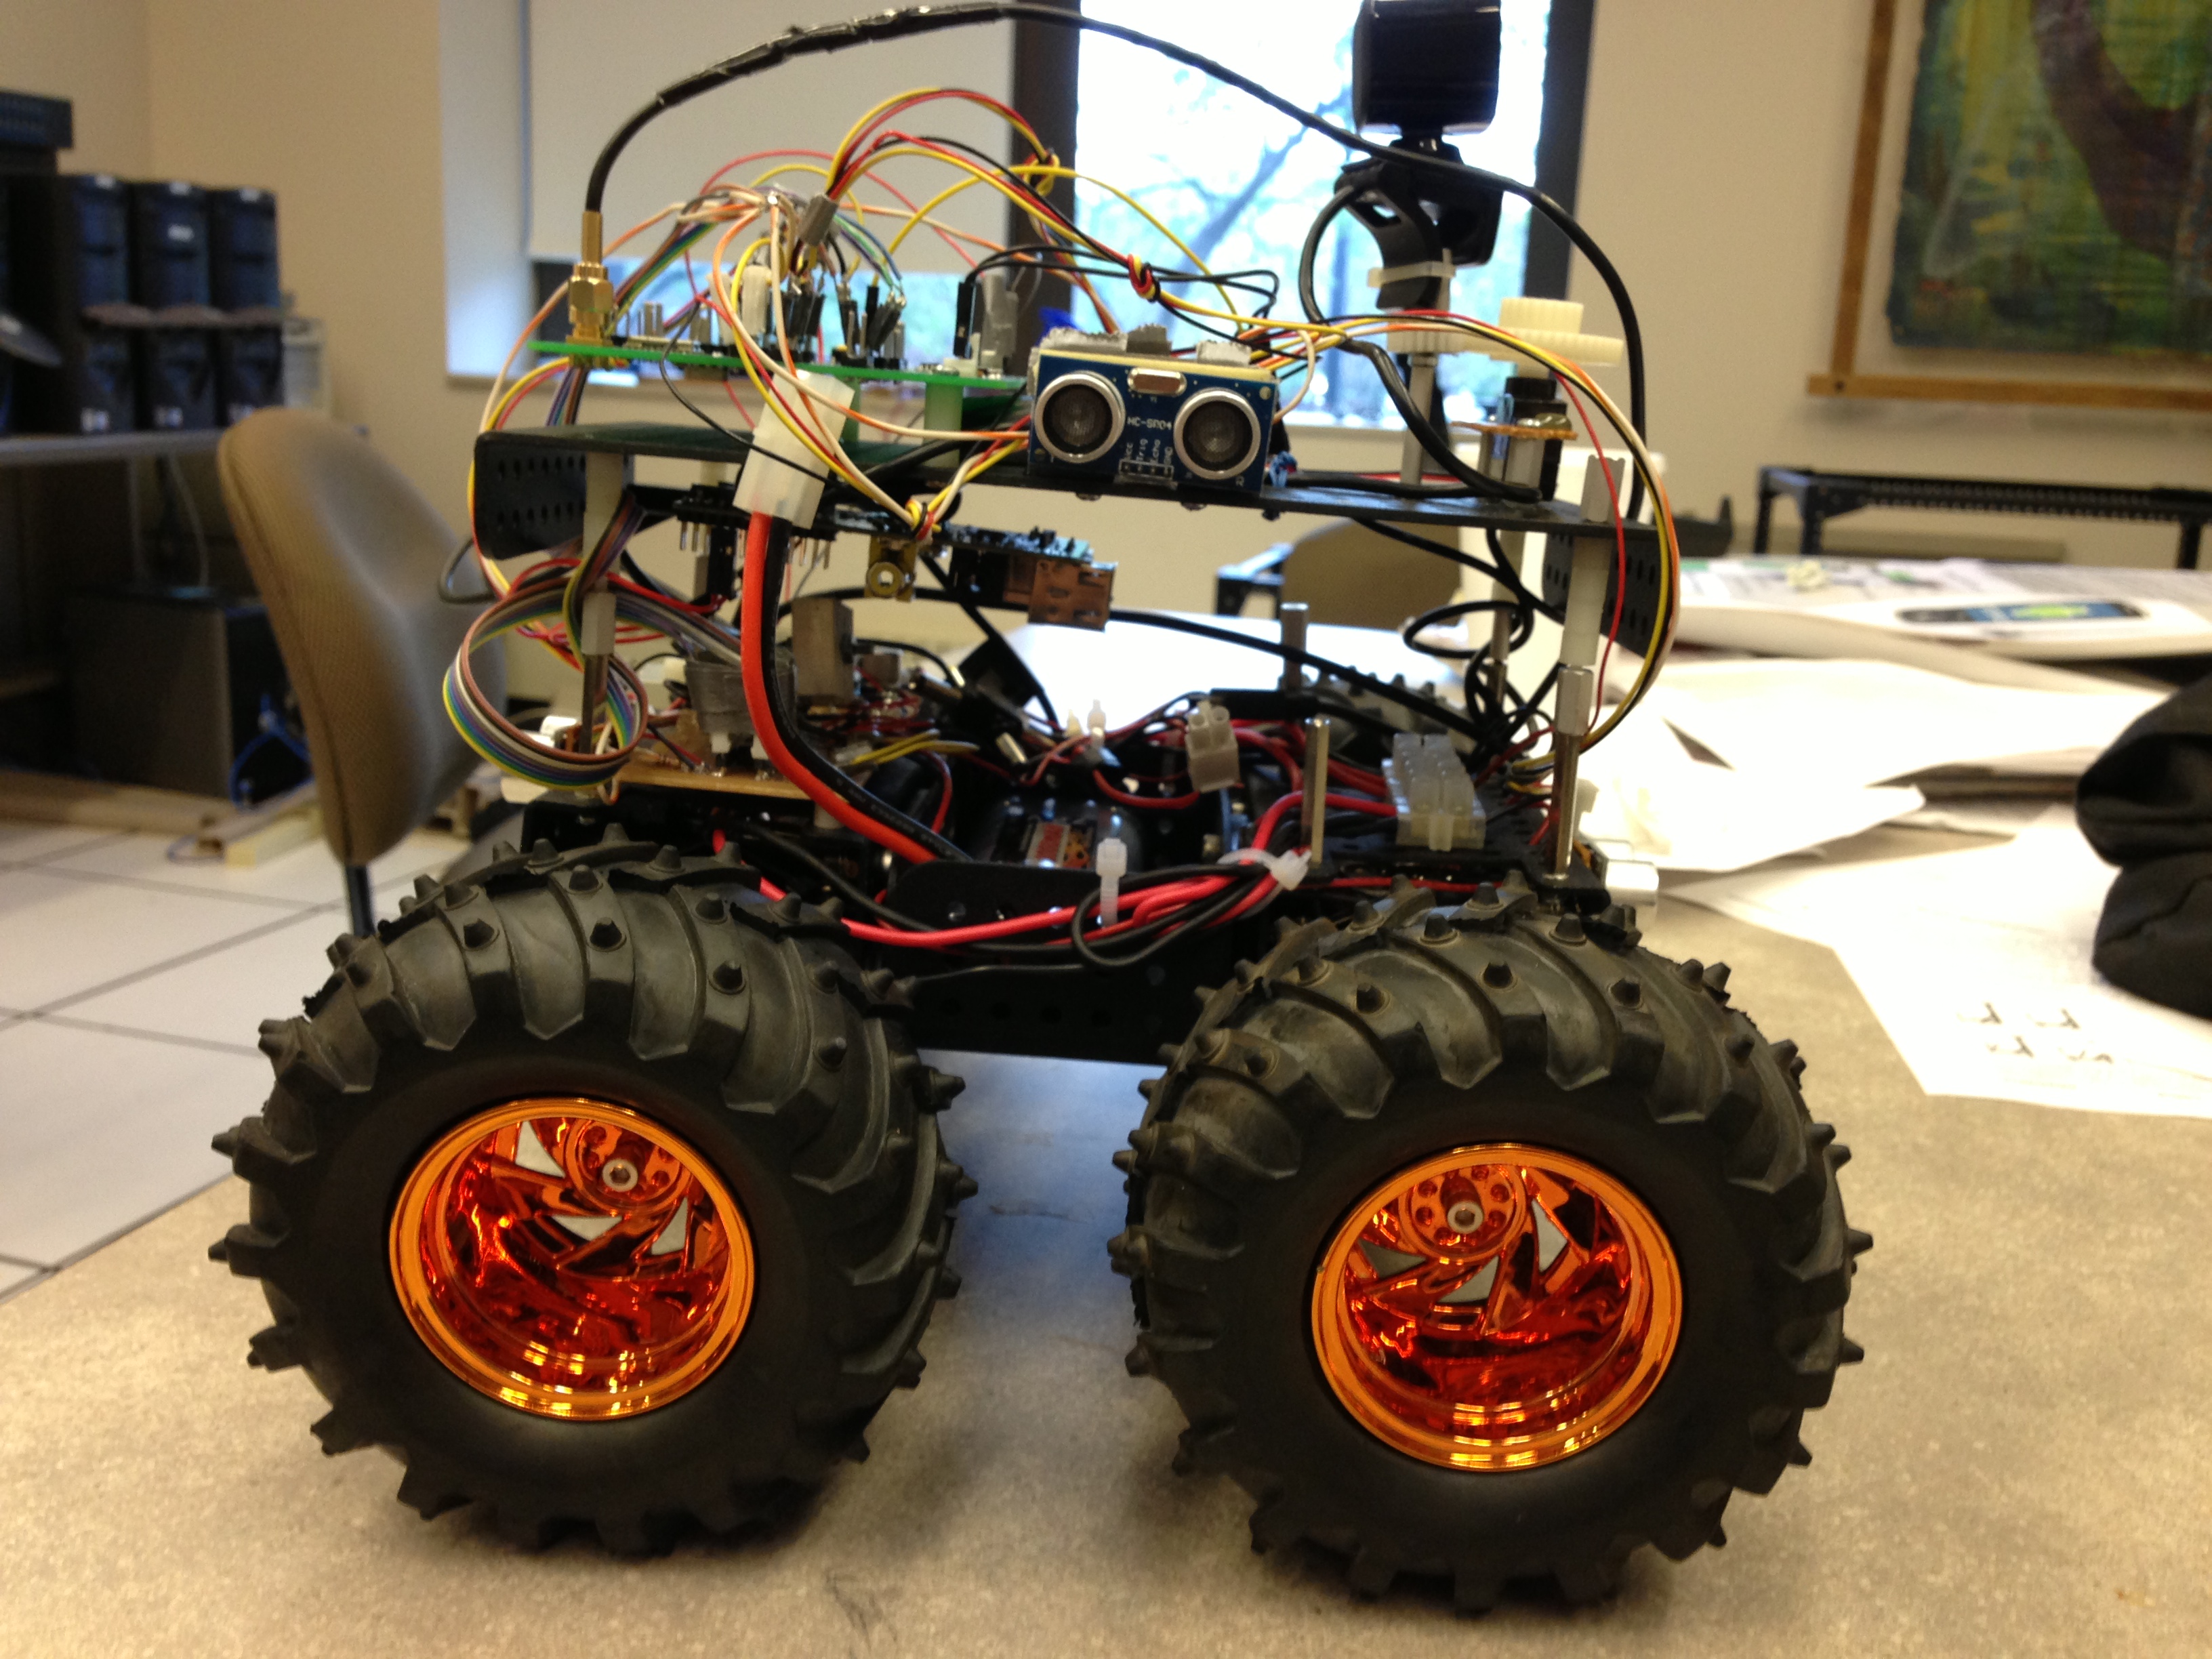
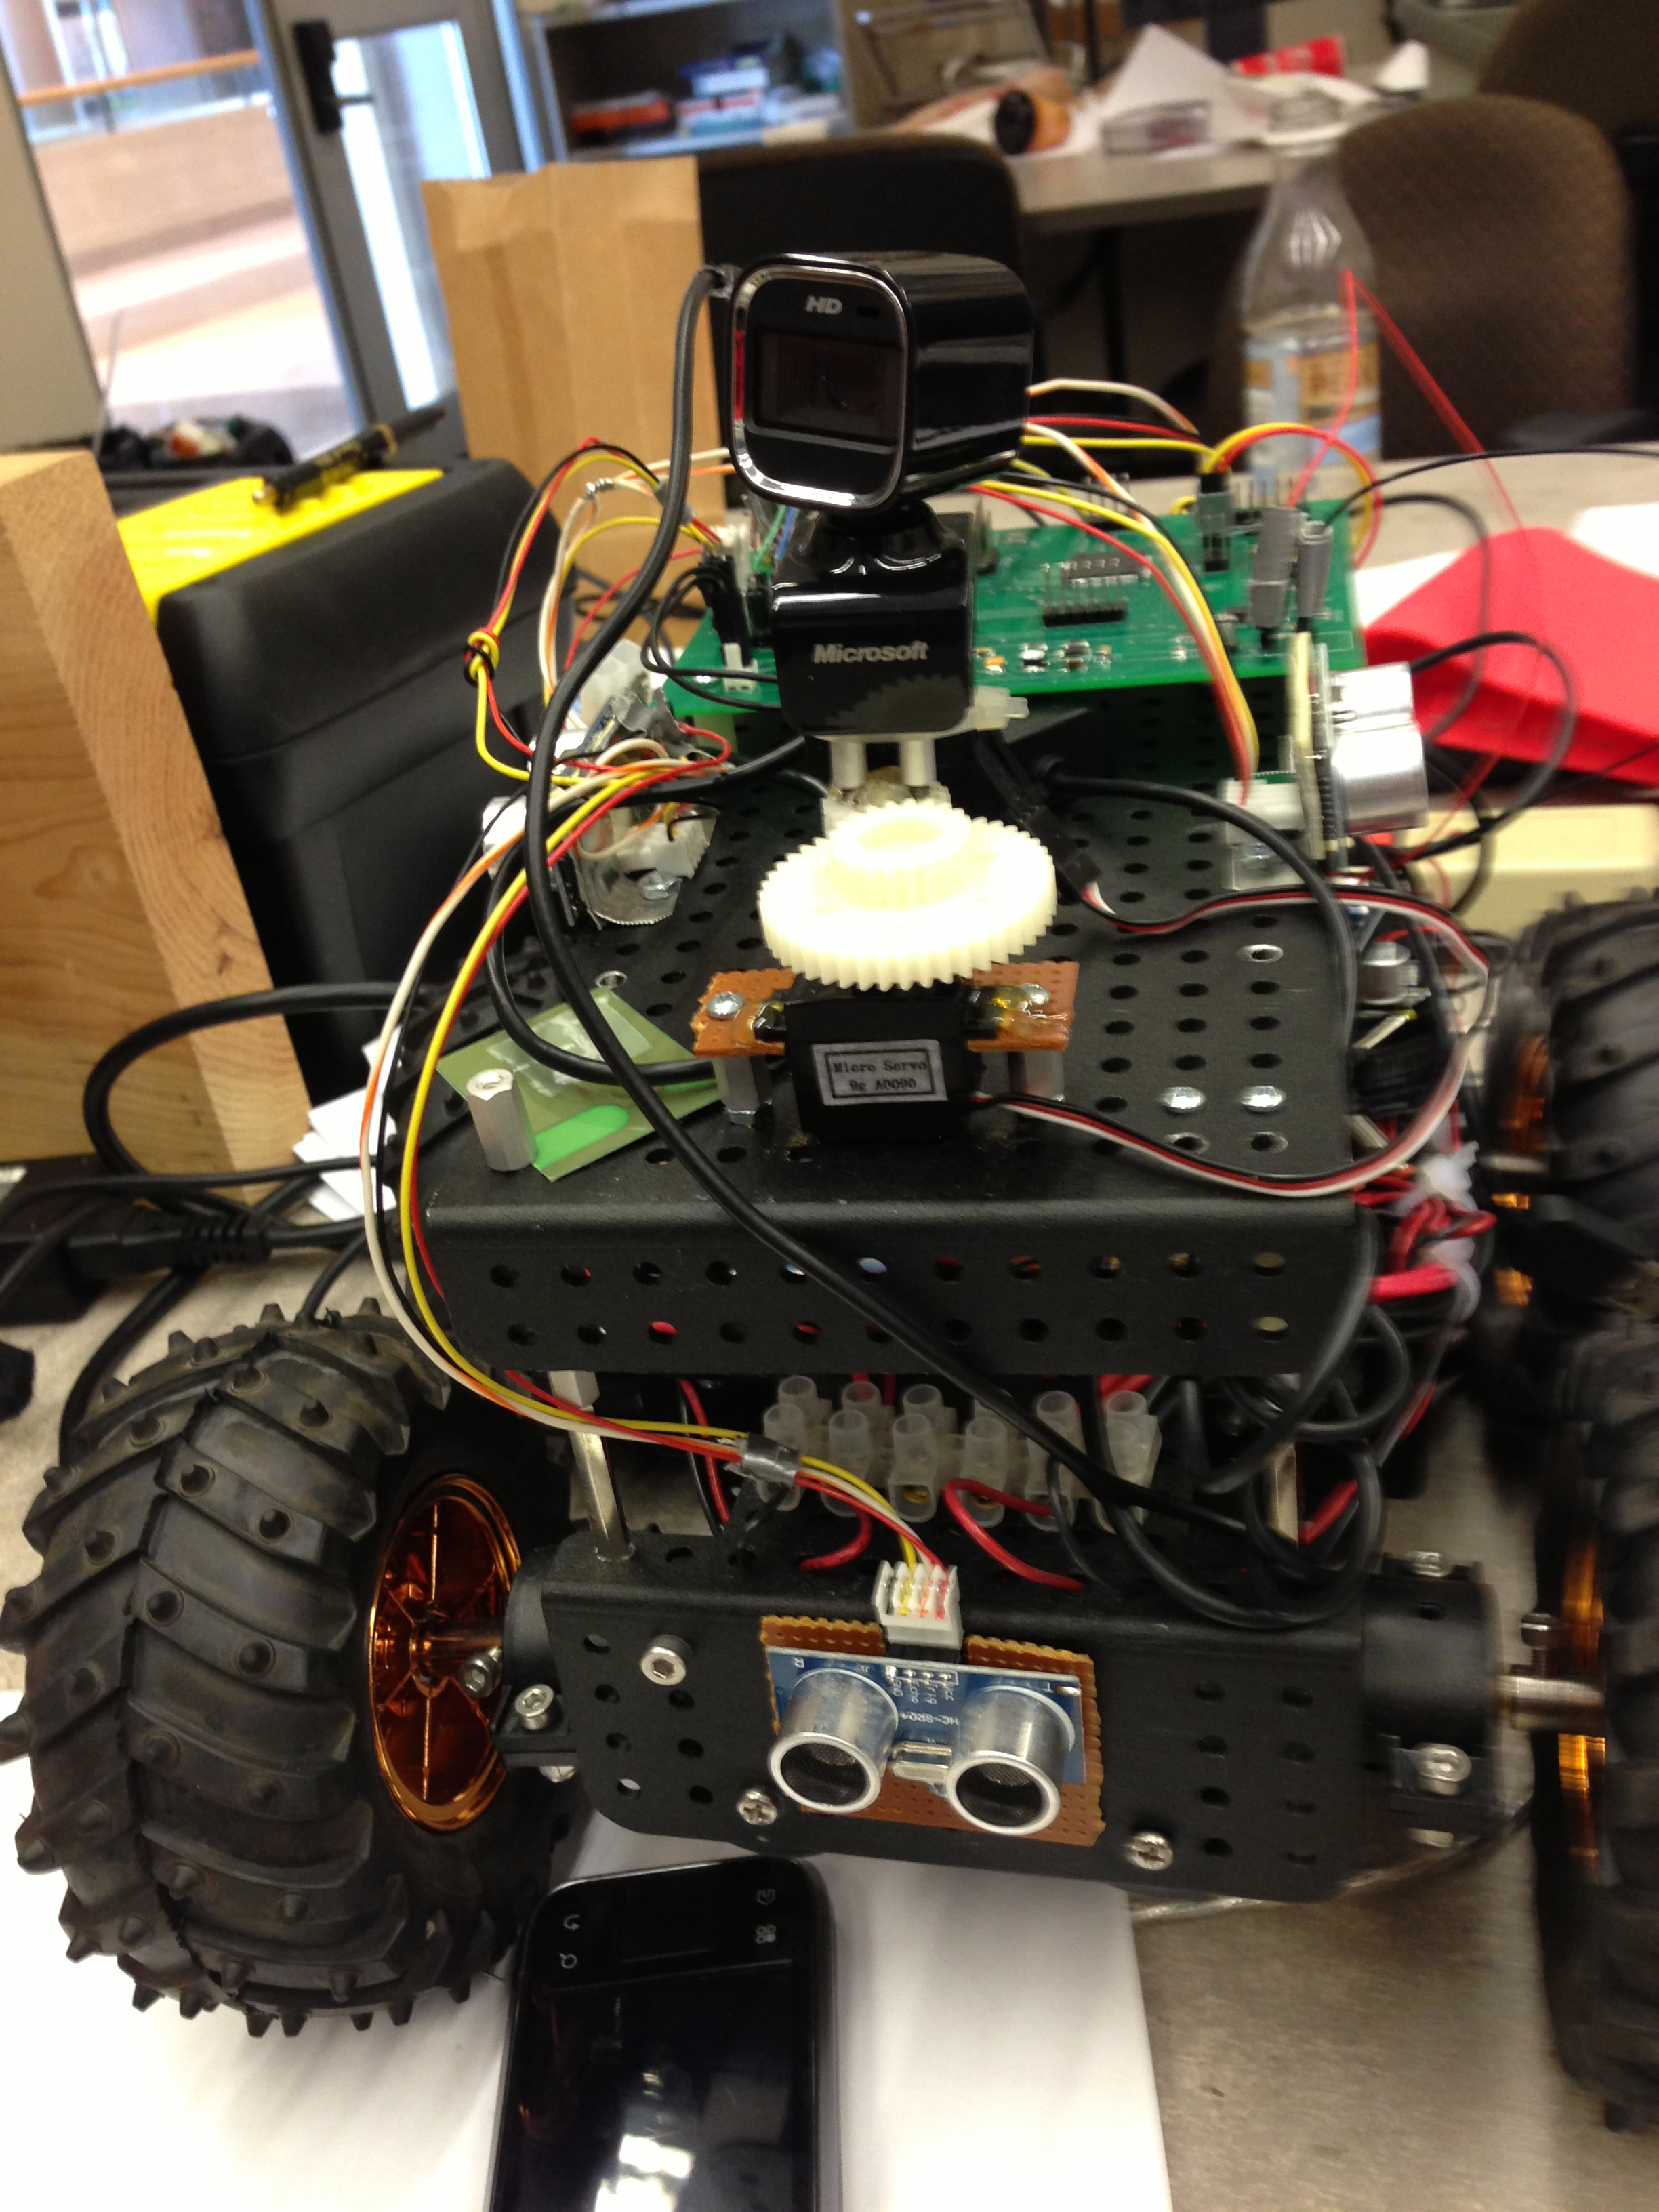
Several captures for our street car(without packaging):
WEEK 16 SUMMARY
Accomplishments: Putting everything together and debug for the android program. Finalization with other teammates.
Weekly Work Total: 22 hours
Project Work Total: 127 hours